
Supported SSH channel types
The available SSH channel types and their functionalities are described below. For details on configuring Channel Policies, see Creating and editing channel policies. For a list of supported client applications, see Supported protocols and client applications.
-
Agent: Forwards the SSH authentication agent from the client to the server.
-
X11 Forward: Forwards the graphical X-server session from the server to the client. Enter the address of the client into the Details > Target address field to permit X11-forwarding only to the specified clients. Specify IP addresses or networks (in IP address/Prefix format).
NOTE: Certain client applications send the Target address as a hostname, while others as an IP address. If you are using a mix of different client applications, you might have to duplicate the channel rules and create IP-address and hostname versions of the same rule.
-
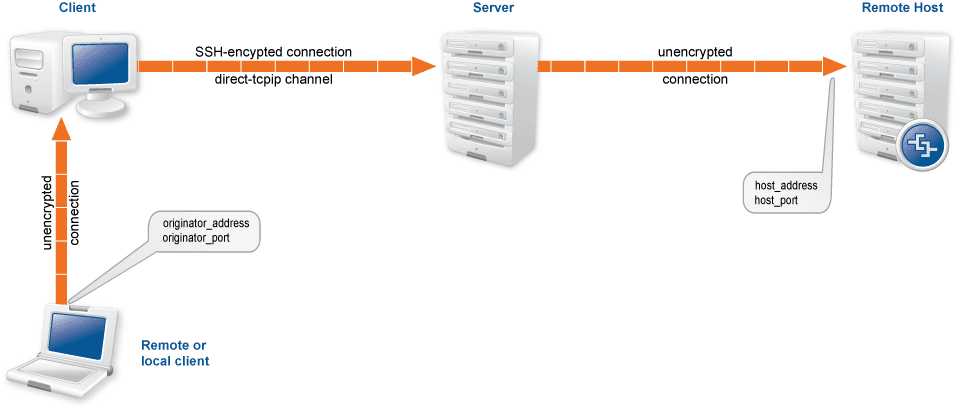
Local Forward: Forwards traffic arriving to a local port of the client to a remote host. To enable forwarding only between selected hosts, enter their IP addresses into the Details field. If the Details field is empty, local forwarding is enabled without restriction, the client may forward any traffic to the remote host. Enter the source of the forwarded traffic into the Originator, the target of the traffic into the Target field. Specify IP addresses or networks (in IP address/Prefix format). These parameters are the end-points of the forwarded traffic (that is, the local host that sends data to the remote host), and not the SSH server or the client.
For example, to enable forwarding from the 192.168.20.20 host to the remote host 192.168.50.50, enter 192.168.20.20 into the Originator, and 192.168.50.50 into the Target field.
Figure 185: Local TCP forwarding
NOTE: Certain client applications send the Originator and Target addresses as hostnames, while others as IP addresses. If you are using a mix of different client applications, you might have to duplicate the channel rules and create IP-address and hostname versions of the same rule.
-
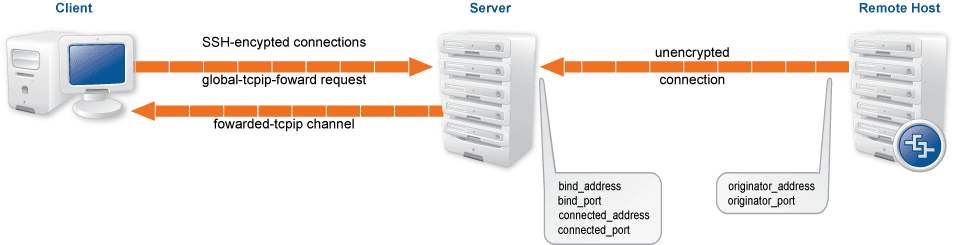
Remote Forward: Forwards traffic arriving a remote port of the server to the client. To enable forwarding only between selected hosts, enter their IP addresses into the Details field. If the Details field is empty, remote forwarding is enabled without restriction, the SSH server may forward any traffic to the client. Enter the source of the forwarded traffic into the Originator, the target of the traffic into the Target field. Specify IP addresses or networks (in IP address/Prefix format). These parameters are the end-points of the forwarded traffic (that is, the remote host that sends data to the client), and not the SSH server.
For example, to enable forwarding from the 192.168.20.20 remote host to the client 192.168.50.50, enter 192.168.20.20 into the Originator, and 192.168.50.50 into the Target field.
Figure 186: Remote TCP forwarding
NOTE: Certain client applications send the Originator and Target addresses as hostnames, while others as IP addresses. If you are using a mix of different client applications, you might have to duplicate the channel rules and create IP-address and hostname versions of the same rule.
-
Session Exec: Execute a remote command (for example rsync) without opening a session shell. Enter the permitted command into the Permitted commands field. You can use regular expressions to specify the commands. This field can contain only letters (a-z, A-Z), numbers (0-9), and the following special characters ({}()*?\\|[]).
Caution: Restricting the commands available in Session Exec channels does not guarantee that no other commands can be executed. Commands can be renamed, or executed from shell scripts to circumvent such restrictions.
-
Session Exec SCP: Transfers files using the Secure Copy (SCP) protocol.
-
To make the list of file operations available in the File operations column of the Search page, navigate to the Channel Policies page of the protocol, and enable the Log file transfers to database option. This option is disabled by default.
-
To send the file operations into the system log, enable the Log file transfers to syslog option. This option is disabled by default.
NOTE: Turning logging on might result in a slight performance penalty. If traffic load slows processes down, disable the option.
-
-
Session Subsystem: Use a subsystem. Enter the name of the permitted subsystem into the Details field.
-
Session SFTP: Transfers files using the Secure File Transfer Protocol (SFTP).
-
To make the list of file operations available in the File operations column of the Search page, navigate to the Channel Policies page of the protocol, and enable the Log file transfers to database option. This option is disabled by default.
-
To send the file operations into the system log, enable the Log file transfers to syslog option. This option is disabled by default.
NOTE: Turning logging on might result in a slight performance penalty. If traffic load slows processes down, disable the option.
-
-
Session Shell: The traditional remote terminal session.


Authentication Policies
An authentication policy is a list of authentication methods that can be used in a connection. Connection definitions refer to an authentication policy to determine how the client can authenticate to the target server. Separate authentication methods can be used on the client and the server-side of the connection.
Figure 187: Authentication policies

Creating a new authentication policy
Client-side authentication settings
Local client-side authentication
Relayed authentication methods
Creating a new authentication policy
The following describes how to create a new authentication policy.
To create a new authentication policy
-
Navigate to SSH Control > Authentication Policies, and click
.
Figure 188: SSH Control > Authentication Policies — Configuring authentication policies
-
Enter a name for the policy into the Name field.
-
Select the authentication method used on the client-side in the Authenticate the client to SPS using field. For details on the client-side authentication settings, see Client-side authentication settings.
-
Select the authentication method used on the server-side in the Relayed authentication methods field. For details on the relayed authentication settings, see Relayed authentication methods.
If you selected Public key > Agent as the relayed authentication method:
If this option is used, SPS requests the client to use its SSH agent to authenticate on the target server. Therefore, you must configure your clients to enable agent forwarding, otherwise authentication will fail. For details on enabling agent forwarding in your SSH application, see the documentation of the application.
-
Click
.
NOTE: -
The client-side authentication settings apply for authenticating the user inband (that is, within the SSH protocol) to the One Identity Safeguard for Privileged Sessions (SPS) gateway, and is independent from the gateway authentication performed on the SPS web interface. The web-based gateway authentication is an out-of-band gateway authentication method that can be required by the connection policy. For details on out-of-band gateway authentication, see Configuring out-of-band gateway authentication.
Gateway authentication on the SPS web interface can be used together with authentication policies. In an extreme setting, this would mean that the user has to perform three authentications: a client-side gateway authentication within the SSH protocol to SPS, an out-of-band gateway authentication on the SPS web interface, and a final authentication on the target server.
-
The Connection Policy will ignore the settings for server-side authentication (set under Relayed authentication methods) if a Credential Store is used in the Connection Policy.
-

Client-side authentication settings
For the client-side connection, One Identity Safeguard for Privileged Sessions (SPS) can authenticate the client inband (within the SSH protocol) using the following authentication methods:
Figure 189: SSH Control > Authentication Policies — Configuring client-side authentication methods
-
LDAP: SPS will authenticate the client to the LDAP database set in the LDAP Server of the connection policy. To use LDAP authentication on the client side, select Authenticate the client to SPS using > LDAP, and select the permitted authentication methods (Password, Public key). More than one method can be permitted.
NOTE: -
SPS will authenticate the client-side connection to the LDAP server configured in the connection policy. This is not necessarily the same as the LDAP server used to authenticate the users accessing the SPS web interface.
-
The public keys of the users stored in the LDAP database must be in OpenSSH format.
-
-
Local user database: Authenticate the client locally on the SPS gateway. For details, see Local client-side authentication.
-
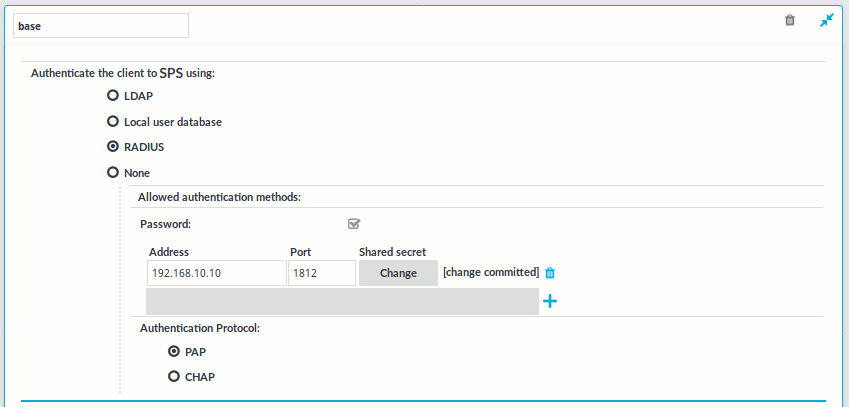
RADIUS: SPS will authenticate the client to the specified RADIUS server. Select Authenticate the client to SPS using > RADIUS, enter the IP address or hostname of the RADIUS server into the Address field, the port number of the RADIUS server into the Port field, and the shared secret of the RADIUS server into the Shared secret field. Only password-authentication is supported (including one-time passwords), challenge-response based authentication is not.
To use the Password Authentication Protocol, select PAP. To use the Challenge-Handshake Authentication Protocol, select CHAP.
Use an IPv4 address.
To add more RADIUS servers, click
-
None: Do not perform client-side authentication, the client will authenticate only on the target server.
Caution: Hazard of security breach. If the None authentication option is selected on the client side and SPS is configured to use public-key or certificate based authentication on the server, the user will not be authenticated at all unless gateway authentication is required for the connection.
To use certificates to authenticate the client, you can use the LDAP and the Local user database backends.
Figure 190: Client-side inband gateway authentication with different certificates
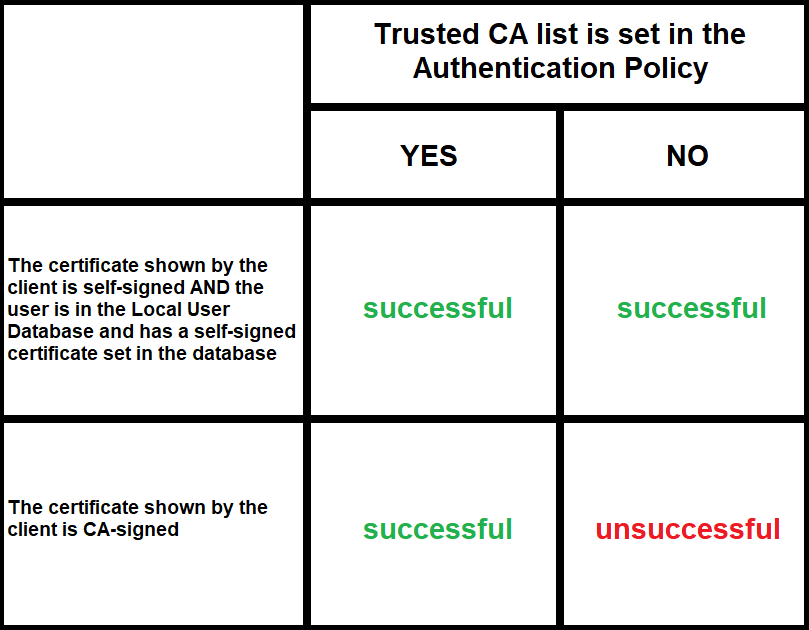
| Trusted CA list is set in the Authentication Policy | ||
|---|---|---|
| YES | NO | |
| The certificate shown by the client is self-signed AND the user is in the Local User Database and has a self-signed certificate set in the database | successful | successful |
| The certificate shown by the client is CA-signed | successful | unsuccessful |