
Server host keys
The host keys of the trusted servers can be managed on the SSH Control > Server Host Keys page. When a client tries to connect to a server, One Identity Safeguard for Privileged Sessions (SPS) verifies the host key of the server. SPS allows connections only to the servers listed on this page, unless the Accept key for the first time or the Accept certificate for the first time option is enabled in the connection policy.
-
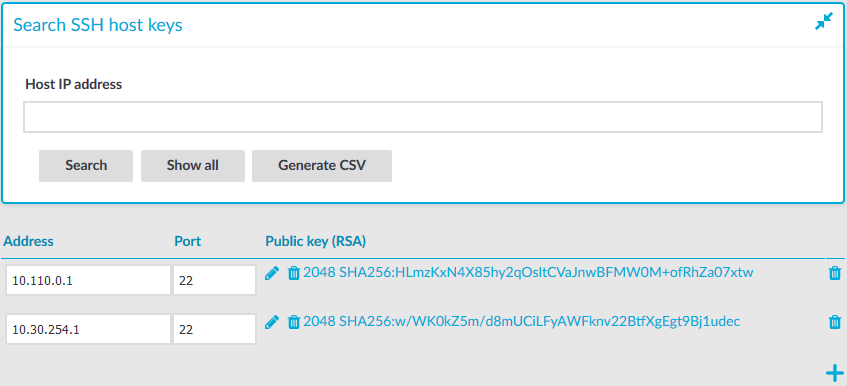
To display the stored host keys of a host, enter its IP address into Host IP address field and click Search. Note that the search requires the exact IP address, and does not support wildcard characters.
You can use IPv4 and IPv6 addresses as well.
-
To display the list of stored host keys, click Show All. Note that this function does not work if there are more than 250 hosts in the database. In this case, use Generate CSV instead.
-
To export the entire list into as a comma-separated list, click Generate CSV.
Figure 192: SSH Control > Server Host Keys — Server host keys
Automatically adding the host keys of a server to One Identity Safeguard for Privileged Sessions (SPS)
The host keys of the servers can be added either automatically or manually.
To add the host key automatically
-
Navigate to the SSH Control > Connections.
-
Configure a connection: fill the From, To, and Port fields.
You can use IPv4 and IPv6 addresses as well.
-
To configure a transparent connection, enter the IP address of the server into the To field.
-
To configure a non-transparent connection, enter the IP address of SPS into the To field, and the address of the target server into the Target field.
-
-
Click
to display the advanced settings and verify that the Server side hostkey settings > Plain host key check option is set to Accept key for the first time.
Click
.
-
Initiate an SSH connection from the client to the server. SPS will automatically record the host key of the server — the server's IP address and the host key will be listed on the SSH Control > Server Host Keys page.
Manually adding the host key of a server
The following describes how to add the host key manually.
|
|
NOTE:
One Identity recommends using 2048-bit RSA keys (or stronger). |

To add the host key manually
-
Navigate to the SSH Control > Server Host Keys and click
.
-
Enter the IP address and port of the server into the Address and Port fields.
You can use IPv4 and IPv6 addresses as well.
-
To set the host key of the server, complete the following steps:
-
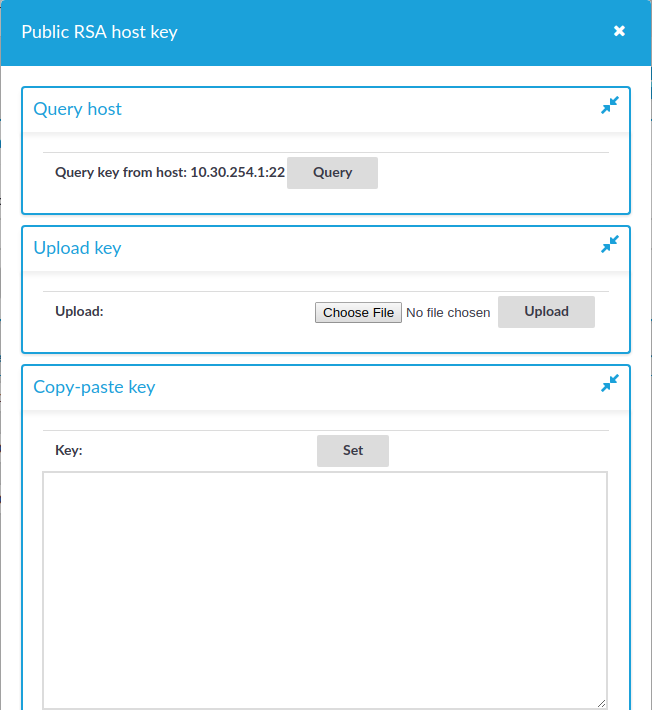
To add the RSA fingerprint of the server, click
in the Public key (RSA) field.
A pop-up window is displayed.
-
Figure 193: SSH Control > Server Host Keys — Uploading server host keys
-
Select Query to retrieve the host key from the server.
-
To upload the host key manually, select Browse, select the file, and click Upload. Optionally, you can also paste the key into the Copy-paste key section and select Upload.
Close the window.
-
-
-
Click
Creating and editing protocol-level SSH settings
SSH settings determine the parameters of the connection on the protocol level. For example, when the server-side connection is built, the timeout value, and greeting message of the connection. The following parameters determine which algorithms are used in the connections, and can be set independently for the client and the server side: key exchange, host key, cipher, MAC, and compression algorithms.
|
|
Caution:
Before modifying any of the algorithm settings, check whether the default algorithms are supported by your SSH client and server. If yes, then you can leave these settings untouched. If not and you need to amend the default algorithm settings, ensure that the client and server sides are harmonized. You can either do that in One Identity Safeguard for Privileged Sessions (SPS) or on the client/server itself. Note that modifying algorithm settings in SPS is recommended to advanced users only. If you are unsure about which settings to amend, then contact our Support Team for assistance. |

Figure 194: SSH Control > Settings — SSH settings

To create a new SSH settings profile or edit an existing one
-
Navigate to the SSH Control > Settings and click
-
Click
-
To set a connection timeout value, enter a value in the Idle timeout field in milliseconds. To avoid early timeout, set it to a larger value, for example a week (604800000 milliseconds).
Caution: Determining if a connection is idle is based on the network traffic generated by the connection, not the activity of the user. For example, if an application or the taskbar of a graphical desktop displays the time which is updated every minute, it generates network traffic every minute, negating the effects of timeout values greater than one minute and preventing One Identity Safeguard for Privileged Sessions (SPS) from closing the connection.
-
To display a greeting message to the clients after connecting the server, enter the message into the Greeting field.
-
To display a banner message to the clients before authentication (as specified in RFC 4252 — The Secure Shell (SSH) Authentication Protocol), enter the message into the Banner field. For example, this banner can inform the users that the connection is audited.
-
Optional. You can specify additional text to append to the SSH protocol banner, for example to mask the OpenSSH version upon connection. Enter the text in the Software version field.
-
If needed, modify the encryption parameters. SPS enforces policies on the various elements of the encrypted SSH communication, such as the MAC, key-exchange, and cipher algorithms that are permitted to be used. The parameters can be set separately for the client and for the server side. The attributes are comma-separated strings listing the enabled methods/algorithms, in the order of preference.
For a complete list of the available parameters, see Supported encryption algorithms.
NOTE: Do not use the CBC block cipher mode, or the diffie-hellman-group1-sha1 key exchange algorithm.
-
To check the protocol-level parameters of the connections very strictly, select the Strict mode option. This option is enabled by default. When this option is enabled:
SPS will reject connections that use unrealistic parameters, for example:
-
The number of columns and rows of the terminal is bigger or equal than 512.
-
The size of the screen is greater than 8192 pixels in either directions.
SPS will reject port-forwarding connections where the address in the port-forwarding request and the channel-opening request does not match.
NOTE: Strict mode can interfere with certain client or server applications.
NOTE: Strict mode is not working with the Windows 10 internal Bash/WSL feature, because it uses a very large terminal window size. Using Windows 10 internal Bash/WSL is not supported.
-
-
Before establishing the server-side connection, SPS can evaluate the connection and channel policies to determine if the connection might be permitted at all, for example it is not denied by a Time Policy. To enable this function, select the Enable pre channel check option. That way SPS establishes the server-side connection only if the evaluated policies permit the client to access the server.
-
Click
-
Select this settings profile in the SSH settings field of your connections.