Chat now with support
Chat with Support

One Identity Safeguard for Privileged Sessions 7.1 - Administration Guide

Preface Introduction The concepts of One Identity Safeguard for Privileged Sessions (SPS)
The philosophy of One Identity Safeguard for Privileged Sessions (SPS) Policies Credential Stores Plugin framework Indexing Supported protocols and client applications Modes of operation Connecting to a server through One Identity Safeguard for Privileged Sessions (SPS) Archive and backup concepts Maximizing the scope of auditing IPv6 in One Identity Safeguard for Privileged Sessions (SPS) SSH host keys Authenticating clients using public-key authentication in SSH The gateway authentication process Four-eyes authorization Network interfaces High Availability support in One Identity Safeguard for Privileged Sessions (SPS) Versions and releases of One Identity Safeguard for Privileged Sessions (SPS) Accessing and configuring One Identity Safeguard for Privileged Sessions (SPS)
Cloud deployment considerations The Welcome Wizard and the first login Basic settings
Supported web browsers The structure of the web interface Network settings Configuring date and time System logging, SNMP and e-mail alerts Configuring system monitoring on SPS Data and configuration backups Archiving Cleaning up audit data Using plugins Forwarding data to third-party systems Starling integration
User management and access control
Login settings Managing One Identity Safeguard for Privileged Sessions (SPS) users locally Setting password policies for local users Managing local user groups Managing One Identity Safeguard for Privileged Sessions (SPS) users from an LDAP database Authenticating users to a RADIUS server Authenticating users with X.509 certificates Authenticating users with SAML2 Managing user rights and usergroups Creating rules for restricting access to search audit data Displaying the privileges of users and user groups Listing and searching configuration changes
Managing One Identity Safeguard for Privileged Sessions (SPS)
Controlling One Identity Safeguard for Privileged Sessions (SPS): reboot, shutdown Managing One Identity Safeguard for Privileged Sessions (SPS) clusters Managing a High Availability One Identity Safeguard for Privileged Sessions (SPS) cluster Upgrading One Identity Safeguard for Privileged Sessions (SPS) Managing the One Identity Safeguard for Privileged Sessions (SPS) license Accessing the One Identity Safeguard for Privileged Sessions (SPS) console Sealed mode Out-of-band management of One Identity Safeguard for Privileged Sessions (SPS) Managing the certificates used on One Identity Safeguard for Privileged Sessions (SPS)
General connection settings HTTP-specific settings ICA-specific settings MSSQL-specific settings RDP-specific settings SSH-specific settings Using Sudo with SPS Telnet-specific settings VMware Horizon View connections VNC-specific settings Indexing audit trails Using the Search interface Advanced authentication and authorization techniques Reports The One Identity Safeguard for Privileged Sessions (SPS) REST API One Identity Safeguard for Privileged Sessions (SPS) scenarios Troubleshooting One Identity Safeguard for Privileged Sessions (SPS)
Network troubleshooting Gathering data about system problems Viewing logs on One Identity Safeguard for Privileged Sessions (SPS) Changing log verbosity level of One Identity Safeguard for Privileged Sessions (SPS) Collecting logs and system information for error reporting Collecting logs and system information of the boot process for error reporting Support hotfixes Status history and statistics Troubleshooting a One Identity Safeguard for Privileged Sessions (SPS) cluster Understanding One Identity Safeguard for Privileged Sessions (SPS) RAID status Restoring One Identity Safeguard for Privileged Sessions (SPS) configuration and data VNC is not working with TLS Configuring the IPMI from the BIOS after losing IPMI password Incomplete TSA response received Using UPN usernames in audited SSH connections
Using SPS with SPP Configuring external devices Using SCP with agent-forwarding Security checklist for configuring One Identity Safeguard for Privileged Sessions (SPS) Jumplists for in-product help Configuring SPS to use an LDAP backend Glossary

Configure your IdP to trust SPS

To configure your Identity Provider (IdP) to trust One Identity Safeguard for Privileged Sessions (SPS) as a Service Provider (SP), you must provide the SP metadata XML file of your SPS to your IdP. If your IdP supports the import of SP metadata, then you can choose either of the following methods to download the SP metadata XML file:

  • Download the SP metadata XML file by clicking Users & Access Control > Login Options > SSO Configuration > SAML2 Service Provider details > Download SAML2 metadata on the SPS web interface.

  • Download the SP metadata XML file from your SPS at the following location:

    https://<ADDRESS-OF-YOUR-SPS>/sts/saml2/sp-metadata.xml

    This file is accessible also for unauthenticated users since it only contains public information about the SAML2 SP configuration.

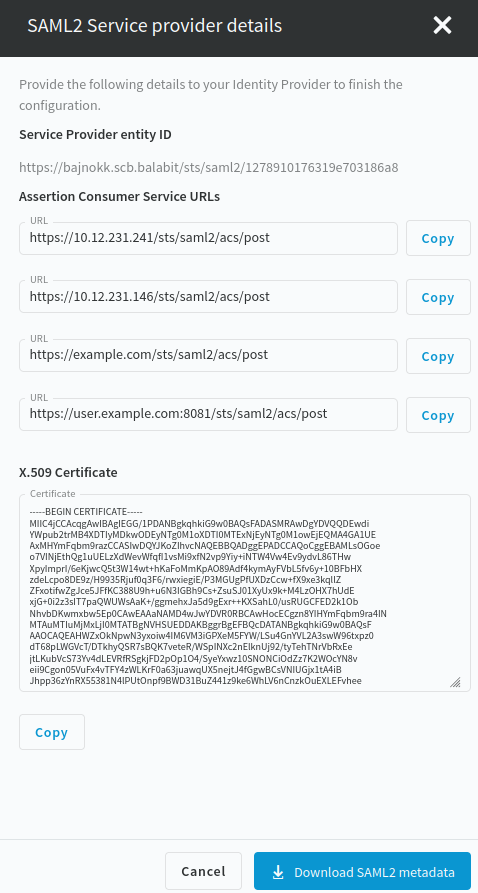
If your IdP does not support the import of SP metadata, then you must configure your IdP based on the summary of the SAML2 Service Provider details page.

Figure 91: Users & Access Control > Login Options > SSO Configuration > SAML2 Service Provider details

Authenticating users with SAML2 login method

To authenticate SPS users with a SAML2 login method, complete the following steps.

  1. Navigate to Users & Access Control > Login Options.

  2. To configure a SAML2 login method, select one of the following options:

    • Select an existing SAML2 login option and click Edit.

    • Click Create new login method and select SAML2.

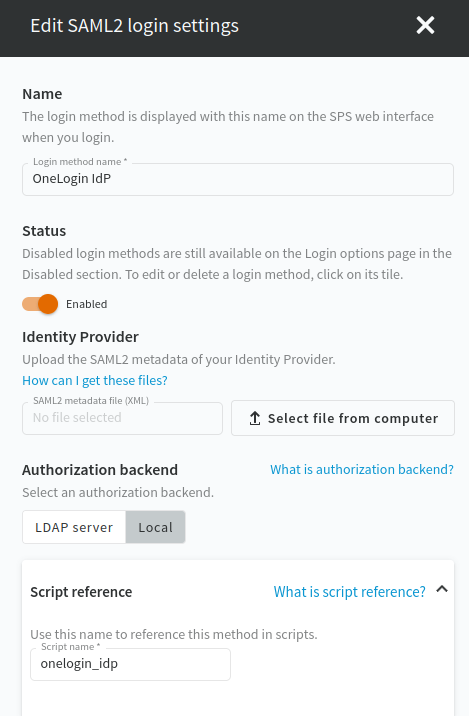
      The following figure shows the configuration options of the SAML2 login method.

      Figure 92: Users & Access Control > Login options — Configuring SAML2 authentication

  3. In the Name field, specify a name for the login option.

  4. Upload the SAML2 metadata XML of your Identity Provider.

    NOTE: Your IdP metadata file should contain a single SAML2 IdP metadata entity. To support SAML2 login with multiple IdPs, you have to configure additional SAML2 login methods.

  5. Select LDAP server or Local as the Authorization backend.

  6. (Optional) To add a new LDAP server, click Add new LDAP server under Authorization backend and select one of the server types:

  7. Script reference is filled out automatically when you specify the name for the login option. Special characters are automatically replaced with dashes ("-"). The Script name is a unique, human readable ID that is used by the REST API clients to select the login method.

  8. To save your modifications, click Commit.

Managing user rights and usergroups

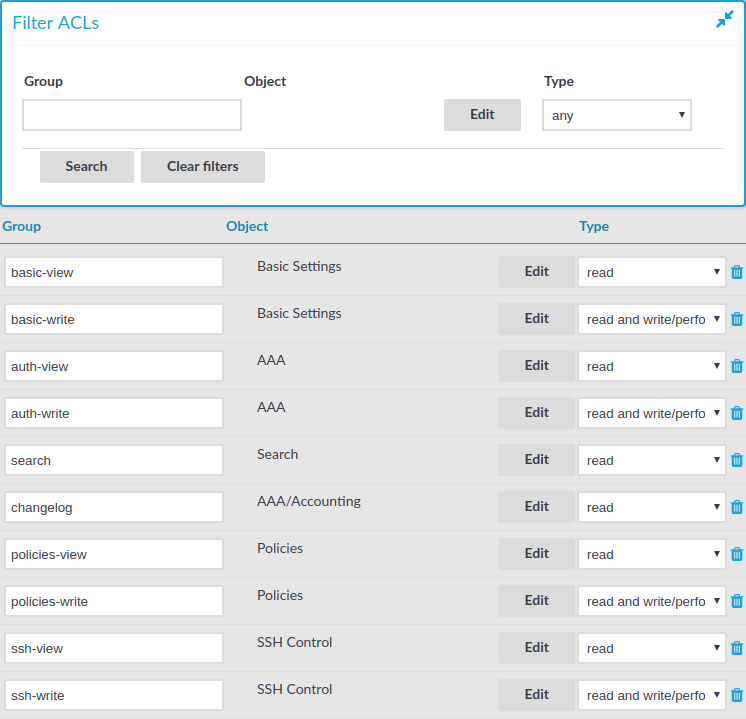
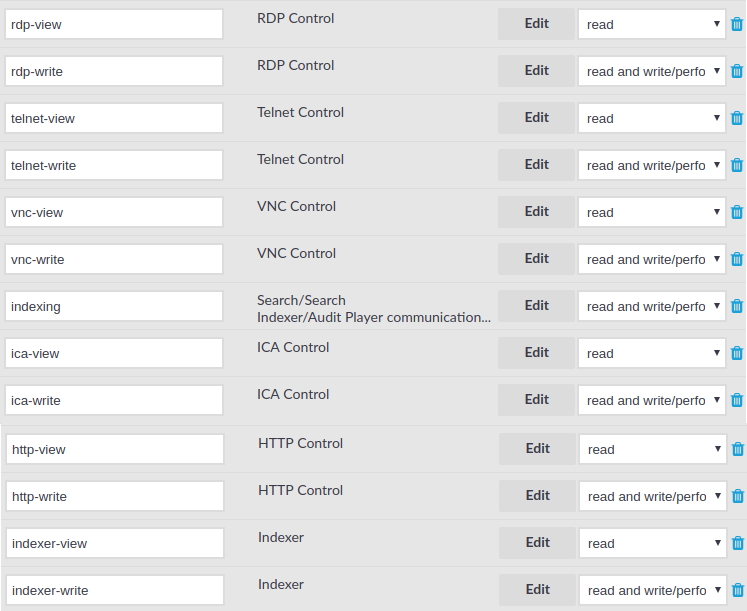
In One Identity Safeguard for Privileged Sessions (SPS), user rights can be assigned to usergroups. SPS has numerous usergroups defined by default, but custom user groups can be defined as well. Every group has a set of privileges: which pages of the SPS web interface it can access, and whether it can only view (read) or also modify (read & write/perform) those pages or perform certain actions.

NOTE: Every group has either read or read & write/perform privileges to a set of pages.

Figure 93: Users & Access Control > Appliance Access — Managing SPS users

Assigning privileges to user groups for the One Identity Safeguard for Privileged Sessions (SPS) web interface

The following describes how to assign privileges to a new group.

To assign privileges to a new group

  1. Navigate to Users & Access Control > Appliance Access and click .

  2. Find your user group. If you start typing the name of the group you are looking for, the auto-complete function will make finding your group easier for you.

  3. Click Edit located next to the name of the group. The list of available privileges is displayed.

  4. Select the privileges (that is, the pages of the One Identity Safeguard for Privileged Sessions (SPS) interface) to which the group will have access and click Save.

    NOTE: To export the configuration of SPS, the Export configuration privilege is required.

    To import a configuration to SPS, the Import configuration privilege is required.

    To update the firmware and set the active firmware, the Firmware privilege is required.

  5. Select the type of access (read or read & write) from the Type field.

  6. Click .

Related Documents

The document was helpful.

Select Rating

I easily found the information I needed.

Select Rating