Setting up Sudo connections in SPS
To enable the SPS and Sudo integration, perform the following steps in SPS.
For a detailed description on configuring connections, see General connection settings.
Prerequisites
-
You have the SPS license required to integrate SPS and Sudo. For more information, contact our Sales Team.
-
An X.509 certificate and its private key to encrypt the communication between the client and SPS. Use your own PKI system to generate these certificates, as they cannot be created on SPS.
To create a Sudo connection in SPS
-
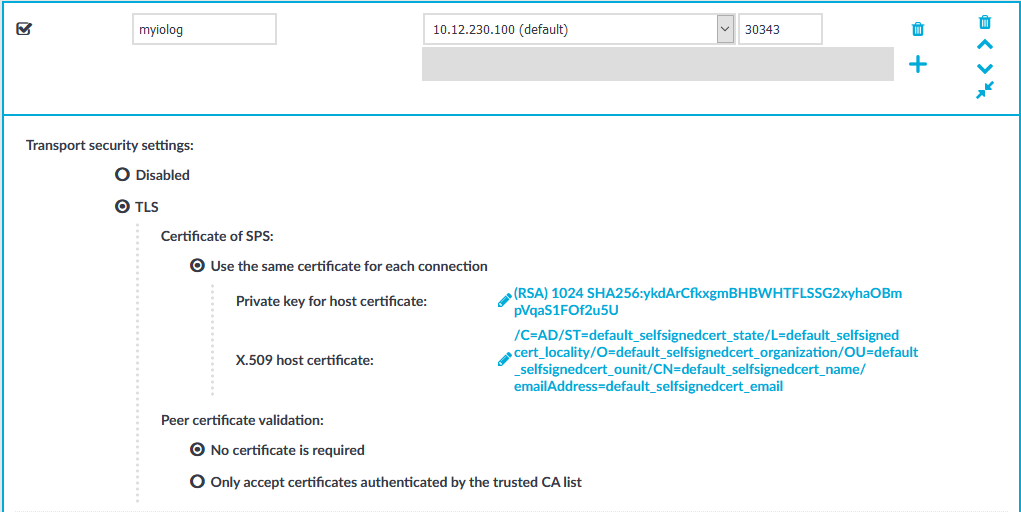
Navigate to Sudo iolog Control > Connections.
Figure 251: Sudo iolog Control > Connections — Creating a Sudo connection in SPS
-
Since SPS can have multiple network interfaces, select an IP address where the Sudo clients can send the iologs. If required, you can change the port number.
-
TLS is disabled by default as you have to configure certificates manually. Make sure that you enable it as iologs carry highly sensitive information.
To require encryption, select TLS. When the connection is encrypted, SPS has to show a certificate to the peer.
-
Select the certificate to show to the peers.
-
Generate and sign a certificate for SPS in your PKI system, and export the certificate and its private key.
-
Select Use the same certificate for each connection.
-
Select Private key for host certificate, click  and upload the private key.
-
Select X.509 host certificate, click and upload the certificate.
-
Select how SPS should authenticate the peers.
-
To permit connections from peers without requesting a certificate, select No certificate is required.
-
To permit connections only from peers with a valid certificate that was signed by a specific CA, complete the following steps.
-
Create a list of trusted Certificate Authorities that will be used to validate the certificates of the peers. For details on creating a trusted CA list, see Verifying certificates with Certificate Authorities.
-
Select Only accept certificates authenticated by the trusted CA list.
-
Select the certificate authority list to use in the Trusted CA field.
-
Select Enable indexing.
Figure 252: Sudo iolog Control > Enable indexing — Select indexing policy

-
To determine the priority level of indexing this connection, select the appropriate Priority level. Selecting a high priority level means that the trails of this connection are indexed first. Selecting a low priority level means that the trails of this connection are also indexed, but there might be a delay in indexing if there are a lot of high-priority connections waiting to be indexed. Selecting near real-time means that the indexing of sessions starts when sessions are still ongoing.
-
Select the Indexing policy to be used.
Both built-in indexer policies feature automatic language detection. To specify a particular language detection configuration, select the indexing policy if you have created before. For more information, see Configuring the internal indexer.
-
To limit the number of new connection requests accepted from a single client IP address per minute, enter the maximum number of accepted connections into the Connection rate limit field.
Figure 253: Sudo iolog Control > Connections — Additional settings

-
Enter how long SPS (in days) should keep the metadata into the Delete search metadata from SPS after field. For example, if you specify 365, SPS deletes the data of connections older than a year. Enter zero (0) to keep the data indefinitely (this is also the default behavior of SPS).
-
If configured, select a policy to control various aspects of the connection. For more information, see Policies.
-
If you want to find out if the audit trail file of a relevant indexed session has already been downloaded, select Log audit trail downloads.
-
Optional: To set a verbosity level for this connection, select Override verbosity level and select the desired log level from the Connection specific verbosity level field.
NOTE: The new verbosity level applies only to new sessions started after committing the change. The verbosity level of active sessions do not change.
-
Click  .
.
Before you can use the SPS and Sudo integration, perform the Sudo-side configuration steps as described in Configuring Sudo.
Configuring Sudo
To enable the SPS and Sudo integration, perform the following steps on the client side.
Prerequisites
To enable the SPS and Sudo integration
-
In Sudo, open the sudoers file using visudo.
-
Add the following lines:
Defaults ignore_iolog_errors
Defaults log_servers = <IP of SPS>:<PORT of SPS>
Defaults log_output
Defaults log_input
Where the options are as follows:
Table 11: Options for the Sudo-side configuration
|
ignore_iolog_errors |
Allow running commands even if sudoers cannot write to the I/O log. |
|
log_servers |
Specify the IP address of your SPS. Additionally, you can specify the port number of SPS. If you use Transport Layer Security (TLS) for encryption, you must also specify it as described below. |
|
log_output |
Enable recording any change, which appears on the screen. |
|
log_input |
Ensure recording of any user input, that is, anything the user types. |
-
To require encryption (recommended), use TLS as follows:
-
Configure the log_servers option in the sudoers file:
Defaults log_servers = <IP of SPS>:<PORT of SPS>(tls)
-
Configure the log_server_cabundle, log_server_peer_cert, or log_server_peer_key settings with the required TLS settings. For more information, see Securing server connections in the Sudoers Manual.
For example, add the path to the certificate authority bundle file in .pem format as shown in the example below:
Defaults log_server_cabundle = <path_to_PEM_file>/<file_name>.pem
Expected result
On the client side, start typing sudo and open any program.
In SPS, you can view the session using the Search interface.
Telnet-specific settings
The following sections describe configuration settings available only for the Telnet protocol. Use the following policies to control who, when, and how can access the Telnet connection. For a list of supported client applications, see Supported protocols and client applications.
-
Channel Policy: The Telnet protocol has only one channel type with no special configuration options. The available channel policy options are the following: Type, From, Target, Time policy, Four-eyes, Record audit trail, Gateway groups, Remote groups, and Content policy. For details on configuring these options, see Creating and editing channel policies.
-
TLS support: To enable TLS-encryption for your Telnet connections, see Enabling TLS-encryption for Telnet connections.
-
Authentication Policy: Authentication policies describe the authentication methods allowed in a connection. Different methods can be used for the client and server-side connections. For details, see Creating a new Telnet authentication policy.
-
Telnet settings: Telnet settings determine the parameters of the connection on the protocol level, including timeout value, and so on. For details, see Creating and editing protocol-level Telnet settings.
-
User lists in Channel Policies: User lists affect Telnet connections only when they are used together with Gateway Authentication. For details, see Configuring gateway authentication.
-
Content Policy: Content policies allow you to inspect the content of the connections for various text patterns, and perform an action if the pattern is found. For example, One Identity Safeguard for Privileged Sessions (SPS) can send an e-mail alert if a specific command is used in a Telnet terminal session. For details, see Creating a new content policy.
-
Authentication and Authorization plugin:
One Identity Safeguard for Privileged Sessions (SPS) provides a plugin framework to integrate SPS to external systems to authenticate or authorize the user before authenticating on the target server. Such plugins can also be used to request additional information from the users, for example, to perform multi-factor authentication.
For details, see Integrating external authentication and authorization systems.
Enabling TLS-encryption for Telnet connections
The following steps describe how to enable TLS-encryption in a Telnet connection policy. Note that when using encryption, One Identity Safeguard for Privileged Sessions (SPS) automatically changes the port number of the connection policy to 992.
Prerequisites
Depending on your requirements, one or more of the following might be needed:
-
An X.509 certificate and its private key. SPS can display the same certificate to the peers on both the client and the server side. You can also use different certificates for the client and server sides. Use your own PKI system to generate these certificates, as they cannot be created on SPS. Note that the Common Name of the certificate must contain the domain name or the IP address of SPS, otherwise the clients might reject the certificate.
-
To generate certificates on-the-fly for a connection, a signing certificate authority is required. For details on creating a signing CA, see Signing certificates on-the-fly.
-
To require the peers of SPS to have an X.509 certificate signed by a specific Certificate Authority, a list of the trusted certificate authorities is needed. For details on creating a trusted CA list, see Verifying certificates with Certificate Authorities.
TIP: One Identity recommends using 2048-bit RSA keys (or stronger).
To enable TLS-encryption in a Telnet connection policy
-
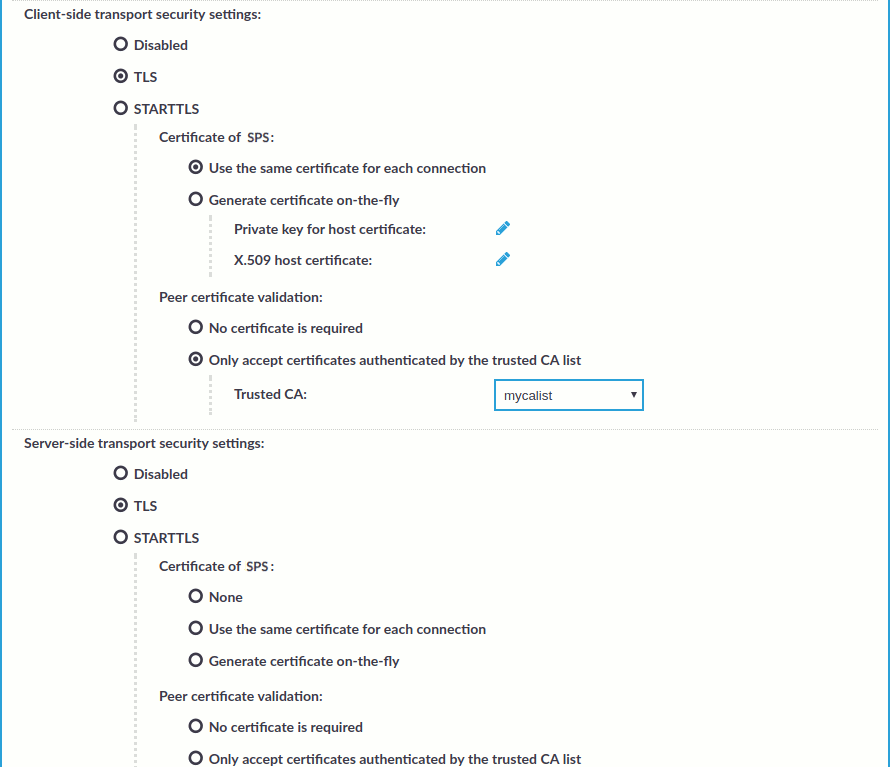
Navigate to Telnet Control > Connections and select the connection policy in which you want to enable TLS.
Figure 254: Telnet Control > Connections — Enabling TLS-encryption for Telnet connections
-
Set the encryption settings used between the client and SPS in the Client-side transport security settings section.
-
To require encryption, select TLS. When the connection is encrypted, SPS has to show a certificate to the peer.
-
To enable encrypted connections that use the STARTTLS method, select STARTTLS. Note that the peer must use the STARTTLS method. Unencrypted connections will be terminated after a brief period.
-
Select the certificate to show to the peers.
-
To use the same certificate for every peer, complete the following steps.
-
Generate and sign a certificate for SPS in your PKI system, and export the certificate and its private key.
-
Select Use the same certificate for each connection.
-
Select Private key for host certificate, click and upload the private key.
-
Select X.509 host certificate, click and upload the certificate.
-
To use a separate certificate for every connection, complete the following steps.
-
Create a certificate authority that will be used to sign the certificates that SPS shows to the peer. For details, see Signing certificates on-the-fly.
-
Select Generate certificate on-the-fly.
-
In the Signing CA field, select the certificate authority to use.
-
Select how SPS should authenticate the peers.
-
To permit connections from peers without requesting a certificate, select No certificate is required.
-
To permit connections only from peers with a valid certificate that was signed by a specific CA, complete the following steps.
-
Create a list of trusted Certificate Authorities that will be used to validate the certificates of the peers. For details on creating a trusted CA list, see Verifying certificates with Certificate Authorities.
-
Select Only accept certificates authenticated by the trusted CA list.
-
Select the certificate authority list to use in the Trusted CA field.
-
Set the encryption settings used between SPS and the server in the Server-side transport security settings section.
-
To require encryption, select TLS. When the connection is encrypted, SPS has to show a certificate to the peer.
-
To enable encrypted connections that use the STARTTLS method, select STARTTLS. Note that the peer must use the STARTTLS method. Unencrypted connections will be terminated after a brief period.
-
Select the certificate to show to the server.
-
To use the same certificate for every peer, complete the following steps.
-
Generate and sign a certificate for SPS in your PKI system, and export the certificate and its private key.
-
Select Use the same certificate for each connection.
-
Select Private key for host certificate, click and upload the private key.
-
Select X.509 host certificate, click and upload the certificate.
-
To use a separate certificate for every connection, complete the following steps.
-
Create a certificate authority that will be used to sign the certificates that SPS shows to the peer. For details, see Signing certificates on-the-fly.
-
Select Generate certificate on-the-fly.
-
Select the certificate authority to use in the Signing CA field.
Limitations
NOTE: When using the Use the same certificate for each connection option and the connection policy that allows access to multiple servers using HTTPS, the client applications will display a warning because the certificate used in the connection will be invalid (namely, the Common Name of the certificate will not match the hostname or IP address of the server).
NOTE: Import the certificate of the signing Certificate Authority to your clients. Otherwise, the client applications will display a warning due to the unknown Certificate Authority.
-
Select how SPS should authenticate the peers.
-
To permit connections from peers without requesting a certificate, select No certificate is required.
-
To permit connections only from peers with a valid certificate that was signed by a specific CA, complete the following steps.
-
Create a list of trusted Certificate Authorities that will be used to validate the certificates of the peers. For details on creating a trusted CA list, see Verifying certificates with Certificate Authorities.
-
Select Only accept certificates authenticated by the trusted CA list.
-
Select the certificate authority list to use in the Trusted CA field.
-
Click .
Expected result
The encryption settings are applied to the connection policy.
