One Identity Safeguard for Privileged Sessions (SPS) offers several types of roles that you can assign to the nodes of an SPS cluster. These roles are listed below.
NOTE:
-
Nodes keep their assigned role in the cluster even after a system restore.
-
Depending on their type, you can assign certain roles only to a single node in the cluster, while others to multiple nodes.
-
One node can also have multiple roles assigned to it, with some restrictions depending on the selected roles. For details, see the description of the roles.
Central management
NOTE: You can assign the Central management role only to a single node in the cluster.
The Central management node is used to set up a central configuration within the cluster, by having the configuration of this node synchronized to the other nodes of the cluster. Any changes that you make in the cluster configuration of this node (for example, role changes, host address changes, and so on) are fetched by the rest of the nodes in the cluster, and are merged into their configuration.
The Central management node also contains status information about all the other nodes in the cluster, so you can check the health of the whole cluster on this node. This status information contains:
Managed host
NOTE: You can assign the Managed host role to multiple nodes in the cluster.
Managed host nodes in a cluster synchronize their entire configuration from the Central management node, not just the cluster-related elements of their configuration. Managed host nodes send their status information to the Central management node every 10 seconds.
Search master
NOTE:
-
A One Identity Safeguard for Privileged Sessions (SPS) node with the Search master role cannot be used for monitoring network traffic, or for session recording and auditing purposes. Before assigning this role to a node, read carefully the limitations that apply to Search master nodes in Managing a cluster with central search configuration and configuration synchronization.
-
You can assign the Search master role only to a single node in the cluster.
Search master: The Search master node allows you to search all the session data recorded by other nodes in the cluster, provided that those other nodes are set to the Search minion role.
This role can only be assigned to nodes that either have the Managed host or Central management role. This is required so that the configuration of Search minion nodes and the Search master node are always in sync.
If there is no configuration synchronization between the node acting as the Search master and the Search minion nodes, then session data may show up on the Search interface of the Search master that come from connections that do not match the connection policies set up on the Search master (because they come from session data recorded by the Search minions).
Search minion
NOTE: You can assign the Search minion role to multiple nodes in the cluster.
Search minion nodes in a cluster send session data that they recorded to the Search master for central search purposes. The session data recorded by a Search minion node is not searchable on the node itself, only on the Search master.
This role can only be assigned to nodes that either have the Managed host or Central management role. This is required so that the configuration of Search minion nodes and the Search master node are always in sync.
If there is no configuration synchronization between the node acting as the Search master and the Search minion nodes, then session data may show up on the Search interface of the Search master that come from connections that do not match the connection policies set up on the Search master (because they come from session data recorded by the Search minions).
Search local
NOTE: You can assign the Search local role to multiple nodes in the cluster.
Search local nodes keep their recorded session data for local searching. Therefore, the session data recorded by a Search local node is searchable on the node itself, but not on the Search master node (if there is one configured in the cluster).
SPP fetcher
NOTE:
-
You can assign the SPP fetcher role only to a single node in the cluster.
-
You can only assign the SPP fetcher role to a node that also has either the Search local or Search minion role assigned.
-
Make sure that the One Identity Safeguard for Privileged Passwords (SPP) node is already connected to the SPS cluster before assigning the SPP fetcher role to a node. For details, see Linking SPS to SPP.
The SPP fetcher node fetches data from an SPP node linked to the cluster. The fetched data includes:
-
Workflow data from the past 5 minutes first, and then new workflow data near real-time.
-
Historical data from the past 1 year, starting with the past 1 week.
The time required for fetching depends on the amount of data to fetch. This data will be then available on the Search interface after the fetching process has finished. To track the fetch progress of historical data, check the status on the About  page.
page.
No role
Nodes in the cluster that have no roles assigned fetch only the cluster-related elements of their configuration from the Central management node.
Such nodes without any roles send their status information to the Central management node every 10 seconds.
To enable cluster management, enable the cluster interface on all nodes that you want to be part of your One Identity Safeguard for Privileged Sessions (SPS) cluster. Complete the following steps on each node of the cluster.
NOTE: All nodes in a cluster must run the same version of SPS.
Prerequisite
The nodes in the cluster must connect to each other using IPsec.
NOTE: IPsec requires UDP ports 500 and 4500 to be open bidirectionally in the firewalls between the nodes.
To enable cluster management
-
Navigate to Basic Settings > Local Services > Cluster Interface.
-
Select Enabled.
The Listening interface field is displayed, showing the interfaces configured in the Basic Settings > Network page.
-
Select a cluster interface for the node to listen on.
Figure 112: Basic Settings > Local Services > Cluster Interface — Enabling cluster management

-
Click  .
.
Create a cluster by promoting a One Identity Safeguard for Privileged Sessions (SPS) node to the role of the Central Management node. Next, join additional nodes to the cluster as described in Joining to a cluster.
Prerequisite
Enable the cluster interface on all nodes that you want to be part of your cluster. For details, see Enabling cluster management. If no cluster interface is enabled, then clicking Basic Settings > Cluster Management results in the following pop-up dialog appearing:
Figure 113: Basic Settings > Cluster management — No cluster interface configured
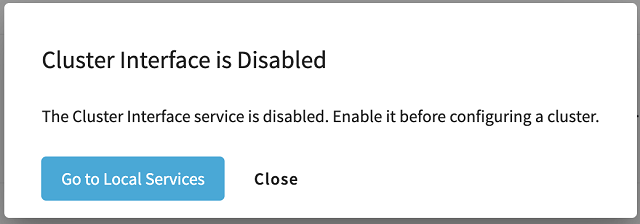
If this happens, click Go to Local Services to open Basic Settings > Local Services > Cluster Interface, and enable a cluster interface. After that, click Basic Settings > Cluster management again.
To create a cluster by promoting a node to Central management role
-
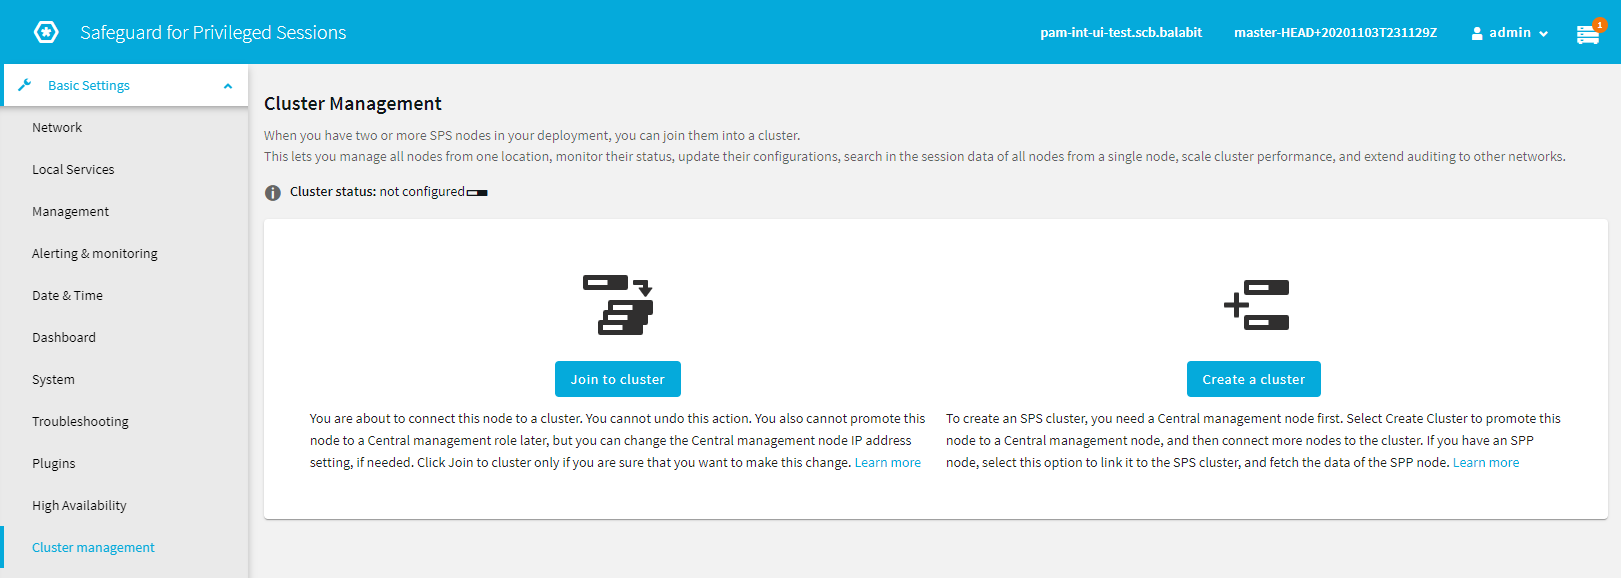
Navigate to Basic Settings > Cluster management. The main Cluster management window appears, allowing you to either join the node to an existing cluster, or create a new one.
Figure 114: Basic Settings > Cluster management — Join and create cluster options
-
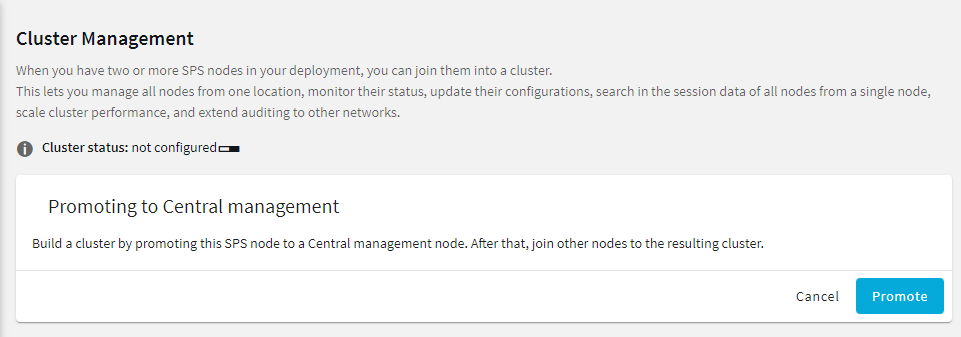
Click Create a cluster to open the node promotion window.
Figure 115: Basic Settings > Cluster management — Promote node to Central management role to create cluster
-
On the Promoting to Central management role dialog, click Promote to promote the node to Central management role, and create the cluster.
NOTE: You cannot undo or modify this action later.
The promotion status is indicated in the Cluster status row above the Promoting to Central Management role window.
Once the node is promoted, the Cluster management window is displayed, with the now-promoted Central management node listed in the screen.
Figure 116: Basic Settings > Cluster management — Cluster management dialog on the Central management node
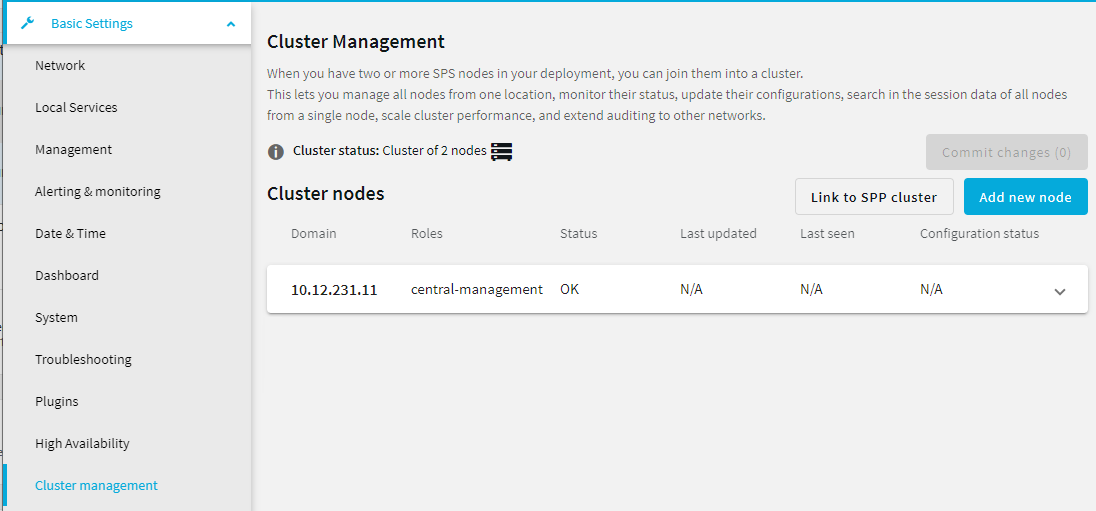
Using this screen, you can join additional nodes to the cluster. For details on how to do that, see Joining to a cluster.
To join additional One Identity Safeguard for Privileged Sessions (SPS) nodes to a cluster, generate a join token on the node that you want to add to the cluster, and then use that token on the Central management node to finish adding the node to the cluster.
|

|
Caution:
Configuration options that you set on a node before joining it to the cluster will be overwritten by the configuration of the Central management node. For example, policies and protocol-specific settings will be overwritten once you assign the Managed host role to the node. Managed host roles periodically fetch the configuration of the Central management node and merge it into their own. This is called configuration synchronization.
To avoid the loss of policies and settings that are specific to your Managed host node, use a configuration synchronization plugin. Such plugins enable you to limit the scope of configuration synchronization.
For more information, see Configuration synchronization across nodes in a cluster. |
Prerequisite
Enable the cluster interface on all nodes that you want to be part of your cluster. For details, see Enabling cluster management. If no cluster interface is enabled, then clicking Basic Settings > Cluster Management results in the following pop-up dialog appearing:
Figure 117: Basic Settings > Cluster management — No cluster interface configured
If this happens, click Go to Local Services to open Basic Settings > Local Services > Cluster Interface, and enable a cluster interface. After that, click Basic Settings > Cluster management again.
To join additional nodes to a cluster by generating and using join tokens
-
Navigate to Basic Settings > Cluster management. The main Cluster management window appears, allowing you to either join the node to an existing cluster, or create a new one.
Figure 118: Basic Settings > Cluster management — Join and create cluster options
-
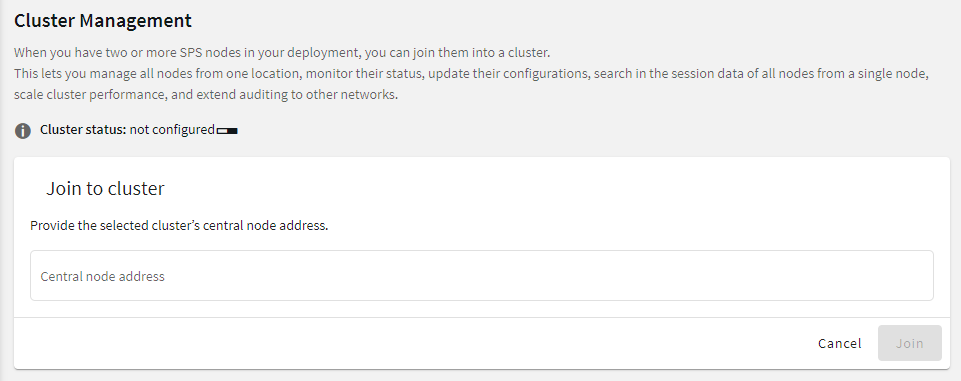
Click Join to cluster to open the cluster join window.
Figure 119: Basic Settings > Cluster management — Join to cluster window
-
On the Join to cluster dialog, in the Central node address field, enter the IP address of the Central management node of the cluster you want to join.
TIP: You can check the IP address on the Basic Settings > Cluster management screen of the Central management node.
-
Click Join. A confirmation dialog appears. Click Join to cluster again in the dialog to proceed.
NOTE: Once you click Join to cluster, you cannot undo the join process, and you will not be able to promote the node you are currently configuring to a Central management role later. However, you will still be able to change the IP address of the Central management node in the Central Node Address field, if needed.
-
A window with a join token appears.
Figure 120: Basic Settings > Cluster management — Join token used to join a cluster
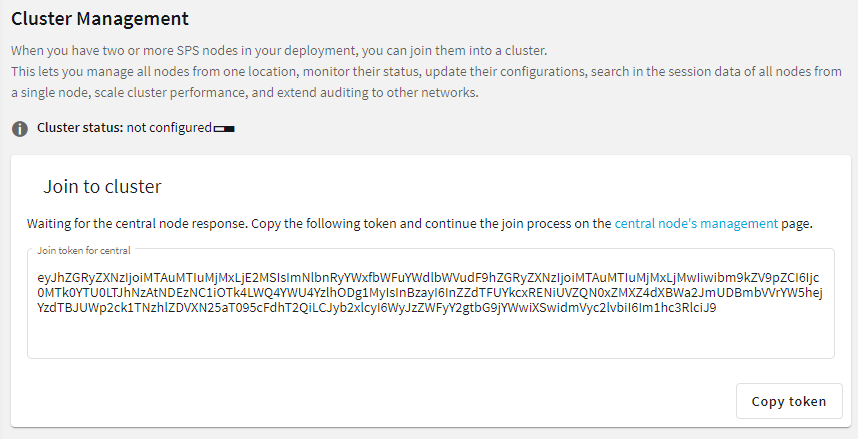
Click Copy token to copy the join token to the clipboard.
-
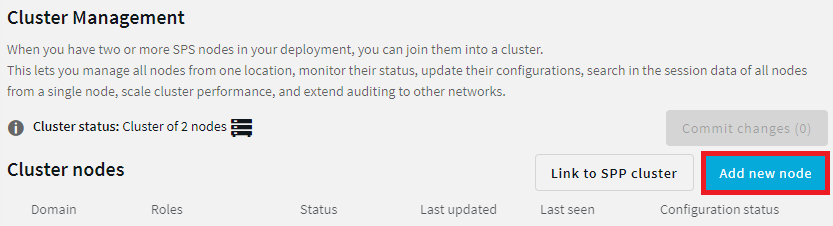
On the Central management node of the cluster you want to join, navigate to Basic Settings > Cluster management, and click Add new node.
Figure 121: Basic Settings > Cluster management — Cluster management dialog on the Central management node
-
The Add new node dialog appears.
Figure 122: Basic Settings > Cluster management — Add new node dialog
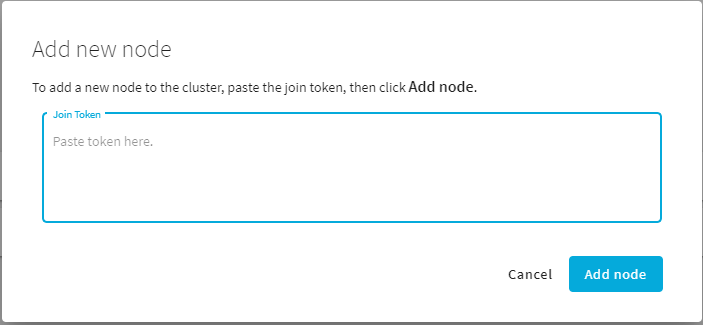
Paste the token in the Join Token field, then click Add node.
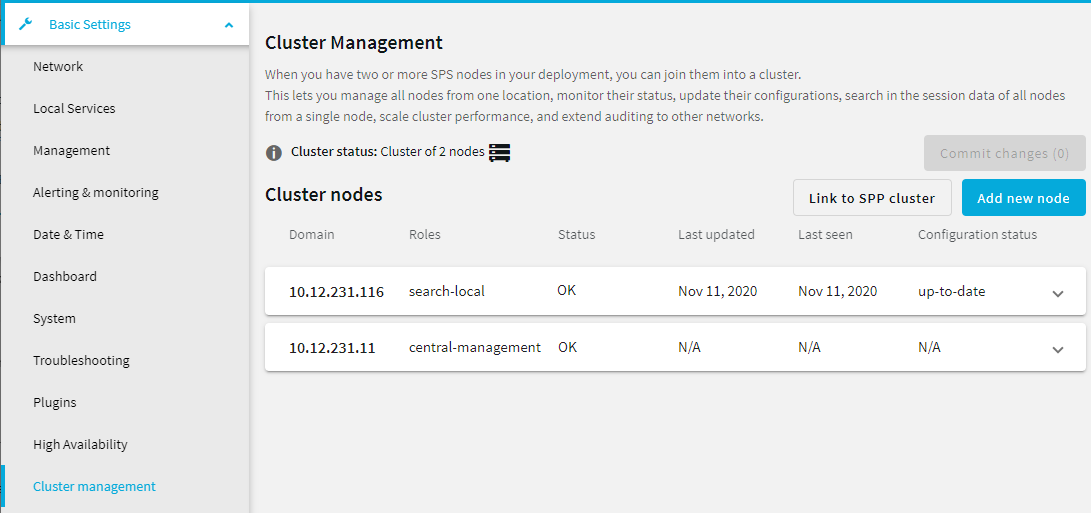
Once the node joined the cluster, it is displayed in the list of nodes on the Basic Settings > Cluster management window of the Central management node.
Figure 123: Basic Settings > Cluster management — New node indicated on the Cluster management node
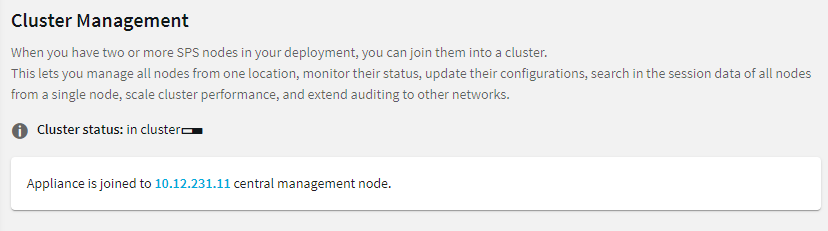
At the same time, on the node that you joined to the cluster, the Basic Settings > Cluster management page shows the IP address of the Central management node of the cluster.
Figure 124: Basic Settings > Cluster management — Join status indicated on the node that newly joined to the cluster
If you want to centrally manage the configuration of the node(s) you have joined to the cluster, assign the Managed host role to them. For details, see Assigning roles to nodes in your cluster.
