Chat now with support
Chat with Support

One Identity Safeguard for Privileged Sessions 7.1 - Administration Guide

Preface Introduction The concepts of One Identity Safeguard for Privileged Sessions (SPS)
The philosophy of One Identity Safeguard for Privileged Sessions (SPS) Policies Credential Stores Plugin framework Indexing Supported protocols and client applications Modes of operation Connecting to a server through One Identity Safeguard for Privileged Sessions (SPS) Archive and backup concepts Maximizing the scope of auditing IPv6 in One Identity Safeguard for Privileged Sessions (SPS) SSH host keys Authenticating clients using public-key authentication in SSH The gateway authentication process Four-eyes authorization Network interfaces High Availability support in One Identity Safeguard for Privileged Sessions (SPS) Versions and releases of One Identity Safeguard for Privileged Sessions (SPS) Accessing and configuring One Identity Safeguard for Privileged Sessions (SPS)
Cloud deployment considerations The Welcome Wizard and the first login Basic settings
Supported web browsers The structure of the web interface Network settings Configuring date and time System logging, SNMP and e-mail alerts Configuring system monitoring on SPS Data and configuration backups Archiving Cleaning up audit data Using plugins Forwarding data to third-party systems Starling integration
User management and access control
Login settings Managing One Identity Safeguard for Privileged Sessions (SPS) users locally Setting password policies for local users Managing local user groups Managing One Identity Safeguard for Privileged Sessions (SPS) users from an LDAP database Authenticating users to a RADIUS server Authenticating users with X.509 certificates Authenticating users with SAML2 Managing user rights and usergroups Creating rules for restricting access to search audit data Displaying the privileges of users and user groups Listing and searching configuration changes
Managing One Identity Safeguard for Privileged Sessions (SPS)
Controlling One Identity Safeguard for Privileged Sessions (SPS): reboot, shutdown Managing One Identity Safeguard for Privileged Sessions (SPS) clusters Managing a High Availability One Identity Safeguard for Privileged Sessions (SPS) cluster Upgrading One Identity Safeguard for Privileged Sessions (SPS) Managing the One Identity Safeguard for Privileged Sessions (SPS) license Accessing the One Identity Safeguard for Privileged Sessions (SPS) console Sealed mode Out-of-band management of One Identity Safeguard for Privileged Sessions (SPS) Managing the certificates used on One Identity Safeguard for Privileged Sessions (SPS)
General connection settings HTTP-specific settings ICA-specific settings MSSQL-specific settings RDP-specific settings SSH-specific settings Using Sudo with SPS Telnet-specific settings VMware Horizon View connections VNC-specific settings Indexing audit trails Using the Search interface Advanced authentication and authorization techniques Reports The One Identity Safeguard for Privileged Sessions (SPS) REST API One Identity Safeguard for Privileged Sessions (SPS) scenarios Troubleshooting One Identity Safeguard for Privileged Sessions (SPS)
Network troubleshooting Gathering data about system problems Viewing logs on One Identity Safeguard for Privileged Sessions (SPS) Changing log verbosity level of One Identity Safeguard for Privileged Sessions (SPS) Collecting logs and system information for error reporting Collecting logs and system information of the boot process for error reporting Support hotfixes Status history and statistics Troubleshooting a One Identity Safeguard for Privileged Sessions (SPS) cluster Understanding One Identity Safeguard for Privileged Sessions (SPS) RAID status Restoring One Identity Safeguard for Privileged Sessions (SPS) configuration and data VNC is not working with TLS Configuring the IPMI from the BIOS after losing IPMI password Incomplete TSA response received Using UPN usernames in audited SSH connections
Using SPS with SPP Configuring external devices Using SCP with agent-forwarding Security checklist for configuring One Identity Safeguard for Privileged Sessions (SPS) Jumplists for in-product help Configuring SPS to use an LDAP backend Glossary

Network Level Authentication (NLA) with domain membership

You can use Credential Security Service Provider (CredSSP, also called Network Level Authentication or NLA) when One Identity Safeguard for Privileged Sessions (SPS) is member of the domain.

Prerequisites

To use NLA with domain membership

  1. Navigate to RDP Control > Settings, and select the RDP settings policy that you use in your connection policies.

  2. Select the Enable Network Level Authentication > Require domain membership option.

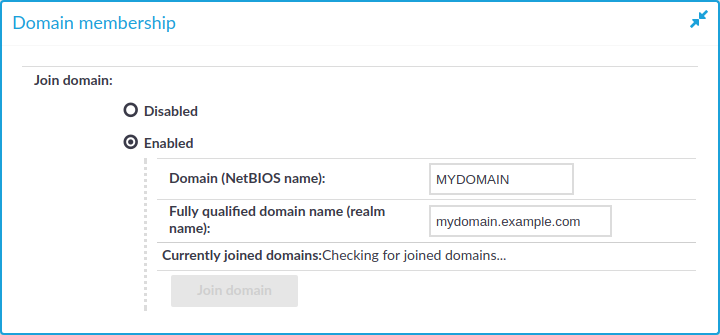
  3. Navigate to RDP Control > Domain membership.

  4. Enter the name of the domain (for example mydomain) into the Domain field.

    Figure 219: RDP Control > Domain membership — Joining a domain

  5. Enter the name of the realm (for example mydomain.example.com) into the Full domain name field.

    NOTE: Ensure that your DNS settings are correct and that the full domain name can be resolved from SPS. To check this, navigate to Basic Settings > Troubleshooting > Ping, enter the full domain name into the Hostname field, and select Ping host.

  6. Click .

  7. Click Join domain. A pop-up window is displayed.

  8. SPS requires an account to your domain to be able to join the domain. Enter the following information:

    • The name of the user into the Username field.

    • The password into the Password field.

      NOTE: SPS accepts passwords that are not longer than 150 characters and supports the following characters:

      • Letters A-Z, a-z

      • Numbers 0-9

      • The space character

      • Special characters: !"#$%&'()*+,-./:;<>=?@[]\^-`{}_|

    • The name of your domain controller into the Domain controller field. If you leave this field blank, SPS tries to find the domain controller automatically.

      NOTE: Ensure that your DNS settings are correct and that the hostname of the domain controller can be resolved from SPS. To check this, navigate to Basic Settings > Troubleshooting > Ping, enter the name of the domain controller into the Hostname field, and select Ping host.

    • The organizational unit (OU) into the Organization unit field.

      The OU string reads from top to bottom without RDNs, and is delimited by a '/'. Note that '\' is used for escape by both the shell and ldap, so it may need to be doubled or quadrupled to pass through, and it is not used as a delimiter.

  9. Click Join domain.

  10. If successful, SPS displays the name of the domain it joined.

    NOTE: If you need SPS to leave the domain for some reason, click Leave domain.

Using One Identity Safeguard for Privileged Sessions (SPS) across multiple domains

If your users are in a domain (EXAMPLE-DOMAIN), One Identity Safeguard for Privileged Sessions (SPS) is also in that domain (EXAMPLE-DOMAIN), but your users need to access servers that are in a different domain (OTHER-DOMAIN), you must establish a level of trust between the domains. This is summarized in the following table.

Domain username of the client Domain of the target server Result
EXAMPLE-DOMAIN\myusername EXAMPLE-DOMAIN Connection is established
EXAMPLE-DOMAIN\myusername OTHER-DOMAIN If OTHER-DOMAIN trusts EXAMPLE-DOMAIN, the connection is established
OTHER-DOMAIN\myusername OTHER-DOMAIN If two-way trust is established between OTHER-DOMAIN and EXAMPLE-DOMAIN, the connection is established
OTHER-DOMAIN\myusername EXAMPLE-DOMAIN If two-way trust is established between OTHER-DOMAIN and EXAMPLE-DOMAIN, the connection is established

NOTE: If you use an LDAP database when using SPS accross multiple domains, LDAP will only use the username without the domain name to verify the group membership.

Verifying the certificate of the RDP server in encrypted connections

By default, One Identity Safeguard for Privileged Sessions (SPS) accepts any certificate shown by the server. This section describes how to accept only verified certificates.

To accept only verified certificates

  1. Create a list of trusted CA certificates that you will use to verify the certificate of the server. For details, see Verifying certificates with Certificate Authorities.

  2. Navigate to RDP Control > Connections and select the connection policy to modify.

  3. Select TLS.

  4. Select the required option under Server certificate validation.

    You have the following options:

    • No validation.

    • Only accept certificates authenticated by the trusted CA list.

    NOTE: The Only accept certificates authenticated by the trusted CA list. option has no effect if the session uses Network Level Authentication, because in such cases SPS uses a different method to validate the server certificate.

    If you use Network Level Authentication (NLA, also called CredSSP), there is no verification performed in the TLS layer due to the TLS session-binding. For more information on TLS session-binding, see section [MS-CSSP]: Credential Security Support Provider (CredSSP) Protocol in the Microsoft documentation.

    Figure 220: RDP Control > Connections — Using SSL-encryption in RDP connections

  5. (Optional) If you selected Only accept certificates authenticated by the trusted CA list., in Trusted CA list, select the CA list to use for verifying the certificate of the server.

  6. Click Commit.

  7. (Optional) Configure your Windows servers to display a certificate signed with the above Certificate Authority for incoming RDP connections. To do this, complete the following steps:

    1. Generate a certificate that contains the IP address or the hostname of the target server in its Common Name (CN) field and sign it with the Certificate Authority whose certificate you added to the Trusted CA list of SPS.

    2. Convert the signed certificate of the target server to PKCS12 format that includes the private key.

    3. Start the Microsoft Management Console (MMC) on the target server and select Add Snap-in > Certificates > Computer Account.

    4. Right-click the Personal store, then select All Tasks > Import, and select the certificate created for the server.

    5. Complete the Certificate Import Wizard, but do not select the Extended certificate properties option.

    6. Select Start > Administrative tools > Remote Desktop > Remote Desktop Session Host Configuration.

    7. Right-click the connection you want to configure and select Properties > General.

    8. Set the Security layer to SSL.

    9. Click Certificate > Select and select the imported certificate. The server uses this certificate to verify its identity for the incoming RDP connections.

Enabling TLS-encryption for RDP connections

To enable TLS-encryption in an RDP connection policy, you have two options:

Prerequisites

Depending on your requirements, you might need one or more of the following:

  • To use the same certificate for each session, an X.509 certificate and its private key are required. One Identity Safeguard for Privileged Sessions (SPS) can display this certificate to the peers on the client side. Use your own PKI system to generate these certificates, as they cannot be created on SPS.

    NOTE: The Common Name of the certificate must contain the domain name or the IP address of target machine, otherwise the clients might reject the certificate.

  • To generate certificates on-the-fly for a connection, you need a signing certificate authority. For details on creating a signing CA, see Signing certificates on-the-fly.

TIP: One Identity recommends using 2048-bit RSA keys (or stronger).

To configure TLS-encryption

  1. Navigate to RDP Control > Connections and select the connection policy in which you want to enable TLS.

    Figure 221: RDP Control > Connections — Enabling TLS-encryption for RDP connections

  2. Set the encryption settings used between the client/server and SPS in the Transport security settings section.

    To require encryption, select TLS. When the connection is encrypted, SPS has to show a certificate to the peer.

  3. Select the certificate to show to the peers.

    • If you want to enable TLS-encryption, but you do not have a certificate that is generated by an external CA, or a signing CA, select Generate self-signed certificate. By default, this option is selected.

    • To use the same certificate for every peer, complete the following steps.

      1. Generate and sign a certificate for SPS in your PKI system, and export the certificate and its private key.

      2. Select Use the same certificate for each connection.

      3. Select Private key for host certificate, click and upload the private key.

      4. Select X.509 host certificate, click and upload the certificate.

    • If you want to use your own Signing CA, complete the following steps.

      1. Create a certificate authority that is used to sign the certificates that SPS shows to the peer. For details, see Signing certificates on-the-fly.

      2. Select Generate certificate on-the-fly.

      3. In the Signing CA field, select the certificate authority to use.

      NOTE: Import the certificate of the signing Certificate Authority to your clients. Otherwise, the client applications will display a warning because of the unknown Certificate Authority.

    • To disable TLS-encryption for RDP connections completely, select Legacy RDP Security Layer (also known as: Standard RDP Security). You might want to do this if you were using legacy RDP encryption, and you are experiencing compatibility issues. For example, you might experience a compatibility issue if you attempt to connect to a very old Windows machine (for example, Windows Server 2003 or older).

  4. (Optional) Even if you choose TLS-encryption, you have the option to choose using legacy RDP encryption as well. If you experience compatibility issues (for example, if you attempt to connect to a very old Windows machine, such as Windows Server 2003 or older) and want to allow using legacy RDP encryption if TLS-encryption is not possible, select Allow fallback to legacy RDP Security Layer (also known as: Standard RDP Security).

    Caution: Security Hazard!

    Selecting the Legacy RDP Security Layer or the Allow fallback to legacy RDP Security Layer options can significantly reduce the strength of the encryption used.

    Selecting these options is only recommended if you cannot overcome compatibility issues in any other way.

    To avoid security hazard, we recommend using TLS encryption.

  5. Click Commit.

    Expected result

    The encryption settings are applied to the connection policy.

Related Documents

The document was helpful.

Select Rating

I easily found the information I needed.

Select Rating