
When four-eyes authorization is required for a connection, a user (called authorizer) must authorize the connection on One Identity Safeguard for Privileged Sessions (SPS) as well. This authorization is in addition to any authentication or group membership requirements needed for the user to access the remote server. For details about the concepts of four-eyes authorization, see Four-eyes authorization.
Preface
Introduction
The concepts of One Identity Safeguard for Privileged Sessions (SPS)
The philosophy of One Identity Safeguard for Privileged Sessions (SPS)
Policies
Credential Stores
Plugin framework
Indexing
Supported protocols and client applications
Cloud deployment considerations
The Welcome Wizard and the first login
HTTP
ICA
MSSQL
Remote Desktop Gateway Server Protocol (RDGSP)
Remote Desktop Protocol (RDP)
Secure Shell Protocol (SSH)
Telnet
VMware Horizon View
Virtual Network Computing (VNC)
Modes of operation
Transparent mode
Single-interface transparent mode
Non-transparent mode
Inband destination selection
Connecting to a server through One Identity Safeguard for Privileged Sessions (SPS)
Connecting to a server through One Identity Safeguard for Privileged Sessions (SPS) using SSH
Connecting to a server through One Identity Safeguard for Privileged Sessions (SPS) using RDP
Connecting to a server through One Identity Safeguard for Privileged Sessions (SPS) using an RD Gateway
Archive and backup concepts
Configuration export
System backup
Connection backup
Connection archive
Support bundle
Debug logs
Connection logs
Core dump files
Maximizing the scope of auditing
IPv6 in One Identity Safeguard for Privileged Sessions (SPS)
SSH host keys
Authenticating clients using public-key authentication in SSH
The gateway authentication process
Four-eyes authorization
Network interfaces
High Availability support in One Identity Safeguard for Privileged Sessions (SPS)
Versions and releases of One Identity Safeguard for Privileged Sessions (SPS)
Accessing and configuring One Identity Safeguard for Privileged Sessions (SPS)
The initial connection to One Identity Safeguard for Privileged Sessions (SPS)
Basic settings
Creating an alias IP address (Microsoft Windows)
Creating an alias IP address (Linux)
Modifying the IP address of One Identity Safeguard for Privileged Sessions (SPS)
Configuring One Identity Safeguard for Privileged Sessions (SPS) with the Welcome Wizard
Logging in to One Identity Safeguard for Privileged Sessions (SPS) and configuring the first connection
Supported web browsers
The structure of the web interface
User management and access control
Elements of the main workspace
Multiple users and locking
Preferences
Change password
Audit keystore
Network settings
Routing table
IP forwarding
Naming
HTTPS proxy
Configuring user and administrator login addresses
Managing logical interfaces
Routing uncontrolled traffic between logical interfaces
Configuring the routing table
Configuring date and time
System logging, SNMP and e-mail alerts
Configuring system logging
Configuring e-mail alerts
Configuring SNMP alerts
Querying SPS status information using agents
Customize system logging in One Identity Safeguard for Privileged Sessions (SPS)
Configuring system monitoring on SPS
Configuring monitoring
Health monitoring
Preventing disk space fill-up
System related traps
Traffic related traps
Data and configuration backups
Creating a backup policy using Rsync over SSH
Creating a backup policy using SMB/CIFS
Creating a backup policy using NFS
Creating configuration backups
Creating data backups
Encrypting configuration backups with GPG
Archiving
Creating an archive policy using SMB/CIFS
Creating an archive policy using NFS
Archiving the collected data
Cleaning up audit data
Using plugins
Forwarding data to third-party systems
Starling integration
Login settings
Managing One Identity Safeguard for Privileged Sessions (SPS) users locally
Managing One Identity Safeguard for Privileged Sessions (SPS)
Creating local users in One Identity Safeguard for Privileged Sessions (SPS)
Deleting local users from One Identity Safeguard for Privileged Sessions (SPS)
Setting password policies for local users
Managing local user groups
Managing One Identity Safeguard for Privileged Sessions (SPS) users from an LDAP database
Authenticating users to a RADIUS server
Authenticating users with X.509 certificates
Authenticating users with SAML2
Managing user rights and usergroups
Assigning privileges to user groups for the One Identity Safeguard for Privileged Sessions (SPS) web interface
Modifying group privileges
Finding specific usergroups
Using usergroups
Built-in usergroups of One Identity Safeguard for Privileged Sessions (SPS)
Creating rules for restricting access to search audit data
Displaying the privileges of users and user groups
Listing and searching configuration changes
Controlling One Identity Safeguard for Privileged Sessions (SPS): reboot, shutdown
Managing One Identity Safeguard for Privileged Sessions (SPS) clusters
General connection settings
Cluster roles
Enabling cluster management
Creating a cluster
Joining to a cluster
Assigning roles to nodes in your cluster
Configuration synchronization across nodes in a cluster
Monitoring the status of nodes in your cluster
Updating the IP address of a node in a cluster
Managing a cluster with configuration synchronization without central search
Managing a cluster with central search configuration and configuration synchronization
Managing a High Availability One Identity Safeguard for Privileged Sessions (SPS) cluster
HA cluster configuration and management options
Adjusting the synchronization speed
Redundant heartbeat interfaces
Next-hop router monitoring
Upgrading One Identity Safeguard for Privileged Sessions (SPS)
Upgrade checklist
Upgrading One Identity Safeguard for Privileged Sessions (SPS) (single node)
Upgrading a High Availability One Identity Safeguard for Privileged Sessions (SPS) cluster
Troubleshooting
Exporting the configuration of One Identity Safeguard for Privileged Sessions (SPS)
Importing the configuration of One Identity Safeguard for Privileged Sessions (SPS)
Managing the One Identity Safeguard for Privileged Sessions (SPS) license
Accessing the One Identity Safeguard for Privileged Sessions (SPS) console
Using the console menu of One Identity Safeguard for Privileged Sessions (SPS)
Enabling SSH access to the One Identity Safeguard for Privileged Sessions (SPS) host
Changing the root password of One Identity Safeguard for Privileged Sessions (SPS)
Firmware update using SSH
Exporting and importing the configuration of One Identity Safeguard for Privileged Sessions (SPS) using the console
Data migration from an SPS instance to another SPS instance
Sealed mode
Out-of-band management of One Identity Safeguard for Privileged Sessions (SPS)
Managing the certificates used on One Identity Safeguard for Privileged Sessions (SPS)
Generating certificates for One Identity Safeguard for Privileged Sessions (SPS)
Uploading external certificates to One Identity Safeguard for Privileged Sessions (SPS)
Generating TSA certificate with Windows Certificate Authority on Windows Server 2008
Generating TSA certificate with Windows Certificate Authority on Windows Server 2012
Configuring connections
Modifying the destination address
Configuring inband destination selection
Modifying the source address
Creating and editing channel policies
Real-time content monitoring with Content Policies
Configuring time policies
Creating and editing user lists
Authenticating users to an LDAP server
Audit policies
HTTP-specific settings
Encrypting audit trails
Timestamping audit trails with built-in timestamping service
Timestamping audit trails with external timestamping service
Digitally signing audit trails
Verifying certificates with Certificate Authorities
Verifying certificates with Certificate Authorities using trust stores
Signing certificates on-the-fly
Creating a Local User Database
Sharing SPS functions with SPP
Supported HTTP channel types
Limitations in handling HTTP connections
Authentication in HTTP and HTTPS
Creating a new HTTP authentication policy
Setting up HTTP connections
ICA-specific settings
Setting up a transparent HTTP connection
Enabling One Identity Safeguard for Privileged Sessions (SPS) to act as an HTTP proxy
Enabling TLS encryption in HTTP
Configuring half-sided SSL encryption in HTTP
Session-handling in HTTP
Creating and editing protocol-level HTTP settings
Customizing HTTP error templates
Setting up ICA connections
Supported ICA channel types
Creating and editing protocol-level ICA settings
One Identity Safeguard for Privileged Sessions (SPS) deployment scenarios in a Citrix environment
Troubleshooting Citrix-related problems
MSSQL-specific settings
Setting up MSSQL connections
Supported MSSQL channel types
Authentication in MSSQL
Creating and editing protocol-level MSSQL settings
Enabling TLS-encryption for MSSQL connections
RDP-specific settings
Supported RDP channel types
Creating and editing protocol-level RDP settings
Network Level Authentication (NLA) with One Identity Safeguard for Privileged Sessions (SPS)
SSH-specific settings
Network Level Authentication (NLA) with domain membership
Using One Identity Safeguard for Privileged Sessions (SPS) across multiple domains
Verifying the certificate of the RDP server in encrypted connections
Enabling TLS-encryption for RDP connections
Using One Identity Safeguard for Privileged Sessions (SPS) as a Remote Desktop Gateway
Configuring Remote Desktop clients for gateway authentication
Inband destination selection in RDP connections
Usernames in RDP connections
Saving login credentials for RDP on Windows
Configuring RemoteApps
Configuring the RemoteApp Launcher
Configuring SPS to enable exporting files from audit trails after RDP file transfer through clipboard or disk redirection
Configuring SPS to enable exporting sound from audit trails
Sharing RDP connection policies with SPP
Sharing RDP connection policies with SPS
Using credential injection in SPP-initiated RDP sessions
Setting the SSH host keys of the connection
Using Sudo with SPS
Telnet-specific settings
Setting the SSH host keys accepted on the server side
Setting the SSH host keys offered to the clients
Supported SSH channel types
Sharing SSH connection policies with SPP
Sharing SSH connection policies with SPS
Authentication Policies
Creating a new authentication policy
Client-side authentication settings
Relayed authentication methods
Configuring your Kerberos environment
Kerberos authentication settings
Server host keys
Automatically adding the host keys of a server to One Identity Safeguard for Privileged Sessions (SPS)
Manually adding the host key of a server
Creating and editing protocol-level SSH settings
Supported encryption algorithms
Enabling TLS-encryption for Telnet connections
Creating a new Telnet authentication policy
Extracting username from Telnet connections
Creating and editing protocol-level Telnet settings
Inband destination selection in Telnet connections
VMware Horizon View connections
VNC-specific settings
Indexing audit trails
Reindex lucene indeces
Configuring the internal indexer
Configuring external indexers
Using the Search interface
Prerequisites and limitations
Hardware requirements for the external indexer host
Configuring One Identity Safeguard for Privileged Sessions (SPS) to use external indexers
Installing the external indexer
Configuring the external indexer
Configuring a service pool
Uploading decryption keys to the external indexer
Configuring a hardware security module (HSM) or smart card to integrate with external indexer
Monitoring the status of the indexer services
HTTP indexer configuration format
Setting up and testing the environment
Encrypting a PKCS#11 PIN
Starting and restarting the external-indexer service when using a custom password for PKCS#11 PIN encryption
Configuring SoftHSM
Configuring AWS CloudHSM
Configuring a smart card
Customizing the indexing of HTTP traffic
Starting the external indexer
Disabling indexing on One Identity Safeguard for Privileged Sessions (SPS)
Managing the indexers
Upgrading the external indexer
Troubleshooting external indexers
Card view
Table view
Flow view
Search Permissions
Specifying time ranges
Using search queries
Searching in the contents of audit trails
Audit trail downloads information on the Search interface
Displaying statistics on search results
Analyzing data using One Identity Safeguard for Privileged Analytics
The search and filter process
Viewing session details
Advanced authentication and authorization techniques
Viewing session details for data recorded by SPS
Viewing session details for data recorded by SPP
Visualizing Frequent Item Sets on the FIS flow view
Replaying audit trails in your browser
Using the browser to play video files
Viewing encrypted screenshots
Replaying encrypted audit trails in your browser
Following active sessions
Creating report subchapters
Creating search-based report subchapters from search results
Creating search-based report subchapters from scratch
Search interface changes between version 5.0 and 6.0
Searching session data on a central node in a cluster
Configuring usermapping policies
Configuring gateway authentication
Reports
Configuring out-of-band gateway authentication
Performing out-of-band gateway authentication on One Identity Safeguard for Privileged Sessions (SPS)
Performing inband gateway authentication in SSH and Telnet connections
Performing inband gateway authentication in RDP connections
Troubleshooting gateway authentication
Configuring four-eyes authorization
Configuring four-eyes authorization
Performing four-eyes authorization on One Identity Safeguard for Privileged Sessions (SPS)
Using credential stores for server-side authentication
Configuring local Credential Stores
Performing gateway authentication to RDP servers using local Credential Store and NLA
Configuring password-protected Credential Stores
Unlocking Credential Stores
Using a custom Credential Store plugin to authenticate on the target hosts
Integrating external authentication and authorization systems
How Authentication and Authorization plugins work
Using a custom Authentication and Authorization plugin to authenticate on the target hosts
Performing authentication with AA plugin in terminal connections
Performing authentication with AA plugin in Remote Desktop connections
Integrating ticketing systems
Creating a custom plugin
Plugin troubleshooting
Contents of the operational reports
Configuring custom reports
Creating report subchapters
The One Identity Safeguard for Privileged Sessions (SPS) REST API
One Identity Safeguard for Privileged Sessions (SPS) scenarios
Creating reports from audit trail content
Creating search-based report subchapters from search results
Creating search-based report subchapters from scratch
Creating PCI DSS reports
Contents of PCI DSS reports
Report output
Configuring public-key authentication on One Identity Safeguard for Privileged Sessions (SPS)
Troubleshooting One Identity Safeguard for Privileged Sessions (SPS)
Configuring public-key authentication using local keys
Configuring public-key authentication using an LDAP server and a fixed key
Configuring public-key authentication using an LDAP server and generated keys
Organizing connections in non-transparent mode
Using inband destination selection in SSH connections
Using inband destination selection with PuTTY
Using inband destination selection with OpenSSH
Using inband selection and nonstandard ports with PuTTY
Using inband selection and nonstandard ports with OpenSSH
Using inband destination selection and gateway authentication with PuTTY
Using inband destination selection and gateway authentication with OpenSSH
SSH usermapping and keymapping in AD with public key
Network troubleshooting
Gathering data about system problems
Viewing logs on One Identity Safeguard for Privileged Sessions (SPS)
Changing log verbosity level of One Identity Safeguard for Privileged Sessions (SPS)
Collecting logs and system information for error reporting
Collecting logs and system information of the boot process for error reporting
Support hotfixes
Status history and statistics
Using SPS with SPP
Connection statistics
Memory
Disk
CPU
Network connections
Interface
Load average
Number of processes
Displaying custom connection statistics
Troubleshooting a One Identity Safeguard for Privileged Sessions (SPS) cluster
Understanding One Identity Safeguard for Privileged Sessions (SPS) cluster statuses
Recovering One Identity Safeguard for Privileged Sessions (SPS) if both nodes broke down
Recovering from a split brain situation
Replacing a HA node in a One Identity Safeguard for Privileged Sessions (SPS) cluster
Resolving an IP conflict between cluster nodes
Understanding One Identity Safeguard for Privileged Sessions (SPS) RAID status
Restoring One Identity Safeguard for Privileged Sessions (SPS) configuration and data
Restoring One Identity Safeguard for Privileged Sessions (SPS) configuration
Restoring One Identity Safeguard for Privileged Sessions (SPS) configuration and data to a new SPS appliance
Restoring One Identity Safeguard for Privileged Sessions (SPS) configuration and data to the same SPS appliance
VNC is not working with TLS
Configuring the IPMI from the BIOS after losing IPMI password
Incomplete TSA response received
Using UPN usernames in audited SSH connections
Configuring the Passwords-initiated workflow
Configuring the Sessions-initiated workflow
Configuring external devices
Configuring SPP for Sessions-initiated workflow
Configuring SPS for Sessions-initiated workflow
Configuring SPS for SRA-initiated workflow
Linking SPS to SPP
Troubleshooting the SPS to SPP link
Configuring advanced routing on Linux
Configuring advanced routing on Cisco routers
Configuring advanced routing on Sophos UTM (formerly Astaro Security Gateway) firewalls
Using SCP with agent-forwarding
Security checklist for configuring One Identity Safeguard for Privileged Sessions (SPS)
Jumplists for in-product help
Basic Settings > Management
Basic Settings > Local Services
Basic Settings > System
<Protocol name> Control > Global Options
Configuring SPS to use an LDAP backend
Glossary
Configuring four-eyes authorization
Configuring four-eyes authorization
Advanced authentication and authorization techniques > Configuring four-eyes authorization > Configuring four-eyes authorization
The following describes how to configure four-eyes authorization.
To require four-eyes authorization for a connection
-
Navigate to the Connections page of the traffic (for example to SSH Control > Connections), and select the connection policy to modify.
-
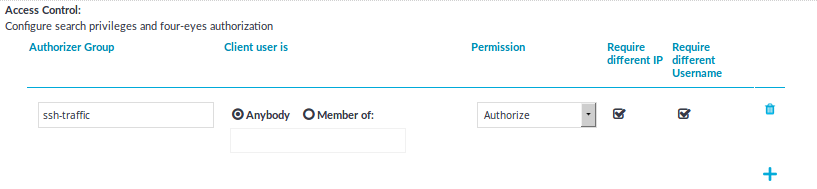
Figure 330: <Protocol name> Control > Connections > Access Control — Configuring four-eyes authorization
Navigate to Access Control and click
.
-
Enter the name of the usergroup whose members are permitted to authorize the sessions of the connection policy into the Authorizer Group field. This group must exist on the Users & Access Control > Local User Groups page. For details on creating and managing usergroups, see Managing user rights and usergroups.
Caution: Usernames, the names of user lists, and the names of usergroups are case sensitive.
-
By default, the authorizer can authorize any session of the connection policy.
If the authorizer is permitted to authorize only the sessions of a certain usergroup, select Client user is > Member of, and enter the name of the userlist whose sessions the authorizer can authorize. If you use four-eyes authorization without gateway authentication, you can specify an LDAP group instead of a userlist.
Caution: Usernames, the names of user lists, and the names of usergroups are case sensitive.
Caution: When using both gateway authentication and four-eyes authorization in a Connection Policy, specify the usergroup of the gateway username. The specified group must be a local or LDAP group.
-
Set the permissions of the usergroup set in the Authorizer Group field.
-
If the Authorizer group can authorize (that is, enable) and audit (that is, monitor in real-time and download the audit trails) the sessions, select Permission > Follow&Authorize.
-
If the Authorizer group can only authorize (that is, enable) the sessions, select Permission > Authorize.
NOTE: This option is not valid for HTTP connections.
-
If the Authorizer group can only audit (that is, monitor in real-time and download the audit trails) the sessions, select Permission > Follow.
NOTE: If the Client user is > Member of field is set, the auditor can only monitor the sessions of the specified usergroup. However, if Client user is > Member of field is set, the Auditor cannot access the Search page. To avoid this problem, add another Access Control rule for the Authorizer Group without setting the Client user isfield.
The admin user of One Identity Safeguard for Privileged Sessions (SPS) can audit and authorize every connection.
-
-
To ensure that the client and the authorizer use different IP addresses and thus prevent self-authorization, enable Require different IP. If this is enabled, and the client and the authorizer do not have different IP addresses, it disables all actions for the connection and the four-eyes authorization, until they have different IP addresses.
-
To ensure that the client and the authorizer use different usernames and thus prevent self-authorization, enable Require different Username. If this is enabled, and the client and the authorizer do not have different usernames, it disables all actions for the connection and the four-eyes authorization, until they have different usernames.
-
Repeat steps 2-6 to add other authorizers or usergroups if needed.
-
Click
.
-
Navigate to the Channel Policies page of the traffic (for example, to SSH Control > Channel Policies), and select the channel policy used in the connection.
Figure 331: <Protocol name> Control > Channel Policies — Configuring four-eyes authorization in the channel policy
-
Enable the Four-eyes option for the channels which should be accessed only using four-eyes authorization.
NOTE: If a connection uses secondary channels that require four-eyes authorization — for example, a Remote Desktop connection allows a Drawing channel but requires four-eyes authorization for a Disk redirection channel — the connection is locked until the authorizer accepts the channel on the Four-Eyes page of SPS, or the four-eyes request times out. During this time, the client application can become nonresponsive, for example, display the graphical desktop but not react to mouse clicks.
-
Click


-
(Optional) If you want to provide a limited SPS web interface to your users that can be used only for gateway authentication and 4-eyes authorization, set up a dedicated user-only web login address. For details, see Configuring user and administrator login addresses.
Performing four-eyes authorization on One Identity Safeguard for Privileged Sessions (SPS)
Advanced authentication and authorization techniques > Configuring four-eyes authorization > Performing four-eyes authorization on One Identity Safeguard for Privileged Sessions (SPS)
The following describes how to perform four-eyes authorization on One Identity Safeguard for Privileged Sessions (SPS).
To perform four-eyes authorization on SPS
-
When a user initiates a connection from a client and four-eyes authorization is required for the connection, SPS will pause the connection.
NOTE: Four-eyes authorization can be set separately for every channel. However, if a client of an existing connection opens a new channel that requires four-eyes authorization, every channel is paused until the authorization is completed.
-
Login to SPS, and select Four-Eyes from the main menu. The list of connections waiting for authorization will be displayed.
Figure 332: Four-Eyes — Performing four-eyes authorization
NOTE: Only those connections will be listed, where your usergroup has the Authorize or the Follow&Authorize permissions. No other SPS privilege is required to access this page.
-
Select the connection and click Accept to enable the connection, Reject to deny the connection, or Accept&Follow to enable it and monitor in real-time.
NOTE: Following a session requires the following:
-
The Record audit trail option must be enabled for the specific channel in the Channel policy of the connection.
-
The Audit Player application must be installed on the computer of the auditor.
-
If the Audit policy of the connection uses encryption, the appropriate decryption keys must be available on the computer of the auditor.
The Safeguard Desktop Player application replays the live streams in live mode. For details on how to monitor a connection in real-time using the Safeguard Desktop Player, see "Replaying audit files in follow mode" in the Safeguard Desktop Player User Guide.
-
-
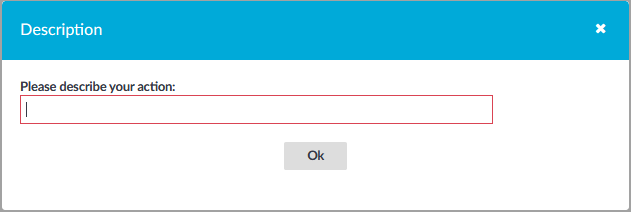
Enter a note why the connection was accepted/rejected into the appearing dialog box. This description will be stored in the connection database together with other metadata about the connection.
Figure 333: Describing why a connection was accepted/rejected
-
If you have to terminate an ongoing connection for some reason, select Active Connections from the main menu. The list of ongoing connections will be displayed.
Figure 334: Active Connections — Displaying active connections
-
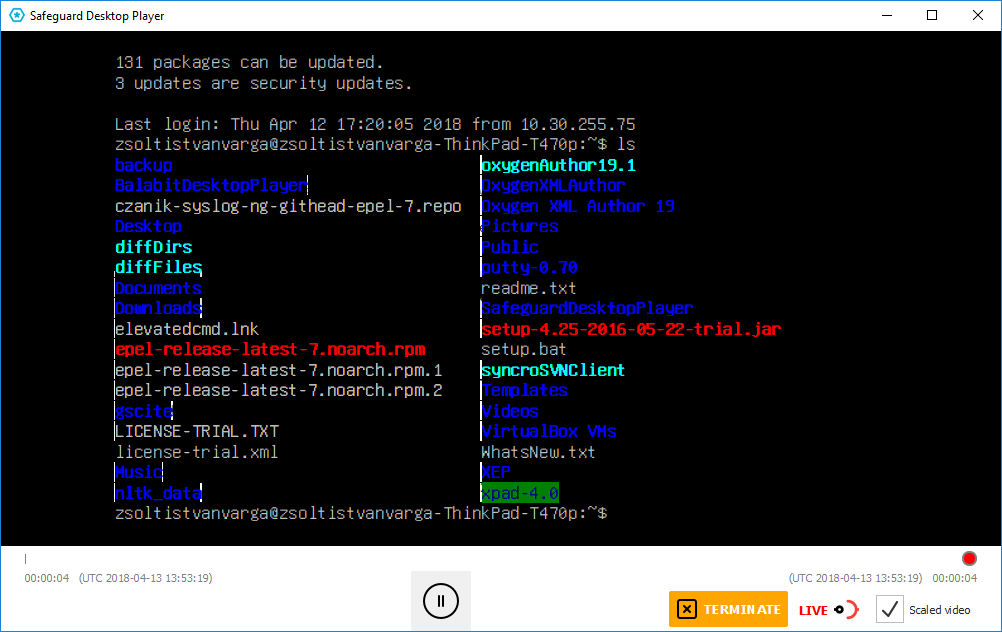
Select the connection to stop, and click Terminate.
NOTE: When following a connection in the Safeguard Desktop Player application, the auditor can also terminate the connection from the Audit Player by clicking Terminate.
Figure 335: Terminating a connection in Safeguard Desktop Player


Using credential stores for server-side authentication
Advanced authentication and authorization techniques > Using credential stores for server-side authentication
Credential Stores offer a way to store user credentials (for example, passwords, private keys, certificates) and use them to log in to the target server, without the user having access to the credentials. That way, the users only have to perform gateway authentication on SPS with their usual password (or to an LDAP database), and if the user is allowed to access the target server, SPS automatically logs in using the Credential Store.
For more information on gateway authentication, see Configuring gateway authentication.
NOTE: Keyboard-interactive authentication is not supported when using credential stores.
Figure 336: Authenticating using Credential Stores
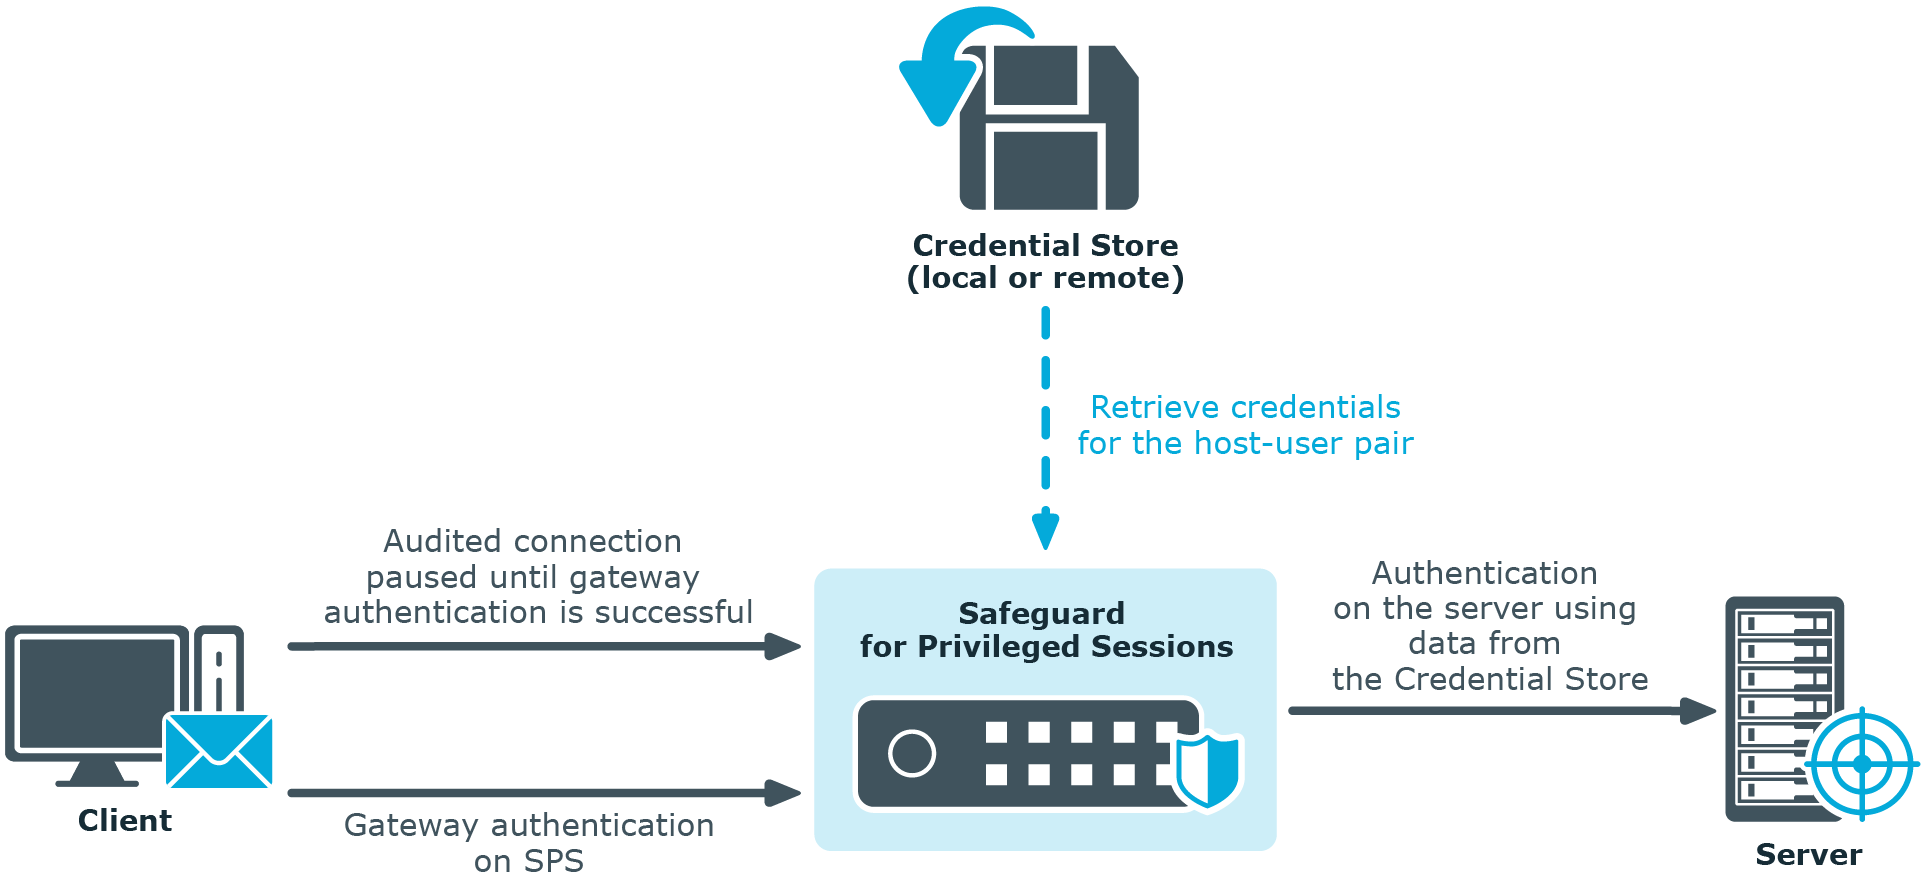
Credential Stores can be stored locally on SPS, or on a remote device. For remote Credential Stores, SPS integrates with external authentication and authorization systems using plugins.
-
To configure a local Credential Store, see Configuring local Credential Stores.
-
To configure a local, password-protected Credential Store, see Configuring password-protected Credential Stores.
-
To unlock a local, password-protected Credential Store, see Unlocking Credential Stores.
-
To configure a custom Credential Store plugin, see Using a custom Credential Store plugin to authenticate on the target hosts.
NOTE: After performing a successful gateway authentication, if the credential store does not contain a password for the user, the user is prompted for the server-side password as a fallback.
In case of authenticating to RDP servers using Network Level Authentication (NLA), the server-side password is prompted at the start of the connection. If there is no password in the credential store for the user and the server-side password is incorrect, the connection is terminated.