User Interfaces
You can use Access Template from the User Interfaces container to delegate the control to users in the User Interfaces container under Server Configuration, to log in to the Active Roles MMC interface.
To examine an Access Template in detail
- Right-click the Access Template and click Properties.
The Permissions tab in the Properties dialog box lists all permissions entries defined in the Access Template, and allows you to inspect each entry.
- Select an entry and click the View button.
|

|
NOTE: Active Roles does not allow predefined Access Templates to be modified or deleted. If you need to make changes to a predefined Access Template, you should create a copy of the Access Template and then modify the copy as needed. To create a copy, right-click the Access Template and click Copy. |
To apply an Access Template by using the Delegation of Control wizard, right-click the Access Template, click Links, and then, in the Links window, click Add to start the wizard.
For more information, see Applying Access Templates later in this chapter.
User Self-management
You can use Access Templates from the User Self-management container to delegate self-management tasks to end-users (for instance, giving end-users the right to make changes to their own accounts by using the Active Roles Web Interface for self-administration).
You can examine an Access Template in detail by viewing the Properties dialog box: right-click the Access Template and click Properties. The Permissions tab in the Properties dialog box lists all permissions entries defined in the Access Template, and allows you to inspect each entry: select an entry and click the View button.
|

|
NOTE: Active Roles does not allow predefined Access Templates to be modified or deleted. If you need to make changes to a predefined Access Template, you should create a copy of the Access Template and then modify the copy as needed. To create a copy, right-click the Access Template and click Copy. |
You can apply an Access Template by using the Delegation of Control wizard: right-click the Access Template, click Links, and then, in the Links window, click Add to start the wizard. For more information, see Applying Access Templates later in this chapter.
Creating an Access Template
The Active Roles console provides the New Object - Access Template wizard for creating Access Templates. You can start the wizard as follows: right-click Access Templates in the console tree, and select New | Access Template. In this case, the wizard adds an Access Template to the Access Templates container.
|

|
NOTE: It is advisable to store custom Access Templates in a separate container. You can create a container as follows: right-click Access Templates in the console tree, and select New | Access Template Container. After you have created a container, you can have the wizard add an Access Template to that container rather than directly to Access Templates: right-click the container in the console tree and select New | Access Template. |
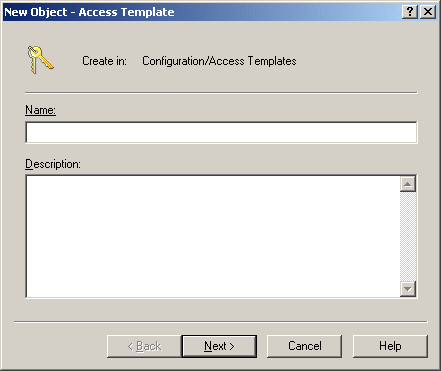
The first page of the wizard looks as shown in the following figure.
Figure 12: Add new Access template

On this page, type a name and description for the new Access Template. The Active Roles console will display the name and description in the list of Access Templates in the details pane.
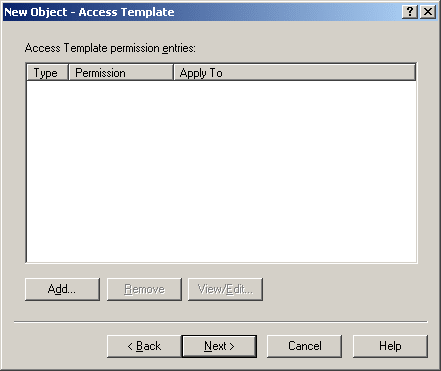
Click Next. The second page of the wizard looks as shown in the following figure.
Figure 13: Access template permission enteries

This page prompts you to configure a list of Access Template permission entries. You can use the Add, Remove and View/Edit buttons to add, remove and modify an entry, respectively. Clicking Add starts the Add Permission Entries wizard that helps you configure permission entries. The wizard is discussed later in this section.
After you have completed the list of permission entries, click Next, and then click Finish. The new Access Template is created.
Add Permission Entries wizard
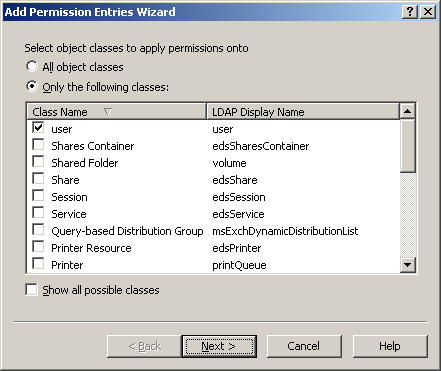
The Add Permission Entries wizard lets you specify the permission to be added into the Access Template. The first page of the wizard looks as shown in the following figure.
Figure 14: Add Permission Entries

On this page, you select the types of objects to which you want the permission to allow (or deny) access. You can select one of these options:
- All object classes With this option, the permission controls access to objects of any type.
- Only the following classes With this option, the permission controls access to objects of the type you choose by selecting the appropriate check boxes in the list.
|

|
NOTE: By default, all object classes are not displayed in the list. To display all object classes, select the Show all possible classes check box. |
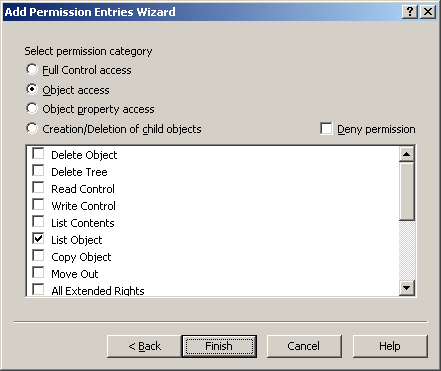
After you have selected the object classes you want, click Next. The next page of the wizard looks as shown in the following figure.
Figure 15: Permission category

On this page, you select a permission category, and specify whether you want the permission to allow or deny certain administrative actions.
You can select one of the following permission categories:
- Full Control access Allows or denies all administrative actions on an object
- Object access Controls how an object is accessed and controlled.
- Object property access Controls access to an object’s attributes.
- Creation/Deletion of child objects Allows or denies creation or deletion of objects in a container.
If you want the permission to deny certain administrative actions, you select the Deny permission check box.
The following sections elaborate on the permission categories you can select in the Add Permission Entries wizard.


