
Organizing connections based on alias IP addresses
To allow the administrators to access protected servers by connecting to an alias IP address of One Identity Safeguard for Privileged Sessions (SPS). The alias IP address determines which server they will access. Organizing connections based on alias IP addresses is advantageous if SPS is connected to a private network and many private IP addresses are available.
|
|
NOTE:
Do not use the listening addresses configured for web login. For more details, see Configuring user and administrator login addresses. |

To organize connections based on alias IP addresses
-
Navigate to Basic Settings > Network.
-
Set up a logical interface: click
and configure a new logical interface. Add alias IP addresses for every protected server. (Use a different IP address for each.)
For more information on configuring logical interfaces and alias IP addresses, see Managing logical interfaces.
-
Navigate to SSH Control > Connections.
-
Add a new connection. Enter the IP address of the administrators into the From fields, and the IP address and port number of the target server into the Target field.
-
Enter an alias IP address of the configured logical interface of SPS into the To field.
-
Repeat Steps 4-5 for every protected server, but every time use a different alias IP address in Step 5.
-
Click
.
Using inband destination selection in SSH connections
The following sections provide examples for using inband destination selection to establish an SSH connection, including scenarios where nonstandard ports or gateway authentication is used.
Since some client applications do not permit the @ and : characters in the username, alternative characters can be used as well:
-
To separate the username and the target server, use the @ or % characters, for example: username%targetserver@scb_address
-
To separate the target server and the port number, use the :, +, or / characters, for example: username%targetserver+port@scb_address
For detailed instructions on configuring inband authentication, see Configuring inband destination selection.
Using inband destination selection with PuTTY
Using inband destination selection with OpenSSH
Using inband selection and nonstandard ports with PuTTY
Using inband selection and nonstandard ports with OpenSSH
Using inband destination selection and gateway authentication with PuTTY
Using inband destination selection and gateway authentication with OpenSSH
Using inband destination selection with PuTTY
To establish an SSH connection through One Identity Safeguard for Privileged Sessions (SPS) with PuTTY, follow one of the methods:
Common method
To establish the SSH-connection using the most common method, enter the username, the target server's hostname (or IP address), and the hostname (or IP address) of SPS using the <username>@<server>@<scb> format in PuTTY.
Example
Assuming the following values:
-
The username is training1
-
The target server is linux.training.example
-
The SPS server is scb
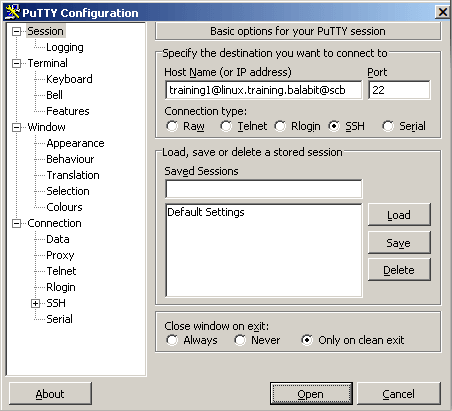
You can enter the following destination in PuTTY:
training1@linux.training.example@scb
Figure 270: Configuring SSH inband destination in PuTTY
Alternative method
To establish the SSH-connection using a different method,
-
Enter only the hostname (or IP address, depending on your configuration) of SPS in PuTTY.
-
At the login prompt, provide the username on the target server, and the target server's hostname (or IP address) using the <username>@<server> format.
Using inband destination selection with OpenSSH
To establish an SSH connection through One Identity Safeguard for Privileged Sessions (SPS), follow these steps:
-
Enter the following command:
# ssh <username>@<server>@<scb>
...where <username> is the username, <server> is the target server's hostname (or IP address), and <scb> is the hostname (or IP address) of SPS
Example
Assuming the following values:
-
The username is training1
-
The target server is linux.training.example
-
The SPS server is scb
You can enter the following command:
# ssh training1@linux.training.example@scb
-
-
Alternative approach:
-
Enter only the hostname (or IP address, depending on your configuration) of SPS:
# ssh <scb>
-
At the login prompt, provide the username on the target server, and the target server's hostname (or IP address) using the <username>@<server> format
-