The Active Roles Console allows you to set a text label that helps you identify your Active Roles installation in the Managed Object Statistics report—a report that lists the managed object counts (see Viewing product usage statistics). You can use the installation label to distinguish between production and non-production or pilot installations. The label text is displayed in the title of the Managed Object Statistics report.
To set or change the installation label
-
Log on as Active Roles Admin, and open the Active Roles Console.
Only members of the Active Roles Admin account are authorized to set or change the installation label.
-
In the Console tree, select the Active Roles root node.
-
On the page in the details pane, expand the Product Usage Statistics section, and then click the Change link next to the Installation label field.
The Console does not display the Change link unless you are logged on as Active Roles Admin.
-
In the Installation Label dialog that appears, type the label text you want, and then click OK.
Active Roles provides the facility to define custom (virtual) attributes for any existing object type. This allows additional object properties to be specified without extending the Active Directory schema. For example, custom attributes can be used to store specific user data.
You can configure a virtual attribute to store the attribute value in the Active Roles database. Otherwise, to use the virtual attribute, you need to implement a script policy to handle the attribute value.
To create a virtual attribute
-
In the Console tree, expand Configuration > Server Configuration.
-
Under Server Configuration, right-click Virtual Attributes and select New > Virtual Attribute.
-
Follow the instructions in the Add Virtual Attribute Wizard.
-
In the Common-Name and the LDAP Display Name boxes, type a common name and an LDAP display name for the new attribute.
In the Unique X.500 object ID box, you can optionally change the default value of the attributeID property (OID) for the new attribute. The default value is generated automatically. If you want to generate your own value, you can use the Oidgen (oidgen.exe) tool, included with the Windows Server Resource Kit.
In the Schema ID GUID box you can optionally change the default value of the schemaIDGUID property. The default value is generated automatically. If you want the new attribute to have the fixed schemaIDGUID property, replace the default value with your own value. For example, you can generate GUID with the Uuidgen tool, included with the Microsoft Platform SDK.
-
Optionally, in the Description box, type a description for the new virtual attribute. Click Next.
-
In the Syntax list, click the syntax you want for the new virtual attribute. If you want the new attribute to be multi-valued, select the Multi-valued check box. Click Next.
-
Select the check boxes next to the object classes with which you want the virtual attribute to be associated. Click Next.
If you need the new attribute to be associated with object classes that are not listed by default, select the Show all possible classes check box.
-
If you want to store the values of the attribute in the Active Roles database, select the check box on the Attribute Storage page.
If you choose not to store the attribute values in the database, a script policy is required to supply the attribute value when retrieving the attribute and to save the attribute value when updating the attribute.
Storing attribute values in the Active Roles configuration database may considerably increase the database size.
This option can be modified after the attribute is created, by managing properties of the virtual attribute.
-
Click Next, and then click Finish to complete the wizard.
After the new virtual attribute has been added, reconnect to the Administration Service. The new virtual attribute appears in the Virtual Attributes container under Configuration/Server Configuration.
To view or modify the value of a virtual attribute on an object
-
Right-click the object, and select All Tasks > Advanced Properties.
-
Select the Show all possible attributes and the Include attributes with empty values check boxes, for the list in the Advanced Properties dialog to display all attributes of the object.
-
Click the attribute in the list, and then click the button beneath the list.
-
In the dialog that opens, view or modify the value of the attribute.
This scenario illustrates how to create and use a virtual attribute to store information on the birthdays of users.
To create the Birthday attribute
-
In the Console tree, expand Configuration > Server Configuration.
-
Under Server Configuration, right-click Virtual Attributes, and select New > Virtual Attribute.
-
Click Next.
-
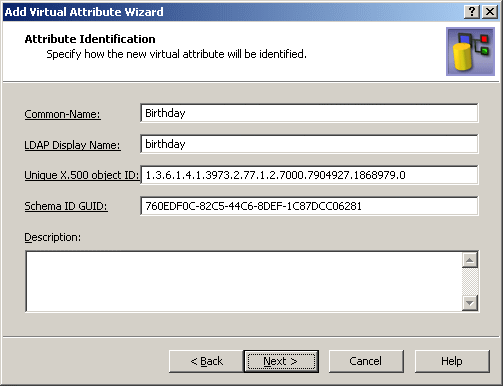
In the Common-Name and LDAP Display Name boxes, type Birthday, as shown in the following figure.
Figure 262: Attribute identification
-
Click Next.
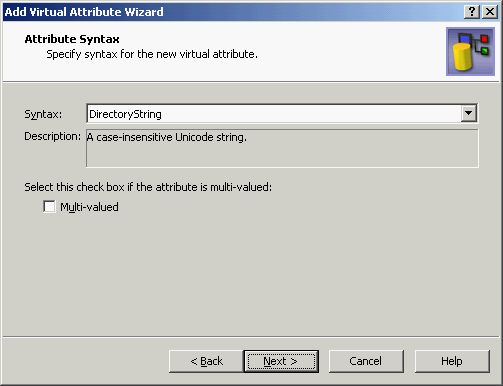
The Attribute Syntax page should look as shown in the following figure.
Figure 263: Attribute syntax
-
Click Next.
-
On the Object Classes page, select the check box next to User, as shown in the following figure.
Figure 264: Object classes

-
Click Next.
-
On the Attribute Storage window, select the Store values of this virtual attribute in the Active Roles Administration Database check box.
-
Click Next, then click Finish to complete the wizard.
To enable the new attribute, reconnect to the Administration Service: right-click the console tree root and click Reconnect.
In the Active Roles Console, you can manage the Birthday attribute on a user account as follows:
-
Right-click the user account and select All Tasks > Advanced Properties.
-
In the Advanced Properties dialog, select both the Show all possible attributes and Include attributes with empty values check boxes.
-
Click Birthday in the list of properties, then click Edit.
-
In the Value box, type a birthday date.
-
Click OK.
You can also manage the Birthday attribute via the Active Roles Web Interface.
First, you need to add the Birthday field to a form that displays user properties, and associate that field with the Birthday attribute. You can accomplish this by customizing the form. For instructions on how to add a field to a form, refer to the Active Roles Web Interface Administration Guide.
Then, the Birthday attribute can be managed by accessing user properties in a Web Interface site. For example, users can view and modify this attribute via Site for Self-Administration, provided that you have self-administration implemented. For more information, see Scenario 2: Implementing Self-Administration.
The Active Roles Console displays comprehensive information about client sessions. With the console connected to a given Administration Service, you can examine which clients are using that Service. Session information provided by the console includes the following:
-
User: Logon name of the account used by the session to connect to the Administration Service.
-
Active Roles Admin: Whether or not the client is logged on as a member of the Active Roles Admin group, and thus has administrator rights on the Administration Service.
-
Client Version: Client application, such as Active Roles Console or Web Interface, and its version.
-
Last Access Time: Date and time that the Administration Service was last accessed within this session.
-
Logon Time: Date and time that the session was opened.
-
Client Host: DNS name of the computer running the client application.
-
Client Site: Network site of the computer running the client application.
To display a list of client sessions on the Administration Service
-
Connect to the Administration Service you want to examine for the client sessions.
-
In the Console tree, expand Configuration > Server Configuration, and select Client Sessions.
As a result, the details pane lists the client sessions for the Administration Service to which the Console is connected.
By using the shortcut menu on a client session, you can also perform the following tasks:
-
Send email to the session user.
-
Disconnect the session from the Administration Service.
-
View additional information about the session.
For example, to view additional information about a session, right-click the session in the details pane and click Properties.
The Properties dialog for a client session includes the following tabs:
-
General: Information about the session user, client version, client host, and client site.
-
Client Activity: Information about logon time, last access time, and the number of operations performed within the session, grouped by operation type.
-
Member Of: List of all security groups computed due to a transitive group membership expansion operation on the session user at the moment of session start.
-
Domain Controllers: Information about the domain controllers used to retrieve and update directory data within the session.
