立即与支持人员聊天
与支持团队交流

Active Roles 8.1.1 - Administration Guide

Introduction Getting started Rule-based administrative views Role-based administration
Access Templates as administrative roles Access Template management tasks Examples of use Deployment considerations Windows claims-based access rules
Rule-based autoprovisioning and deprovisioning
Provisioning Policy Objects Deprovisioning Policy Objects How Policy Objects work Policy Object management tasks Policy configuration tasks
Property Generation and Validation User Logon Name Generation Group Membership AutoProvisioning Exchange Mailbox AutoProvisioning AutoProvisioning in SaaS products OneDrive Provisioning Home Folder AutoProvisioning Script Execution Microsoft 365 and Azure Tenant Selection E-mail Alias Generation User Account Deprovisioning Office 365 Licenses Retention Group Membership Removal Exchange Mailbox Deprovisioning Home Folder Deprovisioning User Account Relocation User Account Permanent Deletion Group Object Deprovisioning Group Object Relocation Group Object Permanent Deletion Notification Distribution Report Distribution
Deployment considerations Checking for policy compliance Deprovisioning users or groups Restoring deprovisioned users or groups Container Deletion Prevention policy Picture management rules Policy extensions
Using rule-based and role-based tools for granular administration Workflows
Key workflow features and definitions About workflow processes Workflow processing overview Workflow activities overview Configuring a workflow
Creating a workflow definition for a workflow Configuring workflow start conditions Configuring workflow parameters Adding activities to a workflow Configure an Approval activity Configuring a Notification activity Configuring a Script activity Configuring an If-Else activity Configuring a Stop/Break activity Configuring an Add Report Section activity Configuring a Search activity Configuring CRUD activities Configuring a Save Object Properties activity Configuring a Modify Requested Changes activity Enabling or disabling an activity Enabling or disabling a workflow Using the initialization script
Approval workflow Email-based approval Automation workflow Activity extensions
Temporal Group Memberships Group Family Dynamic groups Active Roles Reporting Management History Entitlement profile Recycle Bin AD LDS data management One Identity Starling Join and configuration through Active Roles Managing One Identity Starling Connect Configuring linked mailboxes with Exchange Resource Forest Management Configuring remote mailboxes for on-premises users Azure AD, Microsoft 365, and Exchange Online Management
Configuring Active Roles to manage Hybrid AD objects Managing Hybrid AD users
Creating a new Azure AD user with the Web Interface Viewing or updating the Azure AD user properties with the Web Interface Viewing or modifying the manager of a hybrid Azure user Disabling an Azure AD user Enabling an Azure AD user Deprovisioning of an Azure AD user Undo deprovisioning of an Azure AD user Adding an Azure AD user to a group Removing an Azure AD user from a group View the change history and user activity for an Azure AD user Deleting an Azure AD user with the Web Interface Creating a new hybrid Azure user with the Active Roles Web Interface Converting an on-premises user with an Exchange mailbox to a hybrid Azure user Licensing a hybrid Azure user for an Exchange Online mailbox Viewing or modifying the Exchange Online properties of a hybrid Azure user Creating a new Azure AD user with Management Shell Updating the Azure AD user properties with the Management Shell Viewing the Azure AD user properties with the Management Shell Delete an Azure AD user with the Management Shell Assigning Microsoft 365 licenses to new hybrid users Assigning Microsoft 365 licenses to existing hybrid users Modifying or removing Microsoft 365 licenses assigned to hybrid users Updating Microsoft 365 licenses display names
Unified provisioning policy for Azure M365 Tenant Selection, Microsoft 365 License Selection, Microsoft 365 Roles Selection, and OneDrive provisioning Microsoft 365 roles management for hybrid environment users Managing Microsoft 365 contacts Managing Hybrid AD groups Managing Microsoft 365 Groups Managing cloud-only distribution groups Managing cloud-only dynamic distribution groups Managing Azure security groups Managing cloud-only Azure users Managing cloud-only Azure guest users Managing cloud-only Azure contacts Changes to Active Roles policies for cloud-only Azure objects Managing room mailboxes Managing cloud-only shared mailboxes
Modern Authentication Managing the configuration of Active Roles
Connecting to the Administration Service Managed domains Using unmanaged domains Evaluating product usage Creating and using virtual attributes Examining client sessions Monitoring performance Customizing the Console Using Configuration Center Changing the Active Roles Admin account Enabling or disabling diagnostic logs Active Roles Log Viewer
SQL Server replication Using regular expressions Administrative Template Communication ports Active Roles and supported Azure environments Integrating Active Roles with other products and services Active Roles Language Pack Active Roles Diagnostic Tools Active Roles Add-on Manager

Steps for configuring a User Account Deprovisioning policy

To configure a User Account Deprovisioning policy

  1. On the Policy to Configure page, select User Account Deprovisioning, and then click Next.

  2. On the Option to Prevent Logon page, select the options you want the policy to apply when deprovisioning a user account. You can select any combination of these options:

    • Disable the user account

    • Set the user’s password to a random value

    • Set the user logon name to a random value

    • Set the user logon name (pre-Windows 2000) to a random value

    • Rename the user account to

  3. If you selected Rename the user account to, click Configure, and then complete the Configure Value dialog by using the procedure outlined later in this topic, in order to specify how you want the policy to update the user name when deprovisioning a user account.

  4. Click Next.

  5. On the Properties to Be Updated page, specify how you want the policy to update user properties when deprovisioning a user account:

    • Click Add, and then complete the Select Object Property dialog by using the procedure outlined later in this topic, in order to add property update rules.

    • Use View/Edit to modify existing rules.

    • Use Remove to delete existing rules.

  6. Click Next.

  7. On the Enforce Policy page, you can specify objects to which this Policy Object is to be applied:

    • Click Add, and use the Select Objects dialog to locate and select the objects you want.

  8. Click Next, and then click Finish.

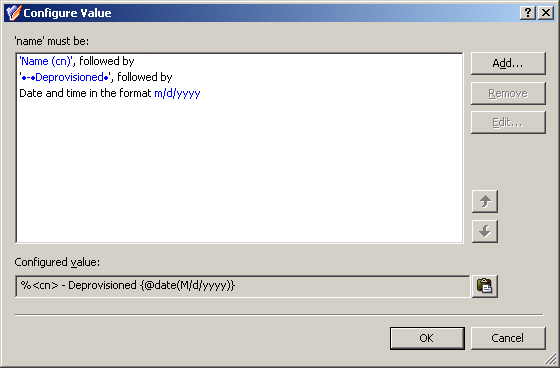
To complete the Configure Value dialog

  1. Click Add.

  2. Configure an entry to include in the value. For more information, see Steps for configuring entries.

  3. In the Configure Value dialog, add more entries, delete or edit existing ones, and then click OK.

To complete Select Object Property dialog

  1. From the Object property list, select an object property, and then click OK. The Add Value dialog appears.

    If you select multiple properties, the Add Value dialog is not displayed. The properties you have selected are added to the list on the Properties to Be Updated page, with the update rule configured to clear those properties, that is, to assign them the “empty” value.

  2. In the Add Value dialog, do one of the following:

    • Select Clear value if you want the update rule to assign the empty value to the property.

    • Select Configure value if you want the update rule to assign a certain, non-empty value to the property. Then, click Configure and complete the Configure Value dialog by using the instructions given earlier in this topic.

Scenario 1: Disabling and renaming the user account upon deprovisioning

The policy described in this scenario performs the following functions during the user deprovisioning process:

  • Disable the user account.

  • Append this suffix to the user name: - Deprovisioned, followed by the date that the user account was deprovisioned.

For example, the policy changes the user name John Smith to John Smith - Deprovisioned 12/11/2010.

To implement this scenario, you must perform the following actions:

  1. Create and configure the Policy Object that defines the appropriate policy.

  2. Apply the Policy Object to a domain, OU, or Managed Unit.

As a result, when deprovisioning a user account in the container you selected in Step 2, Active Roles disables and renames the user account as prescribed by this policy.

The following two sections elaborate on the steps to implement this scenario.

Step 1: Creating and configuring the Policy Object

You can create and configure the Policy Object you need by using the New Deprovisioning Policy Object Wizard. For information about the wizard, see Creating a Policy Object.

To configure the policy, click User Account Deprovisioning on the Select Policy Type page of the wizard. Then, click Next.

On the Options to Prevent Logon page, select these check boxes:

  • Disable the user account

  • Rename the user account to

Then, click Configure, and use the following instructions to complete the Configure Value dialog.

  1. Click Add.

  2. In the Add Entry window, click User Property under Entry type, and configure the entry as follows:

    1. Click Select and choose the Name property.

    2. Click All characters of the property value.

    3. Click OK.

  3. Click Add.

  4. In the Add Entry window, click Text under Entry type, and configure the entry as follows:

    1. In the Text value box, type - Deprovisioned.

    2. Click OK.

  5. Click Add.

  6. In the Add Entry window, click Date and Time under Entry type, and configure the entry as follows:

    1. From the list under Date and time format, select the format m/d/yyyy.

    2. Click OK.

After you complete these steps, the list of entries in the Configure Value dialog should look like the following figure.

Figure 87: Configure Value

Click OK to close the Configure Value dialog. Then, click Next and follow the instructions in the wizard to create the Policy Object.

Step 2: Applying the Policy Object

You can apply the Policy Object by using the Enforce Policy page in the New Provisioning Policy Object Wizard, or you can complete the wizard and then use the Enforce Policy command on the domain, OU, or Managed Unit where you want to apply the policy.

For more information on how to apply a Policy Object, see Applying Policy Objects and Managing policy scope.

相关文档

The document was helpful.

选择评级

I easily found the information I needed.

选择评级