The Active Roles Console makes it possible to apply a filter to display only the objects that match the filtering criteria. To apply a filter, select an Active Directory object or container and click the Filter button on the toolbar: 
Setting up filter
Steps for sorting and filtering lists in the details pane
To sort objects in the details pane
-
Click a column heading to sort by the contents of that column.
-
Click the column heading again to switch between ascending and descending sort order.
To add or remove columns in the details pane
-
On the View menu, click Choose Columns or Add/Remove Columns.
-
Do the following, and then click OK:
-
To add a column, in Available columns, click the column you want to display, and then click Add.
-
To remove a column, in Displayed columns, click the column you want to hide, and then click Remove.
-
To re-order columns, click a column name in Displayed columns, and then click Move Up or Move Down to change the position of the column.
-
NOTE: In the advanced details pane, you can add or remove columns from a list in the upper sub-pane or in the lower sub-pane: click the list in the sub-pane you want to modify, and then follow the steps above.
Filter options help you search for particular objects in the details pane. You can view all objects or only objects of selected type, configure the number of items that can be displayed for each folder, or create custom filters using object attributes and LDAP queries.
To select view filter options
-
On the View menu, click Filter Options.
-
Do one of the following, and then click OK:
-
To view all objects, click Show all types of objects. With this option, the filter is turned off.
-
To view objects of certain types, click Show only the following types of objects, and select check boxes next to the types of objects you want to view.
-
To view objects that match custom filtering criteria, click Create custom filter. Then, Customize and configure your filtering criteria by using the instructions outlined in Steps for building a custom search.
-
-
Optionally, in Maximum number of items displayed per folder, modify the maximum number of objects that can be displayed in the console. The default maximum number of objects displayed in the console is 2,000 objects.
Getting policy-related information
In object creation wizards and properties dialog boxes, some property labels may be displayed as hyperlinks. This indicates that Active Roles enforces policy restrictions on the property.
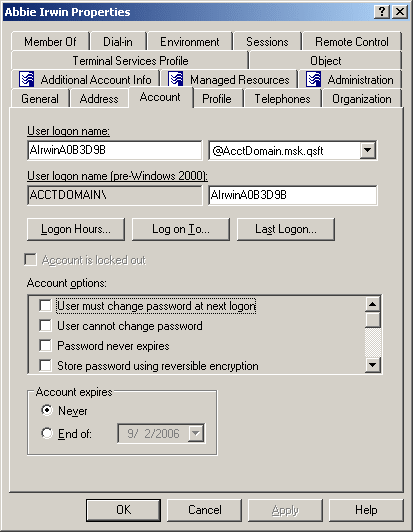
In the following figure, the User logon name and User logon name (pre-Windows 2000) labels are underlined, which means that these properties are under the control of a certain policy defined with Active Roles.
Figure 4: Policy-related information

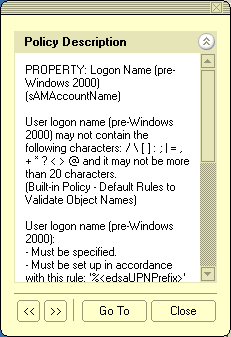
To examine the policy in detail, you can click the label. For example, if you click User logon name (pre-Windows 2000), the Active Roles console presents you with a window similar to the following figure.
Figure 5: Policy description

The window may display the following information:
-
Policy Description: Provides a brief description of the policy.
-
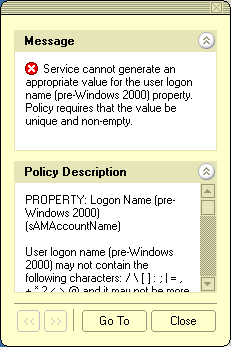
Message: Details the problem if the supplied property value violates the policy.
You can click arrows in the lower-left corner to display description of other policies enforced on the given property.
The Message section is displayed whenever the specified property value violates the policy. The following figure illustrates the situation where a value has not been supplied for a mandatory property.
Figure 6: Policy violation message

When you click Go To in this window, the console moves the pointer to the field that needs to be corrected. You can type or select an appropriate value to correct your input.
Performing Batch operations
In the Active Roles Web Interface, you can select multiple objects (such as users, groups and computers), and then apply a certain command to your selection of objects. This allows you to perform a batch operation on all the selected objects at a time instead of executing the command on each object separately. The Web Interface supports the following batch operations:
-
Delete: Allows you to delete multiple objects at a time.
-
Deprovision: Allows you to deprovision multiple users or groups at a time.
-
Move: Allows you to move a batch of objects to a different Organizational Unit or container.
-
Add to groups: Allows you to add a batch of objects to one or more groups of your choice.
-
Update object attributes: Allows you to perform bulk attributes operations for multiple users at a time.
-
Reset Password: Allows you to reset the password for multiple users at a time.
Batch operations are available in the list of objects on the following Web Interface pages:
-
Search: This page lists the search results when you perform a search.
-
View Contents: This page displays the objects held in a given Organizational Unit, Managed Unit, or container.
To perform a batch operation, select the check box next to the name of each of the desired objects in the list, and then click a command in the top area of the Command pane. This executes the command on each object within your selection.
NOTE: Active Roles administrators can customize Web Interface by adding and removing commands, and modifying pages associated with commands. For more information, see Customizing the Web Interface in the Active Roles Web Interface Administration Guide.
