You can add administrative views (Managed Units) and directory folders (containers) to the policy scope of a given Policy Object in one of these ways:
- Right-click the Policy Object and click Policy Scope. Then, in the Active Roles Policy Scope window, click the Add button.
- Ensure that Advanced Details Pane is checked on the View menu. Then, select the Policy Object. On the Active Roles Policy Scope tab in the details pane, right-click a blank area and click Add.
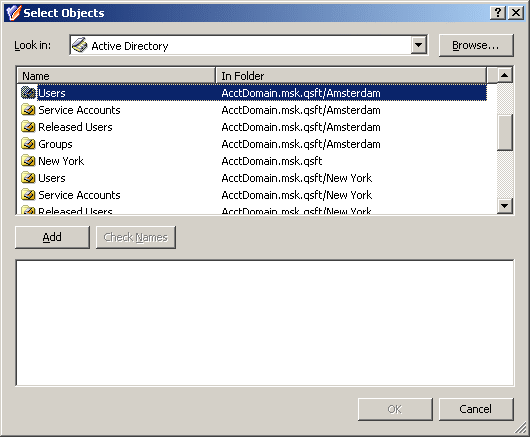
In both cases, clicking Add displays the Select Objects window where you can select containers and Managed Units. To build a list of containers from which to select, click the Browse button and select Active Directory or a container in the hierarchy under Active Directory. The list is shown in the following figure.
Figure 26: Policy Objects
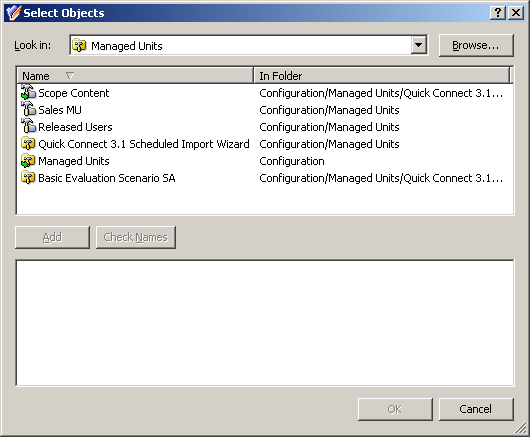
To build a list of Managed Units, click the Browse button and select Managed Units or a container in the hierarchy under Managed Units. The list looks like the following figure:
Figure 27: Managed Units
In the Select Objects window, select containers or Managed Units from the list and click the Add button to build the resultant list of items. When finished, click OK.
For a given directory object (container, user, group, and so on), a list of Policy Objects that affect the directory object is referred to as policy list. If the directory object is in the policy scope of a given Policy Object, the Policy Object is included in the policy list for that directory object.
The steps to add a Policy Object to the policy list for a directory object depend on whether it is a container or leaf object:
- Right-click a Managed Unit or container and click Enforce Policy. Then, in the Active Roles Policy window, click the Add button.
- Right-click a leaf object (user, group, or the like), click Properties, go to the Administration tab, and click the Policy button. Then, in the Active Roles Policy window, click the Add button.
If you use the advanced details pane (Advanced Details Pane is checked on the View menu), you can do this as follows, regardless of the type of the directory object:
- Select the directory object, go to the Active Roles Policy tab in the details pane, right-click a blank area on the tab, and then click Add.
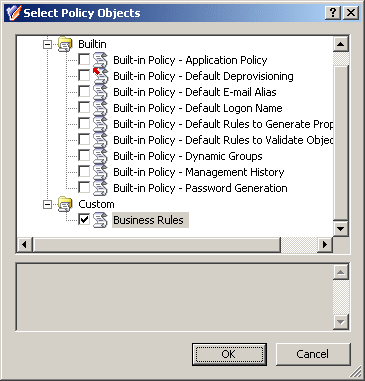
In all these cases, clicking Add displays the Select Policy Objects window where you can select Policy Objects to add. Select check boxes next to names of Policy Objects, as shown in the following figure, and then click OK.
Figure 28: Policy Objects
To apply a Policy Object
- In the console tree, under Configuration | Policies | Administration, locate and select the folder that contains the Policy Object you want to apply.
- In the details pane, right-click the Policy Object, and then click Policy Scope.
- In the Active Roles Policy Scope dialog box, click Add.
- Use the Select Objects dialog box to locate and select the container, Managed Unit, or a leaf object on which you want to specify policy settings by using the Policy Object.
- Click OK to close the Active Roles Policy Scope dialog box.
To specify policy settings on an object by using a Policy Object
- Open the Active Roles Policy dialog box for the object:
- Right-click the object, and click Enforce Policy.
-OR-
- Right-click the object, and click Properties. Then, on the Administration tab in the Properties dialog box, click Policy.
- In the Active Roles Policy dialog box, click Add.
- Use the Select Policy Objects dialog box to locate and select the Policy Object to apply.
- To select a Policy Object, click the check box next to the name of the Policy Object. You can select multiple Policy Objects.
- Click OK to close the Active Roles Policy dialog box.
|

|
TIP: To apply a Policy Object, you can also use the Active Roles Policy Scope or Active Roles Policy tab in the advanced details pane: Right-click a blank area on the tab, and then click Add. To display the advanced details pane, check Advanced Details Pane on the View menu (see Advanced pane earlier in this document). |
To view or modify inheritance options for a Policy Object on a container or Managed Unit
- Open the Active Roles Policy Scope dialog box for the Policy Object: Right-click the Policy Object, and then click Policy Scope.
- In the Active Roles Policy Scope dialog box, select the container or Managed Unit to which the Policy Object is applied and on which you want to examine inheritance options, and then click View/Edit.
- On the General tab, view or modify the selection of these options, which specifies the scope where the Policy Object determines policy settings:
- This directory object. The scope includes the container or Managed Unit you have selected (this option does not cause the scope to include any child objects or members of the container or Managed Unit).
- Child objects of this directory object. The scope includes all the child objects (or members, as applied to a Managed Unit) in the entire hierarchy under the container or Managed Unit you have selected.
- Immediate child objects only. The scope includes only the child objects (or members, as applied to a Managed Unit) of which the container or Managed Unit that you have selected is the direct ancestor.
When applying a Policy Object to a directory object, Active Roles creates a Policy Object link. Thus, policies are put in force by linking Policy Objects to directory objects—Managed Units, directory folders (containers), or individual (leaf) objects.
Each Policy Object link includes the following information:
- Policy Object that defines the policies
- Directory object that is the target of the link
- Flag — Include or Exclude — that specifies whether the directory object is included or excluded from the policy scope
You can display a list of Policy Object links starting from one of the following points:
- Directory object. First, open a window that lists the Policy Objects that affect this directory object:
- For a container object or Managed Unit, right-click the object or Unit and click Enforce Policy.
- For a leaf object, right-click the object, click Properties, go to the Administration tab, and click Policy.
Next, in the window that opens, click the Advanced button.
This displays the links in which the directory object occurs as the target object.
Another way to see a list of Policy Object links is the use of the advanced details pane. Ensure that Advanced Details Pane is checked on the View menu, and then do one of the following:
When you display a list of Policy Object links for a directory object, the list appears in a separate window. Each entry in the list includes the following information:
- Policy Object Name of the Policy Object.
- Directory Object Canonical name of the object to which the Policy Object is linked, that is, the target object of the link.
- Include/Exclude Flag that determines the behavior of the link:
- Include Explicitly. means the link puts the target object within the policy scope, that is, the policies defined in the Policy Object control the target object.
- Exclude Explicitly. means the link puts the target object out of the policy scope, that is, the policies defined in the Policy Object do not control the target object.
The Exclude flag takes precedence over the Include flag. If there are two links with the same Policy Object, one of which is flagged Include while another one is flagged Exclude, the object is effectively excluded from the policy scope of the Policy Object.
The list of Policy Object links displays the links of these categories:
- Direct links. Policy Object is applied (linked) directly to the object you have selected.
- Inherited links. Policy Object is applied (linked) to a container in the hierarchy of containers above the object you have selected, or to a Managed Unit to which the selected object belongs.
The links inherited from parent objects can be filtered out of the list. To do this, clear the Show inherited check box.
To manage links, you can use the buttons beneath the list:
- Add. Displays the dialog box where you can select Policy Objects, creating the links to the Policy Objects you select.
- Remove. Deletes the selected entries from the list of links. Available for direct links only.
- View/Edit. Displays the dialog box to view or modify link properties, such as whether the link affects the child objects of the link target object. Available for only those links that are flagged Include.
- Exclude. Shows up for links flagged Include. Available on direct links only. Changes the flag to Exclude.
- Include. Shows up for links flagged Exclude. Available on direct links only. Changes the flag to Include.
|
|
TIP: The Remove button is only available on direct links. When you need to delete links, it is advisable to manage them using the Policy Scope command on the Policy Object. |
To simplify the management of policy effect on directory objects, the Active Roles console allows you to manage policy scope without directly managing links to Policy Objects. For a directory object, you can view and modify its policy list—a list of Policy Objects that control (affect) the directory object—instead of having to sort through direct and inherited links.
Given a directory object, you can display its policy list as follows:
- For a container or a Managed Unit, right-click it and click Enforce Policy.
- For a leaf object (user, group, or suchlike), right-click it, click Properties, go to the Administration tab, and click Policy.
Each entry in the policy list includes the following information:
- Policy Object. The name of the Policy Object. The Policy Object controls this directory object due to a direct link or inherited links.
- Block Inheritance. Indicates whether policy effect is blocked on this directory object. If the Blocked check box is selected, the Policy Object link flagged Exclude is created for this directory object.
You can manage the policy list using the buttons beneath the list:
- Add. Displays the dialog box where you can select Policy Objects, putting the directory object under the control of the Policy Objects you select.
- Remove. If you select a Policy Object from the policy list and click Remove, the direct link of the Policy Object to this object is deleted.
If the Policy Object is in the list due to an inherited link, the Remove button is unavailable. Moreover, if there are both the direct link and an inherited link to the Policy Object, clicking Remove deletes the direct link but does not remove the Policy Object from the policy list. In this case, the Policy Object remains in the list because the policies are still applied due to inheritance.
If you need to remove the directory object from the policy scope of a given Policy Object, select the Blocked check box in the Block Inheritance column. This adds the Policy Object link flagged Exclude for the directory object.
- View/Edit. Displays the Properties dialog box for the Policy Object you select from the list. You can use the Properties dialog box to manage policies in the Policy Object and gain access to the list of all links where this Policy Object occurs.
- Advanced. Opens the window with the list of Policy Object links for this directory object, discussed earlier in this section.
You can also access the policy list from the advanced details pane. The list is displayed on the Active Roles Policy tab when you select a directory object.
On the Active Roles Policy tab, you can perform the same management tasks as in the Active Roles Policy window: Right-click a list entry or a blank area and use commands on the shortcut menu. The commands act in the same way as the buttons in the Active Roles Policy window.
Given a Policy Object, you can also manage its policy scope by using a list of directory objects to which the Policy Object is applied (linked). The list can be displayed in a separate window or on a tab in the advanced details pane:
- To display the list in a window, right-click the Policy Object and click Policy Scope.
- To display the list on a tab, ensure that Advanced Details Pane is checked on the View menu and select the Policy Object.
The list displays all links of the Policy Object. Each entry in the list includes the following information:
- Name. Canonical name of the directory object to which the Policy Object is linked, that is, the target object of the link.
- Include/Exclude. Flag that determines the behavior of the link:
- Include Explicitly. means the link puts the target object within the policy scope, that is, the policies defined in the Policy Object control the target object.
- Exclude Explicitly. means the link puts the target object out of the policy scope, that is, the policies defined in the Policy Object do not control the target object.
The Exclude flag takes precedence over the Include flag. If there are two links with the same target object, one of which is flagged Include while another one is flagged Exclude, the target object is effectively excluded from the policy scope of the Policy Object.
To manage the list in the Active Roles Policy Scope window, you can use the buttons beneath the list: Add, Remove, View/Edit, Include, or Exclude. The buttons perform basically the same functions as those described earlier in this section. To manage the list in the Active Roles Policy Scope tab, you can use the command on the shortcut menu: Right-click a link or a blank area to access the menu. The menu includes the following commands:
- Add. Appears when you right-click a blank area. Performs the same action as the Add button. Opens the Select Objects dialog box where you can select containers or Managed Units to which you want to link the Policy Object (see Applying Policy Objects).
- Delete. Appears when you right-click a link. Performs the same action as the Remove button. Deletes the link you select from the list.
- Exclude. Appears when you right-click a link flagged Include. Performs the same action as the Exclude button. Changes the flag on the link you select.
- Include. Appears when you right-click a link flagged Exclude. Performs the same action as the Include button. Changes the flag on the link you select.
- Refresh. Updates the list with the current information.
