Synchronizing permissions to Active Directory
Active Roles provides the option to keep Active Directory native security updated with selected permissions specified using Access Templates. This option, referred to as permissions propagation, is intended to provision users and applications with native permissions to Active Directory. The normal operation of Active Roles does not rely on this option.
You can set the permissions propagation option in these ways:
- When applying Access Templates, you can select the Propagate permissions to Active Directory check box in the Delegation of Control wizard.
- When managing Access Template links, you can use the Sync to AD button in a window that displays a list of links or use the Sync to AD command on a tab that displays a list of links in the advanced details pane.
For example, suppose Active Roles defines certain permissions on an Organizational Unit, and you want to synchronize them to Active Directory. You can accomplish this task as follows.
First, right-click the Organizational Unit and click Delegate Control to display the Active Roles Security window.
Next, in the Access Template links list, select the links that define the permissions you want to synchronize.
Finally, click the Sync to AD button. The Sync to Native Security column in the list displays Yes for the links that you are going to synchronize.
After you click OK, Active Roles creates permission entries in Active Directory so that the Trustee has the same rights in Active Directory as it has in the Active Roles environment in accordance with the Access Template links you have synchronized.
You can stop synchronization of permissions at any time by clicking the Desync to AD button. If you do so, Active Roles deletes all permission entries in Active Directory that were created as a result of synchronization.
|

|
TIP: In the Active Roles Security dialog box, the Sync to AD button is only available on direct links. When you need to synchronize links, it is advisable to manage them using the Links command on the Access Template. |
You can also accomplish this task using the advanced details pane as follows:
- Select the Organizational Unit.
- On the Active Roles Security tab, select the Access Template links that define the permissions you want to synchronize.
- Right-click the selection and click Sync to AD.
You can use the Sync to AD command to stop synchronization: right-click the links you want to no longer be synchronized, and click Desync to AD.
|
|
TIP: On the Active Roles Security tab, the Sync to AD command is available on direct links only. When you need to synchronize links, it is advisable to manage them using the Links tab for the Access Template. |
Steps for synchronizing permissions to Active Directory
Active Roles provides the option to keep Active Directory native security updated with selected permission settings that are specified by using Access Templates. This option, referred to as permissions propagation, is intended to provision users and applications with native permissions to Active Directory. The normal operation of Active Roles does not rely upon this option.
You can set the permissions propagation option as follows:
- When applying an Access Template, select the Propagate permissions to Active Directory check box in the Delegation of Control wizard (see Steps for applying an Access Template earlier in this document).
- When managing Access Template links, use the Sync to AD button in the dialog box that displays a list of links (see Steps for managing Access Template links earlier in this document).
As an example, you can use the following instructions to set the permissions propagation option on the permission settings that are defined by applying a certain Access Template to an Organizational Unit:
To synchronize permission settings on an Organizational Unit
- Right-click the Organizational Unit and click Delegate Control.
- In the Active Roles Security dialog box, select the Access Template link that determines the permission settings you want to synchronize to Active Directory, and then click Sync to AD.
- Click OK to close the Active Roles Security dialog box.
|
|
NOTE:
- When synchronizing permissions to Active Directory, Active Roles creates permission entries in Active Directory so that the Trustee has the same rights in Active Directory as it has in the Active Roles environment as per the Access Template links you have synchronized.
- You can stop synchronization of permissions at any time by clicking the Desync to AD button. If you do so, Active Roles deletes all permission entries in Active Directory that were created as a result of synchronization.
- You can also manage the permissions propagation option on the Links or Active Roles Security tab in the advanced details pane, which allows you to perform the same tasks as the Links or Active Roles Security dialog box, respectively. Right-click the link on which you want to set the permissions propagation option, and click Sync to AD to start synchronization or Desync to AD to stop synchronization. The Links tab is displayed when you select an Access Template. Otherwise, the Active Roles Security tab is displayed. To display the advanced details pane, check Advanced Details Pane on the View menu (see Advanced pane earlier in this document).
|
Managing Active Directory permission entries
The Native Security tab in the advanced details pane lists the native Active Directory permission entries for the securable object (for example, an organizational unit) selected in the console tree.
By analyzing information in the Type and Source columns on the Native Security tab, you can determine whether a given entry is synchronized from Active Roles.
In the Type column, the synchronized entries are marked with the  icon. This icon changes to
  if synchronization of the entry is invalid or unfinished. For example, if you delete a synchronized entry from Active Directory, Active Roles detects the deletion and re-creates the entry. Until the entry is re-created, the Type column marks the entry with the icon.
For each synchronized entry, the Source column displays the name of the Access Template that defines the permissions synchronized to that entry.
From the Native Security tab, you can manage permission entries: right-click an entry, and click Edit Native Security. This displays the Permissions dialog box where you can add, remove and modify Active Directory permission entries for the securable object you selected.
Adding, modifying, or removing permissions
When you add, remove, or modify permissions in an Access Template, permission settings automatically change on all objects to which the Access Template is applied (linked), including those that are affected by the Access Template because of inheritance.
To add, remove, or modify permissions in an Access Template, open the Properties dialog box for the Access Template, and go to the Permissions tab.
Figure 19: Access Template - Manage permissions
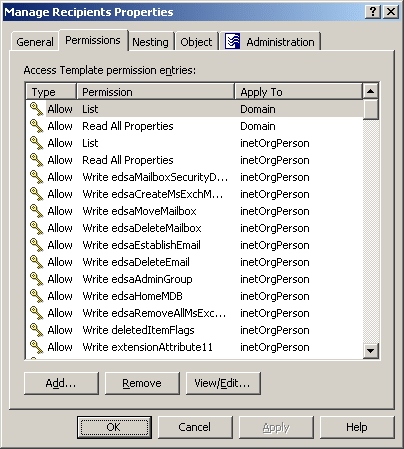
The Permissions tab lists permission entries defined in the Access Template. Each entry in the list includes the following information:
- Type Specifies whether the permission allows or denies access.
- Permission Name of the permission.
- Apply To Type of objects that are subject to the permission.
To add a new permission, click Add and complete the Add Permission Entries wizard, as described in Add Permission Entries wizard earlier in this chapter.
To delete permissions, select them from the Access Template permission entries list, and click Remove.
To modify a permission, select it from the Access Template permission entries list, and click View/Edit. This displays the Modify Permission Entry dialog box, similar to the following figure.
Figure 20: Access Template - Modify permissions
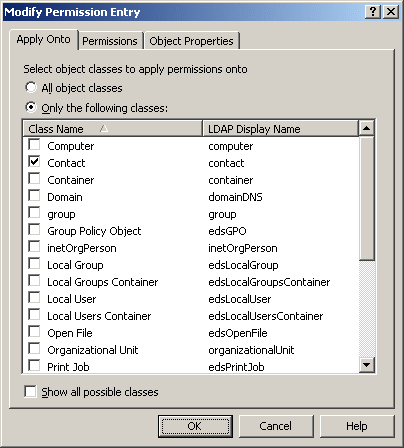
You can use the tabs in that dialog box to modify the permission as needed. The tabs are similar to the pages in the Add Permission Entries wizard, discussed in Add Permission Entries wizard earlier in this chapter.
