Chat now with support
Chat with Support

Active Roles 7.5 - Administration Guide

Introduction About Active Roles Getting Started Rule-based Administrative Views Role-based Administration
Access Templates as administrative roles Access Template management tasks Examples of use Deployment considerations Windows claims-based Access Rules
Rule-based AutoProvisioning and Deprovisioning
About Policy Objects Policy Object management tasks Policy configuration tasks
Property Generation and Validation User Logon Name Generation Group Membership AutoProvisioning E-mail Alias Generation Exchange Mailbox AutoProvisioning AutoProvisioning for SaaS products OneDrive Provisioning Home Folder AutoProvisioning Script Execution Office 365 and Azure Tenant Selection User Account Deprovisioning Office 365 Licenses Retention Group Membership Removal Exchange Mailbox Deprovisioning Home Folder Deprovisioning User Account Relocation User Account Permanent Deletion Group Object Deprovisioning Group Object Relocation Group Object Permanent Deletion Notification Distribution Report Distribution
Deployment considerations Checking for policy compliance Deprovisioning users or groups Restoring deprovisioned users or groups Container Deletion Prevention policy Picture management rules Policy extensions
Workflows
Understanding workflow Workflow activities overview Configuring a workflow
Creating a workflow definition Configuring workflow start conditions Configuring workflow parameters Adding activities to a workflow Configuring an Approval activity Configuring a Notification activity Configuring a Script activity Configuring an If-Else activity Configuring a Stop/Break activity Configuring an Add Report Section activity Configuring a Search activity Configuring CRUD activities Configuring a Save Object Properties activity Configuring a Modify Requested Changes activity Enabling or disabling an activity Enabling or disabling a workflow Using the initialization script
Example: Approval workflow E-mail based approval Automation workflow Activity extensions
Temporal Group Memberships Group Family Dynamic Groups Active Roles Reporting Management History
Understanding Management History Management History configuration Viewing change history
Workflow activity report sections Policy report items Active Roles internal policy report items
Examining user activity
Entitlement Profile Recycle Bin AD LDS Data Management One Identity Starling Management One Identity Starling Two-factor Authentication for Active Roles Managing One Identity Starling Connect Azure AD, Office 365, and Exchange Online management
Configuring Active Roles to manage hybrid AD objects Managing Hybrid AD Users Unified provisioning policy for Azure O365 Tenant Selection, Office 365 License Selection, and Office 365 Roles Selection, and OneDrive provisioning Office 365 roles management for hybrid environment users Managing Office 365 Contacts Managing Hybrid AD Groups Managing Office 365 Groups Managing Azure Security Groups Managing cloud-only Azure users Managing cloud-only Azure guest users Managing cloud-only Azure contacts Changes to Active Roles policies for cloud-only Azure objects Managing room mailboxes
Managing Configuration of Active Roles
Connecting to the Administration Service Adding and removing managed domains Using unmanaged domains Evaluating product usage Creating and using virtual attributes Examining client sessions Monitoring performance Customizing the console Using Configuration Center Changing the Active Roles Admin account Enabling or disabling diagnostic logs Active Roles Log Viewer
SQL Server Replication Appendix A: Using regular expressions Appendix B: Administrative Template Appendix C: Communication ports Appendix D: Active Roles and supported Azure environments Appendix E: Enabling Federated Authentication Appendix F: Active Roles integration with other One Identity and Quest products Appendix G: Active Roles integration with Duo MFA Appendix H: Active Roles integration with Okta MFA

Configuring Mailbox Settings for Azure guest users

You can configure settings related to Messaging Records Management (MRM) for the email account of the selected Azure guest user in the Exchange Online Properties > Mailbox Settings tab of the Active Roles Web Interface. MRM settings must be typically configured to meet mailbox archiving policies in effect within the organization.

For more information about MRM in Exchange Online, see the Messaging records management page of the official Microsoft documentation.

To configure Messaging Records Management settings for an Azure guest user

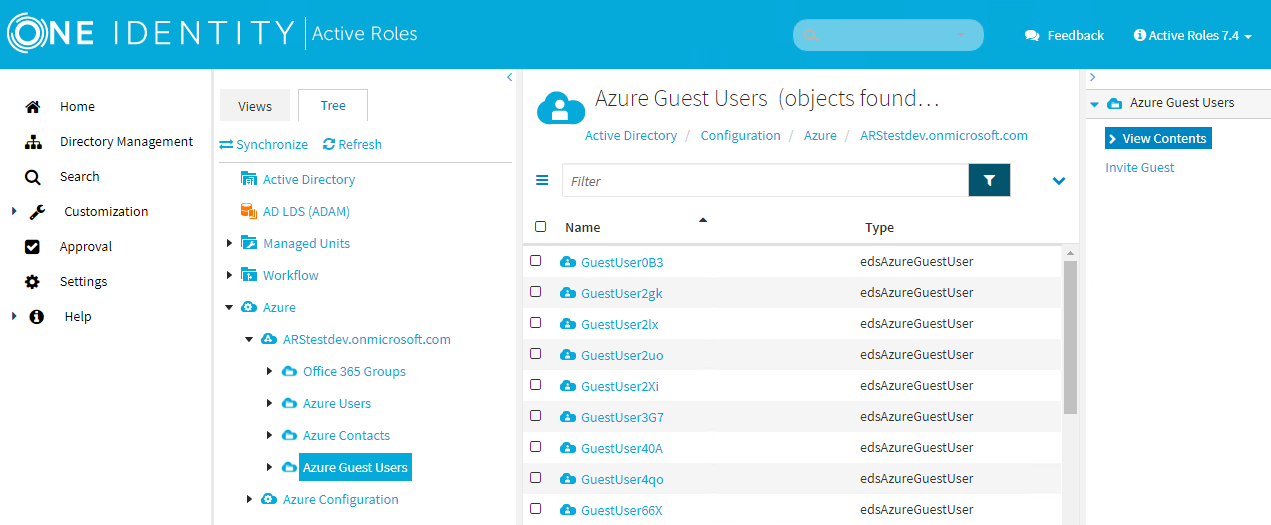
  1. On the Active Roles Web Interface, navigate to Directory Management > Tree View > Azure > <azure-tenant> > Azure Guest Users.

  2. From the list in the middle pane, select the Azure guest user that you want to update.

  3. To open the Exchange Online properties of the selected Azure guest user, click Exchange Online Properties on the right pane.

  4. To open the MRM settings, click the Mailbox Settings tab.

    Figure 133: Directory Management > Tree View > Azure > <azure-tenant> > Azure Guest Users > <azure-guest-user> > Exchange Online Properties > Mailbox Settings — Accessing the MRM settings of an Azure Guest user

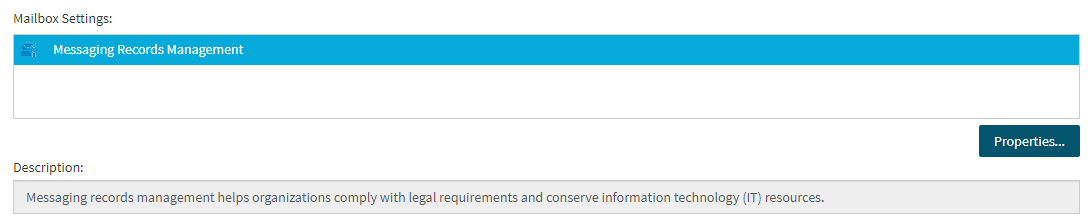
  5. Under Mailbox Settings, make sure that Messaging Records Management is selected, then click Properties.... The Messaging Records Management dialog opens.

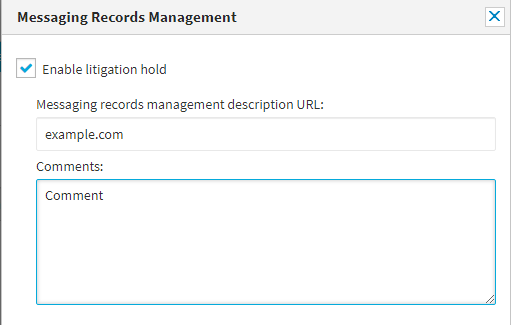
  6. To enable placing the entire contents of the Azure guest user mailbox on hold, enable the Enable litigation hold check box. For more information on the Litigation Hold feature of Exchange Online, see the In-Place Hold and Litigation Hold page of the official Microsoft documentation.

  7. (Optional) If your organization has an internal resource on the litigation hold practices, specify its URL in the Messaging records management description URL text box.

  8. (Optional) If you want to display a customized message in Outlook for the Azure guest user on the litigation hold, write the message in the Comments text box.

  9. Click Save to apply your changes and close the Messaging Records Management dialog.

  10. To close the Exchange Online Properties window, click Close.

Deleting an Azure guest user

You can delete an Azure guest user in the selected Azure tenant with the Delete option of the Active Roles Web Interface. This is typically performed if the guest user no longer works for the organization.

Note: You can only remove certain Azure guest users (for example, Global Administrators) if you have sufficient administrator roles. For more information on these role requirements, see the official Microsoft documentation.

Attempting to delete an Azure guest user without sufficient administrative privileges will result in failure, and the following error log message appearing in the Windows Event Log:

Post-processing operation on object caused a policy violation.

To delete an Azure guest user

  1. Navigate to Directory Management > Tree > Azure > <azure-tenant-name> > Azure Guest Users.

    The list of Azure guest users of the selected tenant is displayed.

    Figure 134: Directory Management > Tree View > Azure > <azure-tenant-name> > Azure Guest Users — Listing the Azure guest users in the tenant

  2. Select the Azure guest user that you want to delete.

  3. Click Delete.

  4. To confirm the removal of the guest user, click Yes.

Configuring the O365 Group membership of an Azure guest user

You can configure and view the Azure group membership(s) of an Azure guest user with the Azure Member Of option of the Active Roles Web Interface. Using this option, you can:

  • View the existing O365 group membership(s) of the Azure guest user.

  • Add or remove the Azure guest user to or from the selected Azure O365 Group(s).

To add or remove an existing Azure guest user to or from an O365 Group

  1. Navigate to Directory Management > Tree > Azure > <azure-tenant-name> > Azure Guest Users.

    The list of Azure guest users of the selected tenant is displayed.

    Figure 135: Directory Management > Tree View > Azure > <azure-tenant-name> > Azure Guest Users — Listing the Azure guest users in the tenant

  2. In the middle pane, select the Azure guest user whose membership you want to view or configure.

  3. In the right pane, click Azure Member Of. The list of Azure O365 groups where the guest user has a membership then appears.

    Figure 136: Directory Management > Tree View > Azure > <azure-tenant> > Azure Guest Users > Azure Member Of – Listing the Azure groups of the selected Azure Guest user

  4. To add the Azure guest user to a new Azure O365 group of the Azure tenant, click Add.

  5. In the Select Object page, select the O365 Group(s) you want the Azure guest user to be a member of, then click OK to apply your changes and return to the Azure Member Of page. The list is then updated with the new groups that you selected previously.

  6. To remove the Azure guest user from any O365 Group(s), select the group(s) in the Azure Member Of page, and then click Remove. Click OK to confirm the removal from the group.

Viewing the change history of an Azure guest user

You can view the change history of an Azure guest user in the selected Azure tenant with the Change History option of the Active Roles Web Interface.

To view the change history of an Azure guest user

  1. Navigate to Directory Management > Tree > Azure > <azure-tenant-name> > Azure Guest Users.

    The list of Azure guest users of the selected tenant is displayed.

    Figure 137: Directory Management > Tree View > Azure > <azure-tenant-name> > Azure Guest Users — Listing the Azure guest users in the tenant

  2. Select the Azure guest user whose change history you want to check.

  3. Click Change History.

    The change history of the Azure guest user then appears.

    Figure 138: Directory Management > Tree View > Azure > <azure-tenant> > Azure Guest Users > Change History – Viewing the change history of the selected Azure guest user

Related Documents

The document was helpful.

Select Rating

I easily found the information I needed.

Select Rating