지금 지원 담당자와 채팅
지원 담당자와 채팅

Safeguard for Privileged Sessions On Demand Hosted - Administration Guide

Preface Introduction The concepts of One Identity Safeguard for Privileged Sessions (SPS)
The philosophy of One Identity Safeguard for Privileged Sessions (SPS) Policies Credential Stores Plugin framework Indexing Supported protocols and client applications Modes of operation Connecting to a server through One Identity Safeguard for Privileged Sessions (SPS) Archive and backup concepts Maximizing the scope of auditing IPv6 in One Identity Safeguard for Privileged Sessions (SPS) SSH host keys Authenticating clients using public-key authentication in SSH The gateway authentication process Four-eyes authorization Network interfaces High Availability support in One Identity Safeguard for Privileged Sessions (SPS) Versions and releases of One Identity Safeguard for Privileged Sessions (SPS) Accessing and configuring One Identity Safeguard for Privileged Sessions (SPS)
Cloud deployment considerations The Welcome Wizard and the first login Basic settings
Supported web browsers and operating systems The structure of the web interface Network settings Configuring date and time System logging, SNMP and e-mail alerts Configuring system monitoring on SPS Data and configuration backups Archiving and cleanup Using plugins Forwarding data to third-party systems Starling integration
User management and access control Managing One Identity Safeguard for Privileged Sessions (SPS)
Controlling One Identity Safeguard for Privileged Sessions (SPS): reboot, shutdown Managing One Identity Safeguard for Privileged Sessions (SPS) clusters Managing a High Availability One Identity Safeguard for Privileged Sessions (SPS) cluster Upgrading One Identity Safeguard for Privileged Sessions (SPS) Managing the One Identity Safeguard for Privileged Sessions (SPS) license Accessing the One Identity Safeguard for Privileged Sessions (SPS) console Sealed mode Out-of-band management of One Identity Safeguard for Privileged Sessions (SPS) Managing the certificates used on One Identity Safeguard for Privileged Sessions (SPS)
General connection settings HTTP-specific settings ICA-specific settings MSSQL-specific settings RDP-specific settings SSH-specific settings Using Sudo with SPS Telnet-specific settings VMware Horizon View connections VNC-specific settings Indexing audit trails Using the Search interface Advanced authentication and authorization techniques Reports The One Identity Safeguard for Privileged Sessions (SPS) REST API One Identity Safeguard for Privileged Sessions (SPS) scenarios Troubleshooting One Identity Safeguard for Privileged Sessions (SPS)
Network troubleshooting Gathering data about system problems Viewing logs on One Identity Safeguard for Privileged Sessions (SPS) Changing log verbosity level of One Identity Safeguard for Privileged Sessions (SPS) Collecting logs and system information for error reporting Collecting logs and system information of the boot process for error reporting Support hotfixes Status history and statistics Troubleshooting a One Identity Safeguard for Privileged Sessions (SPS) cluster Understanding One Identity Safeguard for Privileged Sessions (SPS) RAID status Restoring One Identity Safeguard for Privileged Sessions (SPS) configuration and data VNC is not working with TLS Configuring the IPMI from the BIOS after losing IPMI password Incomplete TSA response received Using UPN usernames in audited SSH connections
Using SPS with SPP Configuring external devices Using SCP with agent-forwarding Security checklist for configuring One Identity Safeguard for Privileged Sessions (SPS) Jumplists for in-product help Configuring SPS to use an LDAP backend Glossary

High Availability

If a hardware failure occurs, Azure moves the Virtual Machine to another location and restarts it in 5-15 minutes. In case you require higher SLA, you are recommended to deploy two standalone SPS nodes into an availability set. Note that to deploy two active SPS nodes as an availability set, you must purchase two standalone SPS licenses.

For details, see Locally redundant storage in the Azure Storage replication document, and Service Healing - Auto-recovery of Virtual Machines.

The Welcome Wizard and the first login

This section describes the initial steps of configuring One Identity Safeguard for Privileged Sessions (SPS). Before completing the steps in The initial connection to One Identity Safeguard for Privileged Sessions (SPS), unpack, assemble, and power on the hardware. Connect interface 1 (labelled 1 or EXT) to the local network, or directly to the computer from which SPS will be configured.

NOTE: For details on unpacking and assembling the hardware, see "One Identity Safeguard for Privileged Sessions Hardware Installation Guide" in the Installation Guide. For details on how to create a High Availability SPS cluster, see "Installing two SPS units in HA mode" in the Installation Guide. For more information about the supported browsers, see Supported web browsers and operating systems.

The initial connection to One Identity Safeguard for Privileged Sessions (SPS)

One Identity Safeguard for Privileged Sessions (SPS) can be connected from a client machine using web browsers and accessed from the local network.

NOTE: For details on supported browsers, see Supported web browsers and operating systems.

Starting with version 3.1, SPS attempts to receive an IP address automatically via DHCP. If it fails to obtain an automatic IP address, it starts listening for HTTPS connections on the 192.168.1.1 IP address. Note that certain switch configurations and security settings can interfere with SPS receiving an IP address via DHCP. SPS accepts connections via its interface 1 (labelled 1 or EXT). For details on the network interfaces, see Network interfaces).

TIP: The SPS console displays the IP address on which interface 1 is listening.

If SPS is listening on the 192.168.1.1 address, note that the 192.168.1.0/24 subnet must be accessible from the client. If the client machine is in a different subnet (for example, its IP address is 192.168.10.X), but in the same network segment, the easiest way is to assign an alias IP address to the client machine. Creating an alias IP on the client machine virtually puts both the client and SPS into the same subnet, so that they can communicate. To create an alias IP complete the following steps.

Caution:

The Welcome Wizard can be accessed only using interface 1, as the other network interfaces are not configured yet.

Creating an alias IP address (Microsoft Windows)

This procedure describes how to assign an alias IP address to a network interface on Microsoft Windows platforms.

To assign an alias IP address to a network interface on Microsoft Windows platforms

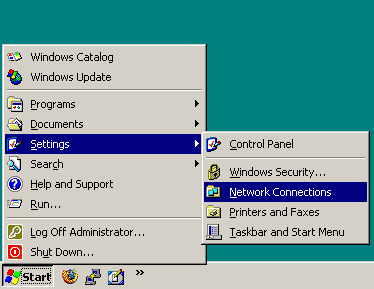
  1. Navigate to Start menu > Settings > Network Connections.

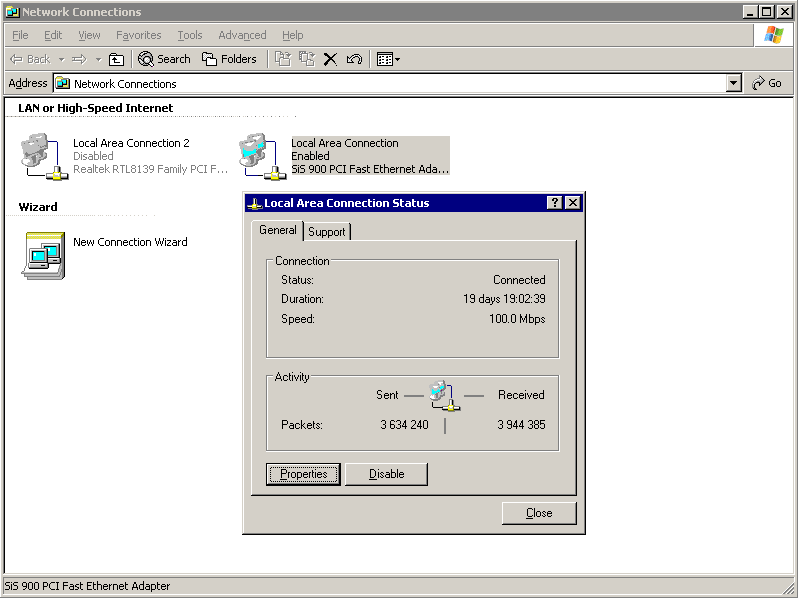
  2. Double-click Local Area Connection and then click Properties.

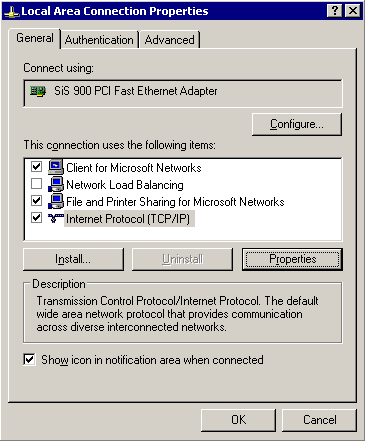
  3. Select the Internet Protocol (TCP/IP) component in the list and click Properties.

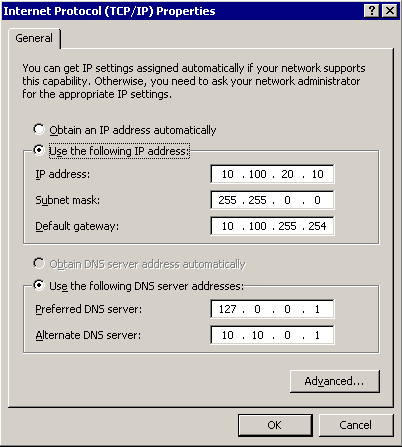
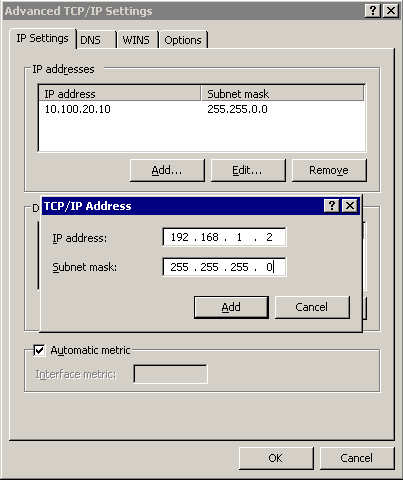
  4. To display the Advanced TCP/IP Settings window, click Advanced.

  5. Select the IP Settings tab, and click Add in the IP Addresses section.

  6. Enter 192.168.1.2 into the IP Address field, and enter 255.255.255.0. into the Netmask field.

    Caution:

    If your internal network uses the 192.168.1.0/24 IP range, it is possible that the 192.168.1.1 and 192.168.1.2 addresses are already in use. In this case, disconnect One Identity Safeguard for Privileged Sessions (SPS) from the network, and connect a computer directly to interface 1 (labelled 1 or EXT) using a standard cross-link cable.

  7. To complete the procedure, click Add.

관련 문서

The document was helpful.

평가 결과 선택

I easily found the information I needed.

평가 결과 선택