VMware Horizon View connections
VMware Horizon View connections
The following sections describe how to use One Identity Safeguard for Privileged Sessions (SPS) to control and audit VMware Horizon View (formerly known as VMware View) connections. When using SPS to control and audit VMware Horizon View connections, the following requirements and restrictions apply:
-
Only connections using the Remote Desktop (RDP) display protocol are supported. Connections using the PCoIP or HP Remote Graphics Software display protocols are not supported.
-
Both direct connections and tunnel connections are supported.
-
The VMware Horizon View connections must pass SPS directly. It is best if SPS is deployed directly before the Virtual Desktops accessed with VMware Horizon View, and connections are configured in transparent mode.
Deploying SPS that way has the advantage of auditing connections even if the clients access the Virtual Desktops directly, without using a View Connection Server.
NOTE: Using non-transparent mode is also possible if the VMware Horizon View traffic is routed to SPS with an external device (for example, a firewall).
SPS treats VMware Horizon View connections that satisfy these criteria as common RDP connections. All the features of SPS that are available for RDP connections can be used with VMware Horizon View connections as well, for example, four-eyes authorization, auditing and replaying, indexing the recorded audit trails, and so on. For details on RPD-specific settings, see RDP-specific settings.
One Identity Safeguard for Privileged Sessions (SPS) deployment scenarios in a VMware environment
One Identity Safeguard for Privileged Sessions (SPS) supports a variety of deployment scenarios, which make it really flexible when it comes to deployment. The following network topologies illustrate typical SPS VMware Horizon View deployment scenarios.
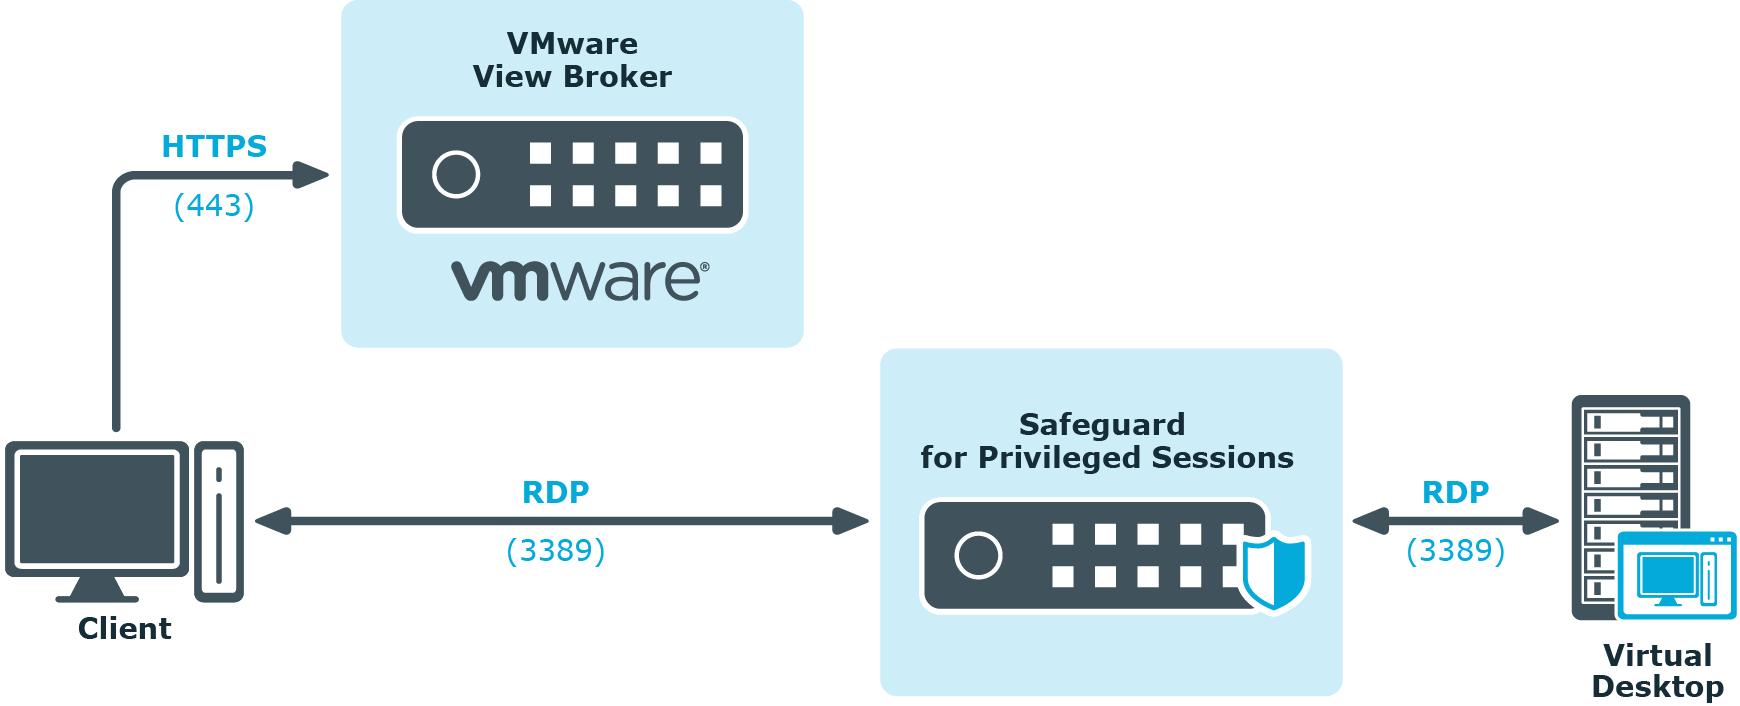
Client - Broker - SPS - Server
SPS is deployed between the Broker and the virtual desktop, where the RDP traffic is embedded into a HTTPS tunnel between the Client and the Broker.
Figure 253: Client - Broker - SPS - Server

Client - SPS - Server
SPS is deployed between the Client and the virtual desktop, the client makes a direct RDP connection to the Server, without tunneling it through the Broker.
Figure 254: Client - SPS - Server
VNC-specific settings
The following sections describe configuration settings available only for the Virtual Networking (VNC) protocol. Use the following policies to control who, when, and how can access the VNC connections. For a list of supported client applications, see Supported protocols and client applications.
|

|
Caution:
To monitor VNC connections, enable user authentication on your VNC server. One Identity Safeguard for Privileged Sessions (SPS) automatically terminates unauthenticated connections. |
-
Channel Policy: The VNC protocol has only one channel type with no special configuration options. The available channel policy options are the following: Type, From, Target, Time policy, Four-eyes, Record audit trail, Gateway groups, Remote groups, and Content policy. For details on configuring these options, see Creating and editing channel policies.
-
TLS support: To enable TLS-encryption for your VNC connections, see Enabling TLS-encryption for VNC connections.
-
VNC settings: VNC settings determine the parameters of the connection on the protocol level, including timeout value, and so on. For details, see Creating and editing protocol-level VNC settings.
-
User lists in Channel Policies: User lists affect VNC connections only when they are used together with Gateway Authentication. For details, see Configuring gateway authentication.
-
Content Policy: Content policies allow you to inspect the content of the connections for various text patterns, and perform an action if the pattern is found. For example, SPS can send an e-mail alert if a specific window title appears in RDP and VNC connections. For details, see Creating a new content policy.
-
WebSocket/VNC audit trails: You can replay audit trails of a WebSocket connection in your browser or using the Safeguard Desktop Player application only if it contains Virtual Network Computing (VNC) traffic. For all other WebSocket connections, export the audit trail as a PCAP file and replay it using the Safeguard Desktop Player application.
For more information, see Supported HTTP channel types.
Enabling TLS-encryption for VNC connections
The following steps describe how to enable TLS-encryption in a VNC connection policy.
NOTE:
Some vendors may use custom protocol elements and TLS-encryption that do not have available documentation. As a result, these cannot be audited by One Identity Safeguard for Privileged Sessions (SPS). Regardless of vendors, only the custom features described in the RFC 6143 are supported. As for encryptions, only those completely TLS-encapsulated streams can be processed where the TLS encryption process was started before the VNC protocol handshake.
Prerequisites
Depending on your requirements, one or more of the following might be needed:
-
An X.509 certificate and its private key. SPS can display the same certificate to the peers on both the client and the server side. You can also use different certificates for the client and server sides. Use your own PKI system to generate these certificates, as they cannot be created on SPS. Note that the Common Name of the certificate must contain the domain name or the IP address of SPS, otherwise the clients might reject the certificate.
-
To generate certificates on-the-fly for a connection, a signing certificate authority is required. For details on creating a signing CA, see Signing certificates on-the-fly.
-
To require the peers of SPS to have an X.509 certificate signed by a specific Certificate Authority, a list of the trusted certificate authorities is needed. For details on creating a trusted CA list, see Verifying certificates with Certificate Authorities.
TIP: One Identity recommends using 2048-bit RSA keys (or stronger).
To enable TLS-encryption in a VNC connection policy
-
Navigate to VNC Control > Connections and select the connection policy in which you want to enable TLS.
Figure 255: VNC Control > Connections — Enabling TLS-encryption for VNC connections

-
Set the encryption settings used between the client and SPS in the Client-side transport security settings section.
To require encryption, select TLS. When the connection is encrypted, SPS has to show a certificate to the peer.
-
-
Select how SPS should authenticate the peers.
-
To permit connections from peers without requesting a certificate, select No certificate is required.
-
To permit connections only from peers with a valid certificate that was signed by a specific CA, complete the following steps.
-
Create a list of trusted Certificate Authorities that will be used to validate the certificates of the peers. For details on creating a trusted CA list, see Verifying certificates with Certificate Authorities.
-
Select Only accept certificates authenticated by the trusted CA list.
-
Select the certificate authority list to use in the Trusted CA field.
-
Set the encryption settings used between SPS and the server in the Server-side transport security settings section.

To require encryption, select TLS. When the connection is encrypted, SPS has to show a certificate to the peer.
-
Select the certificate to show to the server.
-
To use the same certificate for every peer, complete the following steps.
-
Generate and sign a certificate for SPS in your PKI system, and export the certificate and its private key.
-
Select Use the same certificate for each connection.
-
Select Private key for host certificate, click  and upload the private key.
-
Select X.509 host certificate, click and upload the certificate.
-
To use a separate certificate for every connection, complete the following steps.
-
Create a certificate authority that will be used to sign the certificates that SPS shows to the peer. For details, see Signing certificates on-the-fly.
-
Select Generate certificate on-the-fly.
-
Select the certificate authority to use in the Signing CA field.
Limitations
NOTE: When using the Use the same certificate for each connection option and the connection policy that allows access to multiple servers using HTTPS, the client applications will display a warning because the certificate used in the connection will be invalid (namely, the Common Name of the certificate will not match the hostname or IP address of the server).
NOTE: Import the certificate of the signing Certificate Authority to your clients. Otherwise, the client applications will display a warning due to the unknown Certificate Authority.
-
Select how SPS should authenticate the peers.
-
To permit connections from peers without requesting a certificate, select No certificate is required.
-
To permit connections only from peers with a valid certificate that was signed by a specific CA, complete the following steps.
-
Create a list of trusted Certificate Authorities that will be used to validate the certificates of the peers. For details on creating a trusted CA list, see Verifying certificates with Certificate Authorities.
-
Select Only accept certificates authenticated by the trusted CA list.
-
Select the certificate authority list to use in the Trusted CA field.
-
Click  .
.
Expected result
The encryption settings are applied to the connection policy.
