To replay encrypted audit trails in your browser and to view encrypted screenshots, upload the necessary private keys to your audit keystore. In the audit keystore, only private keys are stored.
For more information on the supported key format and the certificates that correspond to the private keys, see Audit keystore.
NOTE: The private keys are stored locally, in your browser.
To add the first key to your audit keystore
-
Navigate to User menu > Audit keystore.
Figure 41: User Menu > Audit keystore > — Empty audit keystore
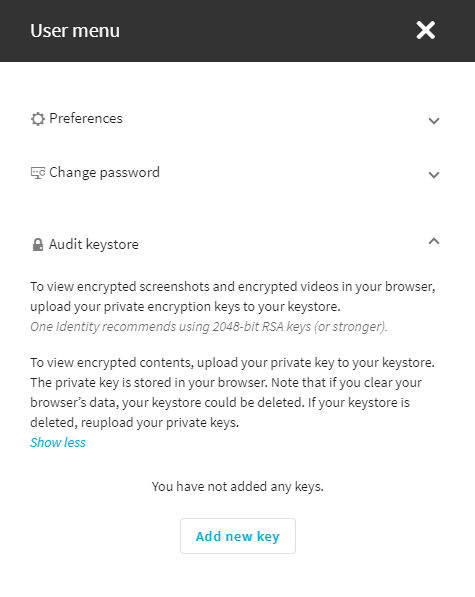
If you want to open an encrypted audit trail or screenshot from the Search interface, but you have not added the corresponding private keys yet to your audit keystore, a dialog will take you to the Audit Keystore option.
-
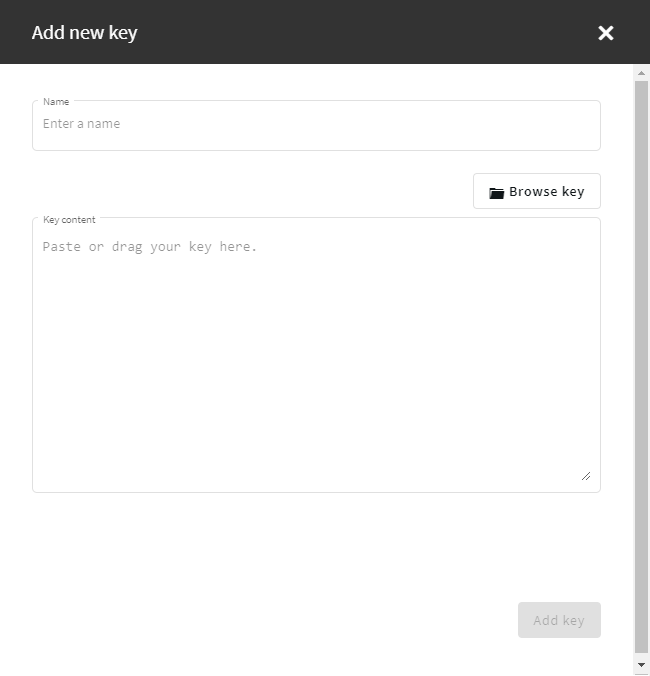
Click Add new key.
Figure 42: User Menu > Audit keystore > Add new key — Add new key
-
In the Name field, enter a name for the key.
-
Click Browse key, select the file containing the key in PEM format, and click Open.
Alternatively, you can also copy-paste or drag your key into the Key content field.
-
(Optional) If you add a private key that is encrypted, an additional field, the Key password field is displayed. In the Key password field, enter the password for the encrypted key.
-
Click Add key.
-
In the Create master password dialog, add a master password.
Figure 43: User Menu > Audit keystore > Add new key — Add a master password
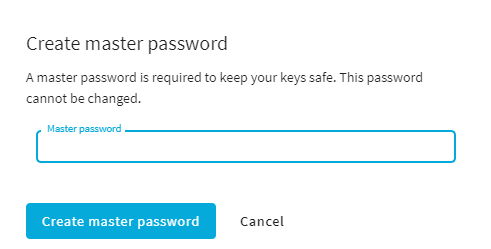
The private key is stored in your audit keystore that is protected by the master password that you created.
-
(Optional) To lock your audit keystore, click Lock keystore.
If you lock your audit keystore, you protect your private keys from unauthorized use. Your private keys can be used to decrypt content only if you unlock your audit keystore.
This section describes how to add new private keys to your audit keystore.
NOTE: The private keys are stored locally, in your browser.
To add further keys to your audit keystore
-
Navigate to User menu > Audit keystore.
-
Click Unlock private keystore.
Figure 44: User Menu > Audit keystore > Unlock private keystore — Enter the master password
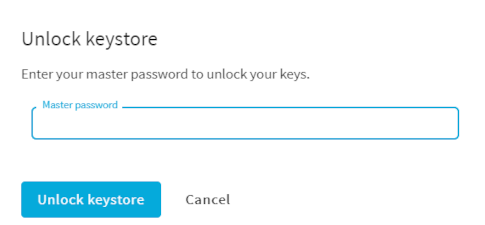
Enter your master password and click Unlock keystore.
The audit keystore is unlocked.
If you forgot your master password, see section Unlocking your audit keystore.
-
Click Add new key.
Figure 45: User Menu > Audit keystore > Add new key — Add new key
-
In the Name field, enter a name for the key.
-
Click Browse key, select the file containing the key in PEM format, and click Open.
Alternatively, you can also copy-paste or drag your key into the Key content field.
-
(Optional) If you add a private key that is encrypted, an additional field, the Key password field is displayed. In the Key password field, enter the password for the encrypted key.
-
Click Add key.
The private key is stored in your audit keystore that is protected by the master password that you created.
-
(Optional) To lock your audit keystore, click Lock keystore.
If you lock your audit keystore, you protect your private keys from unauthorized use. Your private keys can be used to decrypt content only if you unlock your audit keystore.
This section provides information on:
NOTE: The private keys are stored locally, in your browser.
In the audit keystore, the master password protects your private keys from unauthorized use, for example, if you share a computer with anyone.
To use the private keys that are stored in your audit keystore to decrypt audit items, you must unlock your audit keystore by providing your master password. After providing your master password, your audit keystore remains unlocked for the duration of your session, or until you click Lock keystore on User menu > Audit keystore.
To unlock your audit keystore
-
Navigate to User menu > Audit keystore.
-
Click Unlock private keystore.
The Unlock keystore dialog is displayed.
Figure 46: User Menu > Audit keystore > Unlock private keystore — Enter the master password
Enter your master password and click Unlock keystore.
The audit keystore is unlocked.
You can add new keys or manage your uploaded private keys.
Resetting your audit keystore
To reset your audit keystore if you forgot your master password
NOTE: The master password cannot be changed, but if you forget your master password, you can reset your audit keystore. If you reset your audit keystore, you must upload your private keys again.
-
Navigate to User menu > Audit keystore.
-
If you forgot your master password, click Forget password?.
-
In the Forget password? dialog, click Reset keystore.
-
Click Add new key and the Create master password dialog is displayed, where you can add a new master password.
-
Upload the necessary private keys again to your audit keystore.
Result
The audit keystore is unlocked and it remains open for the duration of your session or until you click Lock keystore.
This section provides information on how to delete a key in your audit keystore.
NOTE: The private keys are stored locally, in your browser.
To delete a key from your audit keystore
-
Navigate to User menu > Audit keystore.
-
Click Unlock private keystore.
The Unlock keystore dialog is displayed.
Figure 47: User Menu > Audit keystore > Unlock private keystore — Enter the master password
Enter your master password and click Unlock keystore.
The audit keystore is unlocked.
-
Click  next to the private key that you want to delete.
NOTE: If you delete the last private key from your audit keystore, the audit keystore is reset and next time you add a private key to your audit keystore, you must define a master password again.
Result
The private key is deleted from your audit keystore.
