지금 지원 담당자와 채팅
지원 담당자와 채팅

Safeguard for Privileged Sessions On Demand Hosted - Administration Guide

Preface Introduction The concepts of One Identity Safeguard for Privileged Sessions (SPS)
The philosophy of One Identity Safeguard for Privileged Sessions (SPS) Policies Credential Stores Plugin framework Indexing Supported protocols and client applications Modes of operation Connecting to a server through One Identity Safeguard for Privileged Sessions (SPS) Archive and backup concepts Maximizing the scope of auditing IPv6 in One Identity Safeguard for Privileged Sessions (SPS) SSH host keys Authenticating clients using public-key authentication in SSH The gateway authentication process Four-eyes authorization Network interfaces High Availability support in One Identity Safeguard for Privileged Sessions (SPS) Versions and releases of One Identity Safeguard for Privileged Sessions (SPS) Accessing and configuring One Identity Safeguard for Privileged Sessions (SPS)
Cloud deployment considerations The Welcome Wizard and the first login Basic settings
Supported web browsers and operating systems The structure of the web interface Network settings Configuring date and time System logging, SNMP and e-mail alerts Configuring system monitoring on SPS Data and configuration backups Archiving and cleanup Using plugins Forwarding data to third-party systems Starling integration
User management and access control Managing One Identity Safeguard for Privileged Sessions (SPS)
Controlling One Identity Safeguard for Privileged Sessions (SPS): reboot, shutdown Managing One Identity Safeguard for Privileged Sessions (SPS) clusters Managing a High Availability One Identity Safeguard for Privileged Sessions (SPS) cluster Upgrading One Identity Safeguard for Privileged Sessions (SPS) Managing the One Identity Safeguard for Privileged Sessions (SPS) license Accessing the One Identity Safeguard for Privileged Sessions (SPS) console Sealed mode Out-of-band management of One Identity Safeguard for Privileged Sessions (SPS) Managing the certificates used on One Identity Safeguard for Privileged Sessions (SPS)
General connection settings HTTP-specific settings ICA-specific settings MSSQL-specific settings RDP-specific settings SSH-specific settings Using Sudo with SPS Telnet-specific settings VMware Horizon View connections VNC-specific settings Indexing audit trails Using the Search interface Advanced authentication and authorization techniques Reports The One Identity Safeguard for Privileged Sessions (SPS) REST API One Identity Safeguard for Privileged Sessions (SPS) scenarios Troubleshooting One Identity Safeguard for Privileged Sessions (SPS)
Network troubleshooting Gathering data about system problems Viewing logs on One Identity Safeguard for Privileged Sessions (SPS) Changing log verbosity level of One Identity Safeguard for Privileged Sessions (SPS) Collecting logs and system information for error reporting Collecting logs and system information of the boot process for error reporting Support hotfixes Status history and statistics Troubleshooting a One Identity Safeguard for Privileged Sessions (SPS) cluster Understanding One Identity Safeguard for Privileged Sessions (SPS) RAID status Restoring One Identity Safeguard for Privileged Sessions (SPS) configuration and data VNC is not working with TLS Configuring the IPMI from the BIOS after losing IPMI password Incomplete TSA response received Using UPN usernames in audited SSH connections
Using SPS with SPP Configuring external devices Using SCP with agent-forwarding Security checklist for configuring One Identity Safeguard for Privileged Sessions (SPS) Jumplists for in-product help Configuring SPS to use an LDAP backend Glossary

Protecting against brute-force attacks

This section describes the Protect against brute-force attacks option that you can configure on Users & Access Control > Settings.

How the Protect against brute-force attacks option works

By default, the web login addresses of administrators and users are protected against brute-force attacks. After the users reach the configured number of unsuccessful login attempts, SPS denies all following attempts for the configured time.

The Protect against brute-force attacks option blocks the user name or the IP address based on the following logic:

  • If the number of unsuccessful login attempts from the same IP address with any user name exceeds the threshold, the IP address is blocked.

  • If the number of unsuccessful login attempts with a user name from different IP addresses exceeds the configured threshold, the user name is blocked for all IP addresses.

The authentication attempts rejected by SPS during the blocking do not increase the lockout counters.

NOTE: The admin user is also subject to brute-force attack protection.

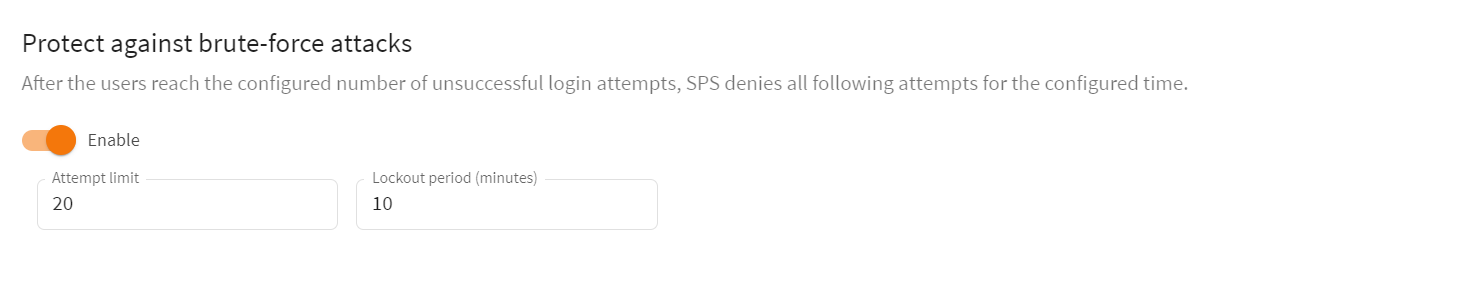
By default, Protect against brute-force attacks blocks the user name or the IP address for 10 minutes after 20 unsuccessful login attempts.

Accepted values:

  • Attempt limit: 1-50 attempts

  • Lockout period: 1-720 minutes

Blocked users receive the Unable to authenticate error message, regardless of whether they enter valid or invalid credentials.

NOTE: The Unable to authenticate error message does not provide details about the error and the possible solutions to prevent providing information for attackers.

Log messages about blocked user names and IP addresses

If a user name or an IP address is blocked, a log event is created, which provides the details about the blocking. The log event contains the following information:

  • Cause of the blocking

  • User name

  • IP address

  • Duration of the blocking

Example: log message about a blocked user name

The following example provides the details about the blocking of a user name. The blocked user name is admin and the IP address used is 1.2.3.4. The reason for the blocking is that the user has exceeded the allowed number of unsuccessful authentication attempts. This user is blocked for 60 minutes.

Authentication denied, too many attempts, username is locked out; username='admin', remote_address='1.2.3.4', lockout='60 min'
Example: log message about a blocked IP address

The following example provides the details about the blocking of an IP address. The user is admin and the blocked IP address is 1.2.3.4. The reason for the blocking is that the allowed number of unsuccessful authentication attempts has been reached from this IP address. This IP address is blocked for 40 minutes.

Authentication denied, too many attempts, remote_address is locked out; username='admin', remote_address='1.2.3.4', lockout='40 min'
Unblocking blocked user names and IP addresses

SPS resets the web lockout counter for a user name or IP address if:

  • The lockout period is over.

  • The server is rebooted.

  • The secondary node becomes active after a High Availability (HA) failover.

  • After the root user clears the list of blocked users/IP addresses on the Troubleshooting page of the text-based physical or SSH console.

NOTE: If you are the root user, on the Troubleshooting page of the text-based physical or SSH console, you can clear the list of blocked user names and IP addresses using the Clear list of blocked users/IPs option. If you clear the list, users and IP addresses that previously were blocked due to exceeding the allowed number of web login attempts can attempt logging in again. Clearing the list does not disable the Protect against brute-force attacks option.

To configure the Protect against brute-force attacks option
  1. Navigate to Users & Access Control > SettingsProtect against brute-force attacks.

    Figure 79: Users & Access Control > SettingsProtect against brute-force attacks

  2. (Optional) Modify the default values of Attempt limit, Lockout period, or both, according to your security requirements.
  3. To save the modifications, click Commit changes.

Authentication banner

You can display a banner with a configurable text on the web and console login screen of One Identity Safeguard for Privileged Sessions (SPS).

Users will see the banner every time they try to log in to SPS. The login screen displays the banner text as plain text, with whitespaces preserved.

To enter a banner message, navigate to Users & Access Control > SettingsAuthentication banner.

Figure 80: Users & Access Control > Settings > Authentication banner — Enter a banner message

Web interface timeout

By default, One Identity Safeguard for Privileged Sessions (SPS) terminates the web session of a user after 10 minutes of inactivity. To change the value of this timeout, adjust the Users & Access Control > Settings > Web interface timeout option.

Figure 81: Users & Access Control > Settings — Web interface timeout

Managing One Identity Safeguard for Privileged Sessions (SPS) users locally

By default, One Identity Safeguard for Privileged Sessions (SPS) users are managed locally on SPS. To add local users in SPS, complete all steps of the following procedure:

  1. Create users.

    For detailed instructions on how to create local users, see Creating local users in One Identity Safeguard for Privileged Sessions (SPS).

  2. Assign users to groups.

    For details about how to add a usergroup, see Managing local user groups.

  3. Assign privileges to groups.

    For information on how to control the privileges of usergroups, see Managing user rights and usergroups.

관련 문서

The document was helpful.

평가 결과 선택

I easily found the information I needed.

평가 결과 선택