지금 지원 담당자와 채팅
지원 담당자와 채팅

Safeguard for Privileged Sessions On Demand Hosted - Administration Guide

Preface Introduction The concepts of One Identity Safeguard for Privileged Sessions (SPS)
The philosophy of One Identity Safeguard for Privileged Sessions (SPS) Policies Credential Stores Plugin framework Indexing Supported protocols and client applications Modes of operation Connecting to a server through One Identity Safeguard for Privileged Sessions (SPS) Archive and backup concepts Maximizing the scope of auditing IPv6 in One Identity Safeguard for Privileged Sessions (SPS) SSH host keys Authenticating clients using public-key authentication in SSH The gateway authentication process Four-eyes authorization Network interfaces High Availability support in One Identity Safeguard for Privileged Sessions (SPS) Versions and releases of One Identity Safeguard for Privileged Sessions (SPS) Accessing and configuring One Identity Safeguard for Privileged Sessions (SPS)
Cloud deployment considerations The Welcome Wizard and the first login Basic settings
Supported web browsers and operating systems The structure of the web interface Network settings Configuring date and time System logging, SNMP and e-mail alerts Configuring system monitoring on SPS Data and configuration backups Archiving and cleanup Using plugins Forwarding data to third-party systems Starling integration
User management and access control Managing One Identity Safeguard for Privileged Sessions (SPS)
Controlling One Identity Safeguard for Privileged Sessions (SPS): reboot, shutdown Managing One Identity Safeguard for Privileged Sessions (SPS) clusters Managing a High Availability One Identity Safeguard for Privileged Sessions (SPS) cluster Upgrading One Identity Safeguard for Privileged Sessions (SPS) Managing the One Identity Safeguard for Privileged Sessions (SPS) license Accessing the One Identity Safeguard for Privileged Sessions (SPS) console Sealed mode Out-of-band management of One Identity Safeguard for Privileged Sessions (SPS) Managing the certificates used on One Identity Safeguard for Privileged Sessions (SPS)
General connection settings HTTP-specific settings ICA-specific settings MSSQL-specific settings RDP-specific settings SSH-specific settings Using Sudo with SPS Telnet-specific settings VMware Horizon View connections VNC-specific settings Indexing audit trails Using the Search interface Advanced authentication and authorization techniques Reports The One Identity Safeguard for Privileged Sessions (SPS) REST API One Identity Safeguard for Privileged Sessions (SPS) scenarios Troubleshooting One Identity Safeguard for Privileged Sessions (SPS)
Network troubleshooting Gathering data about system problems Viewing logs on One Identity Safeguard for Privileged Sessions (SPS) Changing log verbosity level of One Identity Safeguard for Privileged Sessions (SPS) Collecting logs and system information for error reporting Collecting logs and system information of the boot process for error reporting Support hotfixes Status history and statistics Troubleshooting a One Identity Safeguard for Privileged Sessions (SPS) cluster Understanding One Identity Safeguard for Privileged Sessions (SPS) RAID status Restoring One Identity Safeguard for Privileged Sessions (SPS) configuration and data VNC is not working with TLS Configuring the IPMI from the BIOS after losing IPMI password Incomplete TSA response received Using UPN usernames in audited SSH connections
Using SPS with SPP Configuring external devices Using SCP with agent-forwarding Security checklist for configuring One Identity Safeguard for Privileged Sessions (SPS) Jumplists for in-product help Configuring SPS to use an LDAP backend Glossary

Authenticating users with X.509 certificates

One Identity Safeguard for Privileged Sessions (SPS) provides a method to authenticate the users of the web interface with X.509 client certificates. The client certificate is validated against a trust store, and the username is exported from the client certificate for identification.

TIP: One Identity recommends using 2048-bit RSA keys (or stronger).

To authenticate SPS users on the SPS web interface with X.509 client certificates, complete the following steps.

Prerequisites

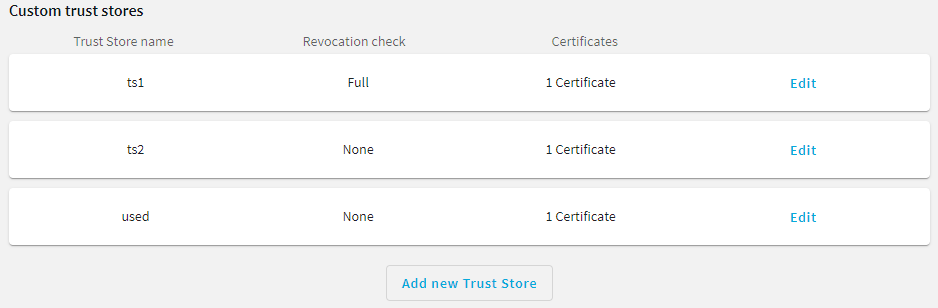
Navigate to Basic Settings > Trust Stores and create a custom trust store. For more information, see Verifying certificates with Certificate Authorities using trust stores.

Figure 88: Basic Settings > Trust Stores— Creating a custom trust store

To authenticate users with X.509 certificates

  1. Navigate to Users & Access Control > Login options.

  2. To configure an X.509 login method, select one of the following options:

    • Select an existing X.509 login option and click Edit.

    • Click Create new authentication method and select X.509.

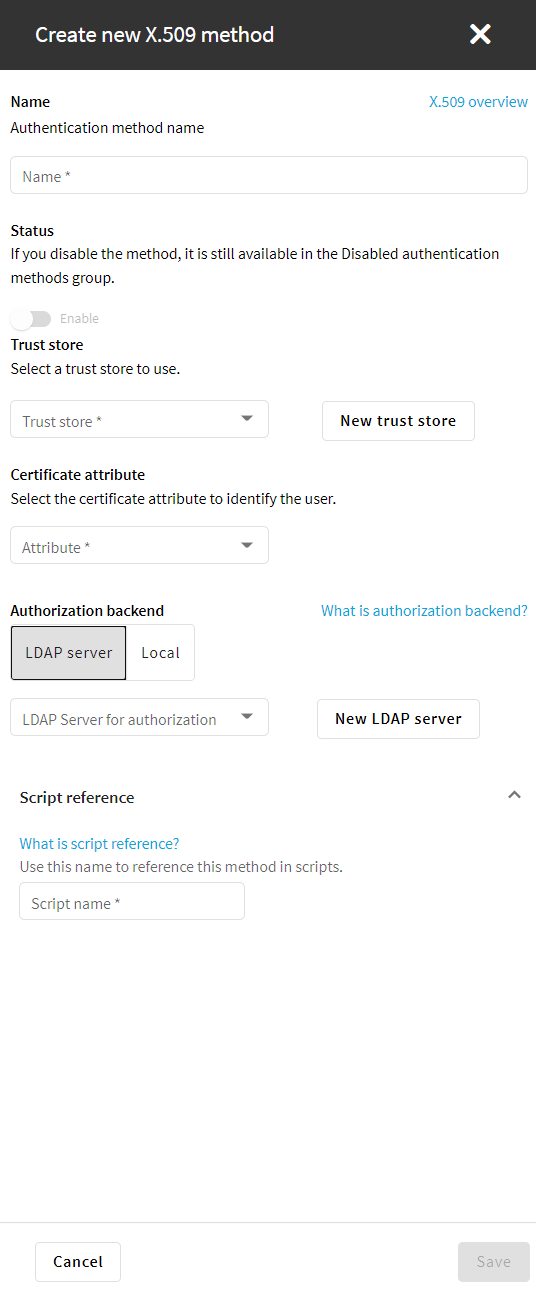
    The following figure shows the configuration options of the X.509 login method.

    Figure 89: Users & Access Control > Login options — Configuring X.509 authentication

  3. In the Name field, specify a name for the login option.

  4. (Optional) Enable the X.509 login method.

    NOTE: You can enable only one X.509 login method at a time.

  5. Select the trust store you created as a prerequisite in Basic Settings > Trust Stores.

    CAUTION: From version 6.8, SPS changes authenticating the users of the web interface with X.509 client certificates: certificates are validated against a trust store instead of a trusted CA list. During the upgrade, the trusted CA list formerly used for authentication is copied to a trust store that has revocation check disabled by default.

    If you have previously enabled revocation check for your trusted CA list and already added the URLs of Certificate Revocation Lists (CRL), or you want to enable revocation check, you must edit the trust store settings manually.

    • Navigate to Basic Settings > Trust Stores.

    • Select the revocation check type Leaf or Full for the trust store.

    • Add a CRL URL for each root and intermediate CA.

    For more information about trust stores and how to configure them, see "Verifying certificates with Certificate Authorities using trust stores" in the Administration Guide.

  6. In the Certificate attribute field, select the user certificate field that contains the username. In most cases, it is the commonName or userid field, but SPS supports the emailAddress and userPrincipalName fields as well.

  7. Select LDAP server or Local as the Authorization Backend.

  8. (Optional) To add a new LDAP server, click New LDAP server under Authorization backend and select one of the server types:

  9. Specify a Script name for the Script reference. The Script name is a unique, human readable ID that is used by the REST API clients to select the login method.

  10. To save your modifications, click Commit.

Managing user rights and usergroups

In One Identity Safeguard for Privileged Sessions (SPS), user rights can be assigned to usergroups. SPS has numerous usergroups defined by default, but custom user groups can be defined as well. Every group has a set of privileges: which pages of the SPS web interface it can access, and whether it can only view (read) or also modify (read & write/perform) those pages or perform certain actions.

NOTE: Every group has either read or read & write/perform privileges to a set of pages.

Figure 90: Users & Access Control > Appliance Access — Managing SPS users

Assigning privileges to user groups for the One Identity Safeguard for Privileged Sessions (SPS) web interface

The following describes how to assign privileges to a new group.

To assign privileges to a new group

  1. Navigate to Users & Access Control > Appliance Access and click .

  2. Find your user group. If you start typing the name of the group you are looking for, the auto-complete function will make finding your group easier for you.

  3. Click Edit located next to the name of the group. The list of available privileges is displayed.

  4. Select the privileges (that is, the pages of the One Identity Safeguard for Privileged Sessions (SPS) interface) to which the group will have access and click Save.

    NOTE: To export the configuration of SPS, the Export configuration privilege is required.

    To import a configuration to SPS, the Import configuration privilege is required.

    To update the firmware and set the active firmware, the Firmware privilege is required.

  5. Select the type of access (read or read & write) from the Type field.

  6. Click .

Modifying group privileges

The following describes how to modify the privileges of an existing group.

To modify the privileges of an existing group

  1. Navigate to Users & Access Control > Appliance Access.

  2. Find the group you want to modify and click Edit. The list of available privileges is displayed.

  3. Select the privileges (pages of the One Identity Safeguard for Privileged Sessions (SPS) interface) to which the group will have access and click Save.

    Figure 91: Users & Access Control > Appliance Access > Edit — Modifying group privileges

    Caution:

    Assigning the Search privilege to a user on the Users & Access Control page automatically enables the Search in all connections privilege, and grants the user access to every audit trail, even if the user is not a member of the groups listed in the Access Control option of the particular connection policy.

  4. Select the type of access (read or read & write) from the Type field.

  5. Click .

The admin user is available by default and has all privileges. It is not possible to delete this user.

관련 문서

The document was helpful.

평가 결과 선택

I easily found the information I needed.

평가 결과 선택