This section describes how to temporarily disable some or all of the controlled traffic to the protected servers.
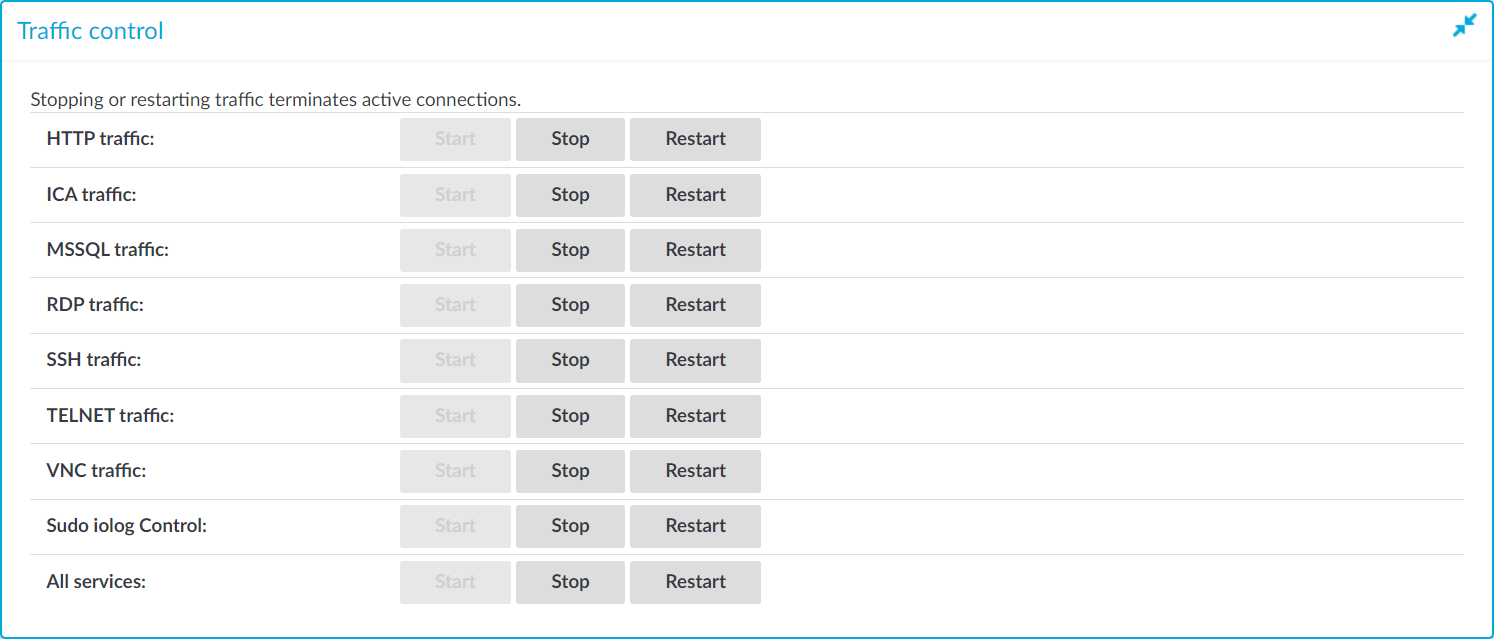
Figure 107: Basic Settings > System > Traffic control — Disabling the controlled traffic
|

|
Caution:
Using the Stop option of the respective traffic types on Basic Settings > System > Traffic control disables the traffic only temporarily. Committing specific changes on the SPS web interface enables the connections again. For details on how to permanently disable a type of traffic, see Disabling controlled traffic permanently. |
NOTE: Disabling the traffic affects only the traffic configured in the Connection policies. Other network traffic (such as web management, DNS, LDAP, SNMP, SMTP, and so on) can pass SPS even if all traffic is disabled. For details on configuring Connection policies, see General connection settings.
To temporarily disable some or all of the controlled traffic to the protected servers
-
Navigate to Basic Settings > System > Traffic control.
-
To disable any of the supported traffic types, click Stop in the respective traffic field. You can disable the following traffic types on this page:
-
HTTP
-
ICA
-
MSSQL
-
RDP
-
SSH
-
Telnet
-
VNC
-
Sudo iolog
-
All services
NOTE: Disabling SSH traffic also disables all other traffic forwarded in SSH, for example X11.
Disabling Telnet also disables TN3270 traffic.
The Traffic overview under About displays the status of all traffic types.
NOTE: Disabling the traffic affects only the traffic configured in the Connection policies, other traffic can pass SPS even if the all traffic is disabled. For details on configuring Connection policies, see General connection settings.
To disable controlled traffic permanently
-
Figure 108: <Protocol name> Control > Global Options — Disabling the controlled traffic persistently

Navigate to the Global Options page of the traffic type you want to disable, for example to SSH Control > Global Options to disable SSH traffic.
-
Set the Traffic > Service field to disabled.
-
Click  .
.
When you have a set of two or more One Identity Safeguard for Privileged Sessions (SPS) instances in your deployment, you can join them into a cluster. This has several advantages. You can:
-
Manage the nodes from one central location.
-
Monitor their status and update their configuration centrally.
-
Search all session data recorded by all nodes in the cluster on a single node.
-
Scale the performance of the cluster by adding new nodes and joining them to the cluster easily.
-
Extend auditing to other networks by adding new nodes to the cluster and joining them to the cluster.
This is achieved by assigning roles to the individual nodes in your cluster: you can set one of your SPS nodes to be the Central management node and the rest of the nodes are managed from this central node.
NOTE: Consider the following:
-
All nodes in a cluster must run the same version of SPS.
-
One Identity recommends managing not more than a few tens of instances from the Central management node.
-
Nodes in the cluster connect to each other using IPsec.
You can configure your One Identity Safeguard for Privileged Sessions (SPS) cluster in the following ways:
-
Configuration synchronization without a central search: This method allows you to perform your configuration settings on your Central management node. Managed host nodes periodically fetch and merge the settings into their own: this is called "configuration synchronization". Central search is not configured in this method, so you can search for sessions on each node, including the Central management node.
For more information on this method, see Configuration synchronization without a central search.
-
Central search with configuration synchronization: This method allows you to use a Central management node with a Search master role to view session data recorded by the minion nodes of your cluster, as well as manage all the nodes in the cluster from one central location.
For more information on this method, see Central search with configuration synchronization.
IMPORTANT: One Identity does not recommend having a central search configuration without configuration synchronization.
SPS (SPS) offers several types of roles that you can assign to the nodes of an SPS cluster. These roles are listed below.
NOTE:
-
Nodes keep their assigned role in the cluster even after a system restore.
-
Depending on their type, you can assign certain roles only to a single node in the cluster, while others to multiple nodes.
-
One node can also have multiple roles assigned to it, with some restrictions depending on the selected roles. For details, see the description of the roles.
Central management
NOTE: You can assign the Central management role only to a single node in the cluster.
The Central management node is used to set up a central configuration within the cluster, by having the configuration of this node synchronized to the other nodes of the cluster. Any changes that you make in the cluster configuration of this node (for example, role changes, host address changes, and so on) are fetched by the rest of the nodes in the cluster, and are merged into their configuration.
The Central management node also contains status information about all the other nodes in the cluster, so you can check the health of the whole cluster on this node. This status information contains:
Managed host
NOTE: You can assign the Managed host role to multiple nodes in the cluster.
Managed host nodes in a cluster synchronize their entire configuration from the Central management node, not just the cluster-related elements of their configuration. Managed host nodes send their status information to the Central management node every 10 seconds.
Search master
NOTE:
-
A One Identity Safeguard for Privileged Sessions (SPS) node with the Search master role cannot be used for monitoring network traffic, or for session recording and auditing purposes. Before assigning this role to a node, read carefully the limitations that apply to Search master nodes in Managing a cluster with central search configuration and configuration synchronization
-
You can assign the Search master role only to a single node in the cluster.
Search master: The Search master node allows you to search all the session data recorded by other nodes in the cluster, provided that those other nodes are set to the Search minion role.
This role can only be assigned to nodes that either have the Managed host or Central management role. This is required so that the configuration of Search minion nodes and the Search master node are always in sync.
If there is no configuration synchronization between the node acting as the Search master and the Search minion nodes, then session data may show up on the Search interface of the Search master that come from connections that do not match the connection policies set up on the Search master (because they come from session data recorded by the Search minions).
Search minion
NOTE: You can assign the Search minion role to multiple nodes in the cluster.
Search minion nodes in a cluster send session data that they recorded to the Search master for central search purposes. The session data recorded by a Search minion node is not searchable on the node itself, only on the Search master.
This role can only be assigned to nodes that either have the Managed host or Central management role. This is required so that the configuration of Search minion nodes and the Search master node are always in sync.
If there is no configuration synchronization between the node acting as the Search master and the Search minion nodes, then session data may show up on the Search interface of the Search master that come from connections that do not match the connection policies set up on the Search master (because they come from session data recorded by the Search minions).
Search local
NOTE: You can assign the Search local role to multiple nodes in the cluster.
Search local nodes keep their recorded session data for local searching. Therefore, the session data recorded by a Search local node is searchable on the node itself, but not on the Search master node (if there is one configured in the cluster).
SPP fetcher
NOTE:
-
You can assign the SPP fetcher role only to a single node in the cluster.
-
You can only assign the SPP fetcher role to a node that also has either the Search local or Search minion role assigned.
-
Make sure that the One Identity Safeguard for Privileged Passwords (SPP) node is already connected to the SPS cluster before assigning the SPP fetcher role to a node. For details, see Linking SPS to SPP.
The SPP fetcher node fetches data from an SPP node linked to the cluster. The fetched data includes:
-
Workflow data from the past 5 minutes first, and then new workflow data near real-time.
-
Historical data from the past 1 year, starting with the past 1 week.
The time required for fetching depends on the amount of data to fetch. This data will be then available on the Search interface after the fetching process has finished. To track the fetch progress of historical data, check the status on the About  page.
page.
No role
Nodes in the cluster that have no roles assigned fetch only the cluster-related elements of their configuration from the Central management node.
Such nodes without any roles send their status information to the Central management node every 10 seconds.
