The SPS license must be updated before the existing license expires or when you purchase a new license.
To update the license
-
Navigate to Basic Settings > System > License.
-
Click Browse and select the new license file.
NOTE: It is not required to manually decompress the license file. Compressed licenses (for example .zip archives) can also be uploaded.
-
Click Upload, then  .
.
-
|

|
Caution:
This step terminates all controlled connections going through SPS. Disconnect your clients from the protected servers before proceeding. |
To activate the new license, navigate to Traffic control > All services and click Restart.
Connecting to One Identity Safeguard for Privileged Sessions (SPS) locally or remotely using Secure Shell (SSH) allows you to access the console menu of SPS. The console menu provides access to the most basic configuration and management settings of SPS. It is mainly used for troubleshooting purposes, the primary interface of SPS is the web interface.
The console menu is accessible to the root user using the password set during completing the Welcome Wizard.
Figure 137: The console menu
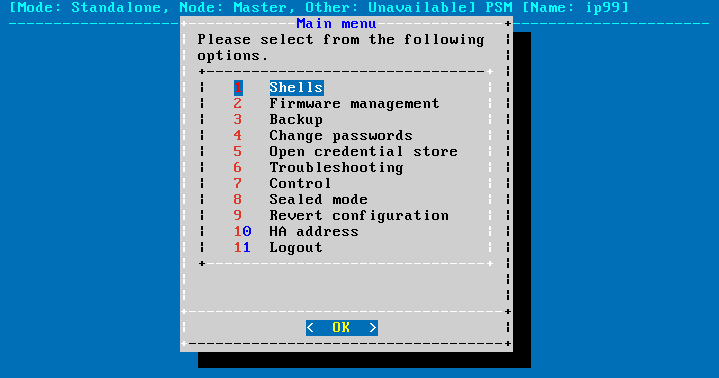
The console menu provides allows you to perform the following actions.
Access the local core and boot shells.
This is usually not recommended and only required in certain troubleshooting situations. Select the boot/core shell's keyboard layout for the local console. This will not affect the keyboard layout if you have accessed the shell via SSH.
The boot firmware boots up SPS, provides High Availability support, and starts the core firmware. The core firmware, in turn, handles everything else: provides the web interface, manages the connections, and so on.
Select the active firmware, and delete unneeded firmwares.
Accessing the firmware management is useful if after an update the new firmware does not operate properly and the web interface is not available to activate the previous firmware.
Start backup processes.
For more information about backup processes, see Data and configuration backups.
Change the passwords of the root and admin users.
For details, see Changing the root password of One Identity Safeguard for Privileged Sessions (SPS).
Access the network-troubleshooting functions and display the available log files.
If the web interface is inaccessible, it can be the result of an internal locking error. To resolve this issue, delete the lock files. After deletion, they are archived, and included in the support bundle if they are not older than 30 days. To create a support bundle, if the web interface is inaccessible, select Create support bundle.
Reboot and shutdown the system.
For details, see Controlling One Identity Safeguard for Privileged Sessions (SPS): reboot, shutdown.
Enable and disable sealed mode.
For details, see Sealed mode.
Set the IP address of the HA interface.
For more information about assigning an IP address to the HA interface of a node, see Resolving an IP conflict between cluster nodes.
NOTE: Note that logging in to the console menu automatically locks the SPS interface, meaning that users cannot access the web interface while the console menu is used. The console menu can be accessed only if there are no users accessing the web interface. The connection of web-interface users can be terminated to force access to the console menu.
Exclusively for troubleshooting purposes, you can access the One Identity Safeguard for Privileged Sessions (SPS) host using SSH.
Completing the Welcome Wizard automatically disables SSH access to SPS. Re-enabling it allows you to connect remotely to the SPS host and login using the root user. The password of the root user is the one you provided in the Welcome Wizard. For details on how to change the root password from the web interface, see Changing the root password of One Identity Safeguard for Privileged Sessions (SPS).
The following encryption algorithms are configured on the local SSH service of SPS:
-
Key exchange (KEX) algorithms:
diffie-hellman-group-exchange-sha256
-
Ciphers:
aes256-ctr,aes128-ctr
-
Message authentication codes:
hmac-sha2-512,hmac-sha2-256
SSH access is, by default, protected against brute-force attacks: after 20 unsuccessful login attempts, the offending IP is blocked from accessing the SSH service for ten minutes.
You can turn off brute force protection by unselecting the Protect against brute-force attacks option for the SSH server.
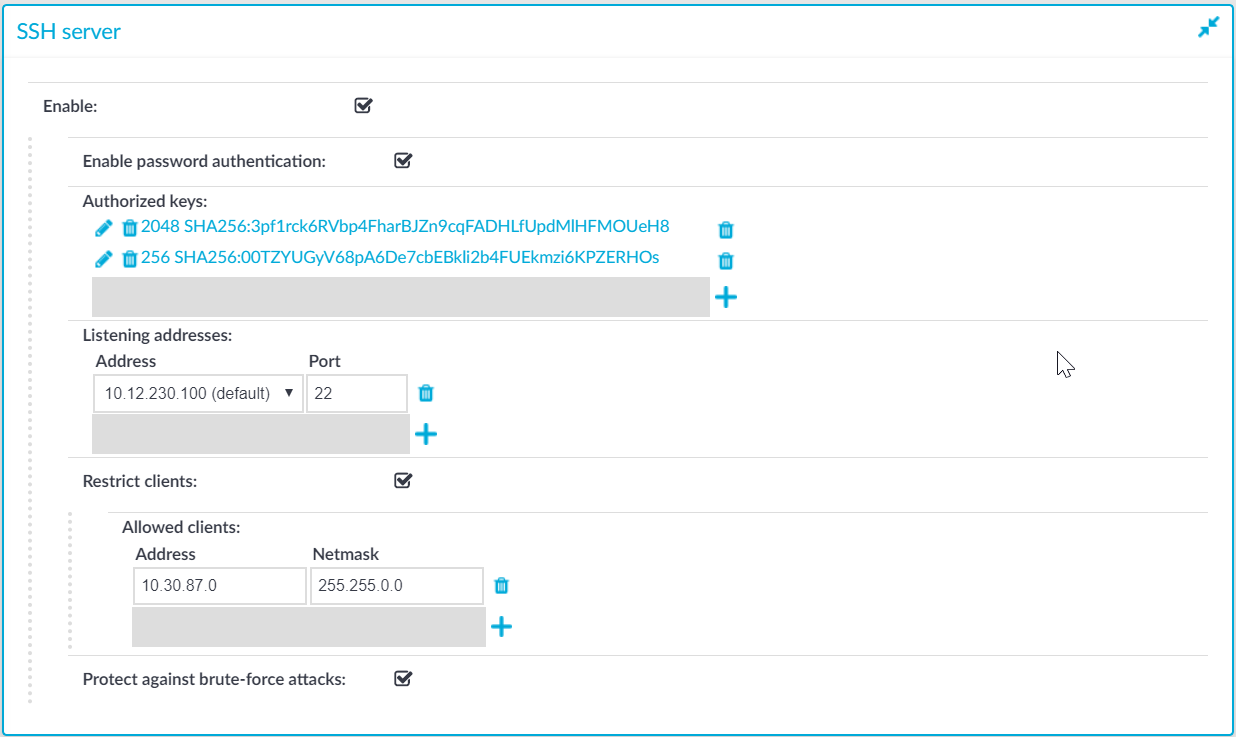
To enable SSH access to the SPS host
-
Navigate to Basic Settings > Local Services > SSH server.
Figure 138: Basic Settings > Local Services > SSH server — Enabling remote SSH access to SPS
-
Select the Enable option.
NOTE: Remote SSH access is automatically disabled if Sealed mode is enabled. For details, see Sealed mode.
-
Choose the authentication method for the remote SSH connections.
-
To enable password-based authentication, select the Enable password authentication option.
-
To enable public-key authentication, click  in the Authorized keys field, click
  and upload the public keys of the users who can access and manage SPS remotely via SSH.
SPS allows you to use the following SSH host keys:
-
RSA (ssh-rsa), which is the most widely used public-key algorithm for the SSH key. In SPS, uploading RSA SSH host keys are supported in PKCS #1 PEM, PKCS #8 PEM, OpenSSH (openssh-key-v1), and PuTTY private key formats.
NOTE:
TIP: One Identity recommends using 2048-bit RSA keys (or stronger).
-
Ed25519 (ssh-ed25519), which offers a better security and faster performance compared to RSA.
In SPS, uploading Ed25519 SSH host keys are supported in PKCS #8 PEM, OpenSSH (openssh-key-v1), and PuTTY private key formats.
-
ECDSA NIST P-256 (ecdsa-sha2-nistp256), which is a variant of the Digital Signature Algorithm (DSA). In SPS, uploading ECDSA SSH host keys are supported in SEC1 PEM, PKCS #8 PEM, OpenSSH (openssh-key-v1), and PuTTY private key formats.
You can have multiple SSH server host keys on SPS for the same server, however, you cannot set more than one key for each type. For example, you can keep your old RSA SSH key and generate a new Ed25519 key but you cannot set two RSA keys.
-
Choose an address and a port for the SSH server in the Listening addresses section.
The available addresses correspond to the interface addresses configured in Basic Settings > Network > Interfaces. Only IPv4 addresses can be selected.
To add multiple addresses, click .
-
(Optional) To permit SSH acces only from selected subnets or IP addresses, select Restrict clients, click and enter the IP address and netmask of the allowed clients.
Use an IPv4 address.
To add multiple addresses, click .
-
Click .
