Preface
Introduction
The concepts of One Identity Safeguard for Privileged Sessions (SPS)
The philosophy of One Identity Safeguard for Privileged Sessions (SPS)
Policies
Credential Stores
Plugin framework
Indexing
Supported protocols and client applications
Cloud deployment considerations
The Welcome Wizard and the first login
HTTP
ICA
MSSQL
Remote Desktop Gateway Server Protocol (RDGSP)
Remote Desktop Protocol (RDP)
Secure Shell Protocol (SSH)
Telnet
VMware Horizon View
Virtual Network Computing (VNC)
Modes of operation
Transparent mode
Single-interface transparent mode
Non-transparent mode
Inband destination selection
Connecting to a server through One Identity Safeguard for Privileged Sessions (SPS)
Connecting to a server through One Identity Safeguard for Privileged Sessions (SPS) using SSH
Connecting to a server through One Identity Safeguard for Privileged Sessions (SPS) using RDP
Connecting to a server through One Identity Safeguard for Privileged Sessions (SPS) using an RD Gateway
Archive and backup concepts
Configuration export
System backup
Connection backup
Connection archive
Support bundle
Debug logs
Connection logs
Core dump files
Maximizing the scope of auditing
IPv6 in One Identity Safeguard for Privileged Sessions (SPS)
SSH host keys
Authenticating clients using public-key authentication in SSH
The gateway authentication process
Four-eyes authorization
Network interfaces
High Availability support in One Identity Safeguard for Privileged Sessions (SPS)
Versions and releases of One Identity Safeguard for Privileged Sessions (SPS)
Accessing and configuring One Identity Safeguard for Privileged Sessions (SPS)
The initial connection to One Identity Safeguard for Privileged Sessions (SPS)
Basic settings
Creating an alias IP address (Microsoft Windows)
Creating an alias IP address (Linux)
Modifying the IP address of One Identity Safeguard for Privileged Sessions (SPS)
Configuring One Identity Safeguard for Privileged Sessions (SPS) with the Welcome Wizard
Logging in to One Identity Safeguard for Privileged Sessions (SPS) and configuring the first connection
Supported web browsers and operating systems
The structure of the web interface
User management and access control
Elements of the main workspace
Multiple users and locking
Preferences
Change password
Audit keystore
Network settings
Configuring user and administrator login addresses
Managing logical interfaces
Routing uncontrolled traffic between logical interfaces
Configuring the routing table
Configuring date and time
System logging, SNMP and e-mail alerts
Configuring system logging
Configuring e-mail alerts
Configuring SNMP alerts
Querying SPS status information using agents
Customize system logging in One Identity Safeguard for Privileged Sessions (SPS)
Configuring system monitoring on SPS
Configuring monitoring
Health monitoring
Preventing disk space fill-up
System related traps
Traffic related traps
Data and configuration backups
Creating a backup policy using Rsync over SSH
Creating a backup policy using SMB/CIFS
Creating a backup policy using NFS
Creating configuration backups
Creating data backups
Encrypting configuration backups with GPG
Archiving and cleanup
Creating a cleanup policy
Creating an archive policy using SMB/CIFS
Creating an archive policy using NFS
Archiving or cleaning up the collected data
Using plugins
Forwarding data to third-party systems
Starling integration
Login settings
Managing One Identity Safeguard for Privileged Sessions (SPS) users locally
Managing One Identity Safeguard for Privileged Sessions (SPS)
Creating local users in One Identity Safeguard for Privileged Sessions (SPS)
Deleting local users from One Identity Safeguard for Privileged Sessions (SPS)
Setting password policies for local users
Managing local user groups
Managing One Identity Safeguard for Privileged Sessions (SPS) users from an LDAP database
Authenticating users to a RADIUS server
Authenticating users with X.509 certificates
Managing user rights and usergroups
Assigning privileges to user groups for the One Identity Safeguard for Privileged Sessions (SPS) web interface
Modifying group privileges
Finding specific usergroups
Using usergroups
Built-in usergroups of One Identity Safeguard for Privileged Sessions (SPS)
Creating rules for restricting access to search audit data
Displaying the privileges of users and user groups
Listing and searching configuration changes
Controlling One Identity Safeguard for Privileged Sessions (SPS): reboot, shutdown
Managing One Identity Safeguard for Privileged Sessions (SPS) clusters
General connection settings
Cluster roles
Enabling cluster management
Creating a cluster
Joining to a cluster
Assigning roles to nodes in your cluster
Configuration synchronization across nodes in a cluster
Monitoring the status of nodes in your cluster
Updating the IP address of a node in a cluster
Managing a cluster with configuration synchronization without central search
Managing a cluster with central search configuration and configuration synchronization
Managing a High Availability One Identity Safeguard for Privileged Sessions (SPS) cluster
HA cluster configuration and management options
Adjusting the synchronization speed
Redundant heartbeat interfaces
Next-hop router monitoring
Upgrading One Identity Safeguard for Privileged Sessions (SPS)
Upgrade checklist
Upgrading One Identity Safeguard for Privileged Sessions (SPS) (single node)
Upgrading a High Availability One Identity Safeguard for Privileged Sessions (SPS) cluster
Troubleshooting
Exporting the configuration of One Identity Safeguard for Privileged Sessions (SPS)
Importing the configuration of One Identity Safeguard for Privileged Sessions (SPS)
Managing the One Identity Safeguard for Privileged Sessions (SPS) license
Accessing the One Identity Safeguard for Privileged Sessions (SPS) console
Using the console menu of One Identity Safeguard for Privileged Sessions (SPS)
Enabling SSH access to the One Identity Safeguard for Privileged Sessions (SPS) host
Changing the root password of One Identity Safeguard for Privileged Sessions (SPS)
Firmware update using SSH
Exporting and importing the configuration of One Identity Safeguard for Privileged Sessions (SPS) using the console
Sealed mode
Out-of-band management of One Identity Safeguard for Privileged Sessions (SPS)
Managing the certificates used on One Identity Safeguard for Privileged Sessions (SPS)
Generating certificates for One Identity Safeguard for Privileged Sessions (SPS)
Uploading external certificates to One Identity Safeguard for Privileged Sessions (SPS)
Generating TSA certificate with Windows Certificate Authority on Windows Server 2008
Generating TSA certificate with Windows Certificate Authority on Windows Server 2012
Configuring connections
Modifying the destination address
Configuring inband destination selection
Modifying the source address
Creating and editing channel policies
Real-time content monitoring with Content Policies
Configuring time policies
Creating and editing user lists
Authenticating users to an LDAP server
Audit policies
HTTP-specific settings
Encrypting audit trails
Timestamping audit trails with built-in timestamping service
Timestamping audit trails with external timestamping service
Digitally signing audit trails
Verifying certificates with Certificate Authorities
Verifying certificates with Certificate Authorities using trust stores
Signing certificates on-the-fly
Creating a Local User Database
Configuring cleanup for the One Identity Safeguard for Privileged Sessions (SPS) connection database
Sharing SPS functions with SPP
Supported HTTP channel types
Limitations in handling HTTP connections
Authentication in HTTP and HTTPS
Creating a new HTTP authentication policy
Setting up HTTP connections
ICA-specific settings
Setting up a transparent HTTP connection
Enabling One Identity Safeguard for Privileged Sessions (SPS) to act as a HTTP proxy
Enabling TLS encryption in HTTP
Configuring half-sided SSL encryption in HTTP
Session-handling in HTTP
Creating and editing protocol-level HTTP settings
Customizing HTTP error templates
Setting up ICA connections
Supported ICA channel types
Creating and editing protocol-level ICA settings
One Identity Safeguard for Privileged Sessions (SPS) deployment scenarios in a Citrix environment
Troubleshooting Citrix-related problems
MSSQL-specific settings
Setting up MSSQL connections
Supported MSSQL channel types
Authentication in MSSQL
Creating and editing protocol-level MSSQL settings
Enabling TLS-encryption for MSSQL connections
RDP-specific settings
Supported RDP channel types
Creating and editing protocol-level RDP settings
Network Level Authentication (NLA) with One Identity Safeguard for Privileged Sessions (SPS)
SSH-specific settings
Network Level Authentication (NLA) with domain membership
Using One Identity Safeguard for Privileged Sessions (SPS) across multiple domains
Verifying the certificate of the RDP server in encrypted connections
Enabling TLS-encryption for RDP connections
Using One Identity Safeguard for Privileged Sessions (SPS) as a Remote Desktop Gateway
Configuring Remote Desktop clients for gateway authentication
Inband destination selection in RDP connections
Usernames in RDP connections
Saving login credentials for RDP on Windows
Configuring RemoteApps
Configuring the RemoteApp Launcher
Configuring SPS to enable exporting files from audit trails after RDP file transfer through clipboard or disk redirection
Configuring SPS to enable exporting sound from audit trails
Sharing RDP connection policies with SPP
Setting the SSH host keys of the connection
Using Sudo with SPS
Telnet-specific settings
Setting the SSH host keys accepted on the server side
Setting the SSH host keys offered to the clients
Supported SSH channel types
Sharing SSH connection policies with SPP
Authentication Policies
Creating a new authentication policy
Client-side authentication settings
Relayed authentication methods
Configuring your Kerberos environment
Kerberos authentication settings
Server host keys
Automatically adding the host keys of a server to One Identity Safeguard for Privileged Sessions (SPS)
Manually adding the host key of a server
Creating and editing protocol-level SSH settings
Supported encryption algorithms
Enabling TLS-encryption for Telnet connections
Creating a new Telnet authentication policy
Extracting username from Telnet connections
Creating and editing protocol-level Telnet settings
Inband destination selection in Telnet connections
VMware Horizon View connections
VNC-specific settings
Indexing audit trails
Configuring the internal indexer
Configuring external indexers
Using the Search interface
Prerequisites and limitations
Hardware requirements for the external indexer host
Configuring One Identity Safeguard for Privileged Sessions (SPS) to use external indexers
Installing the external indexer
Configuring the external indexer
Uploading decryption keys to the external indexer
Configuring a hardware security module (HSM) or smart card to integrate with external indexer
Monitoring the status of the indexer services
HTTP indexer configuration format
Setting up and testing the environment
Encrypting a PKCS#11 PIN
Starting and restarting the external-indexer service when using a custom password for PKCS#11 PIN encryption
Configuring SoftHSM
Configuring AWS CloudHSM
Configuring a smart card
Customizing the indexing of HTTP traffic
Starting the external indexer
Disabling indexing on One Identity Safeguard for Privileged Sessions (SPS)
Managing the indexers
Upgrading the external indexer
Troubleshooting external indexers
Card view
Table view
Flow view
Search Permissions
Specifying time ranges
Using search queries
Searching in the contents of audit trails
Audit trail downloads information on the Search interface
Displaying statistics on search results
Analyzing data using One Identity Safeguard for Privileged Analytics
The search and filter process
Viewing session details
Advanced authentication and authorization techniques
Viewing session details for data recorded by SPS
Viewing session details for data recorded by SPP
Visualizing Frequent Item Sets on the FIS flow view
Replaying audit trails in your browser
Using the browser to play video files
Viewing encrypted screenshots
Replaying encrypted audit trails in your browser
Following active sessions
Creating report subchapters
Creating search-based report subchapters from search results
Creating search-based report subchapters from scratch
Search interface changes between version 5.0 and 6.0
Searching session data on a central node in a cluster
Configuring usermapping policies
Configuring gateway authentication
Reports
Configuring out-of-band gateway authentication
Performing out-of-band gateway authentication on One Identity Safeguard for Privileged Sessions (SPS)
Performing inband gateway authentication in SSH and Telnet connections
Performing inband gateway authentication in RDP connections
Troubleshooting gateway authentication
Configuring four-eyes authorization
Configuring four-eyes authorization
Performing four-eyes authorization on One Identity Safeguard for Privileged Sessions (SPS)
Using credential stores for server-side authentication
Configuring local Credential Stores
Performing gateway authentication to RDP servers using local Credential Store and NLA
Configuring password-protected Credential Stores
Unlocking Credential Stores
Using a custom Credential Store plugin to authenticate on the target hosts
Integrating external authentication and authorization systems
How Authentication and Authorization plugins work
Using a custom Authentication and Authorization plugin to authenticate on the target hosts
Performing authentication with AA plugin in terminal connections
Performing authentication with AA plugin in Remote Desktop connections
Integrating ticketing systems
Creating a custom plugin
Plugin troubleshooting
Contents of the operational reports
Configuring custom reports
Creating report subchapters
The One Identity Safeguard for Privileged Sessions (SPS) REST API
One Identity Safeguard for Privileged Sessions (SPS) scenarios
Creating reports from audit trail content
Creating search-based report subchapters from search results
Creating search-based report subchapters from scratch
Creating statistics from custom database queries
Database tables available for custom queries
Creating PCI DSS reports
Contents of PCI DSS reports
Report output
The alerting table
The aps table
The archives table
The audit_trail_downloads table
The channels table
The closed_connection_audit_channels view
The closed_not_indexed_audit_channels view
The connection_events view
The connection_occurrences view
The connections view
The events table
The file_xfer table
The http_req_resp_pair table
The indexer_jobs table
The occurrences table
The progresses table
The results table
The skipped_connections table
The usermapped_channels view
Querying trail content with the lucene-search function
Configuring public-key authentication on One Identity Safeguard for Privileged Sessions (SPS)
Troubleshooting One Identity Safeguard for Privileged Sessions (SPS)
Configuring public-key authentication using local keys
Configuring public-key authentication using an LDAP server and a fixed key
Configuring public-key authentication using an LDAP server and generated keys
Organizing connections in non-transparent mode
Using inband destination selection in SSH connections
Using inband destination selection with PuTTY
Using inband destination selection with OpenSSH
Using inband selection and nonstandard ports with PuTTY
Using inband selection and nonstandard ports with OpenSSH
Using inband destination selection and gateway authentication with PuTTY
Using inband destination selection and gateway authentication with OpenSSH
SSH usermapping and keymapping in AD with public key
Network troubleshooting
Gathering data about system problems
Viewing logs on One Identity Safeguard for Privileged Sessions (SPS)
Changing log verbosity level of One Identity Safeguard for Privileged Sessions (SPS)
Collecting logs and system information for error reporting
Collecting logs and system information of the boot process for error reporting
Support hotfixes
Status history and statistics
Using SPS with SPP
Connection statistics
Memory
Disk
CPU
Network connections
Interface
Load average
Number of processes
Displaying custom connection statistics
Troubleshooting a One Identity Safeguard for Privileged Sessions (SPS) cluster
Understanding One Identity Safeguard for Privileged Sessions (SPS) cluster statuses
Recovering One Identity Safeguard for Privileged Sessions (SPS) if both nodes broke down
Recovering from a split brain situation
Replacing a HA node in a One Identity Safeguard for Privileged Sessions (SPS) cluster
Resolving an IP conflict between cluster nodes
Understanding One Identity Safeguard for Privileged Sessions (SPS) RAID status
Restoring One Identity Safeguard for Privileged Sessions (SPS) configuration and data
Restoring One Identity Safeguard for Privileged Sessions (SPS) configuration
Restoring One Identity Safeguard for Privileged Sessions (SPS) configuration and data to a new SPS appliance
Restoring One Identity Safeguard for Privileged Sessions (SPS) configuration and data to the same SPS appliance
VNC is not working with TLS
Configuring the IPMI from the BIOS after losing IPMI password
Incomplete TSA response received
Using UPN usernames in audited SSH connections
Configuring the Passwords-initiated workflow
Configuring the Sessions-initiated workflow
Configuring external devices
Configuring SPP for Sessions-initiated workflow
Configuring SPS for Sessions-initiated workflow
Configuring SPS for SRA-initiated workflow
Linking SPS to SPP
Troubleshooting the SPS to SPP link
Configuring advanced routing on Linux
Configuring advanced routing on Cisco routers
Configuring advanced routing on Sophos UTM (formerly Astaro Security Gateway) firewalls
Using SCP with agent-forwarding
Security checklist for configuring One Identity Safeguard for Privileged Sessions (SPS)
Jumplists for in-product help
Basic Settings > Management
Basic Settings > Local Services
Basic Settings > System
<Protocol name> Control > Global Options
Configuring SPS to use an LDAP backend
Glossary
Creating report subchapters
Creating reports from audit trail content
One Identity Safeguard for Privileged Sessions (SPS) can index the contents of audit trails using its own indexer service or external indexers. Indexing extracts the text from the audit trails and segments it to tokens. A token is a segment of the text that does not contain whitespace: for example words, dates (2009-03-14), MAC or IP addresses, and so on. The indexer returns the extracted tokens to SPS, which builds a comprehensive index from the tokens of the processed audit trails.
Once indexed, the contents of the audit trails can be searched from the web interface. SPS can extract the commands typed and the texts seen by the user in terminal sessions, and text from graphical protocols like RDP, Citrix ICA, and VNC. Window titles are also detected.
SPS has an internal indexer, which runs on the SPS appliance. In addition to the internal indexer, external indexers can run on Linux hosts.
Processing and indexing audit trails requires significant computing resources. If you have to audit lots of connections, or have a large number of custom reports configured, consider using an external indexer to decrease the load on SPS. For sizing recommendations, ask your One Identity partner or contact our Support Team.
SPS also creates statistics of the occurrences of the search keywords, as well as screenshots from the audit trail. These statistics and screenshots can be included in custom reports as subchapters.
NOTE: The screenshots of the sessions containing the search keywords are not included in the report output for security reasons, but you can access the screenshots by using the clickable QR codes.
For more information on accessing the screenshots, see section Report output.
NOTE: Consider the following:
-
The screenshot generated from the search results contains the first occurrence of the search keywords. If your search keywords are visible in the audit trail for a longer period, it is possible that the first occurrence is not the most relevant.
-
For technical reasons, trail data in terminal connections (SSH and Telnet) is aggregated for each second. The screenshot generated for the report reflects the terminal buffer, as it was visible at the end of that second. If data that contains the search keyword was pushed off-screen during this second, the search still finds it, but it will not be visible on the generated screenshot. Similarly, if you search for multiple keywords, it is possible that you will receive results that do not contain every keyword on the same screen (but they were separately visible within the one-second interval).
NOTE: Only audit trails created after the content subchapter has been configured will be processed. It is not possible to create reports from already existing audit trails.
Prerequisites for the indexer service
If you are indexing the audit trails with the indexer service, make sure to enable indexing for the connections you want to include in the report. Otherwise, reporting on audit trail content will not work. For more information, see Configuring the internal indexer.
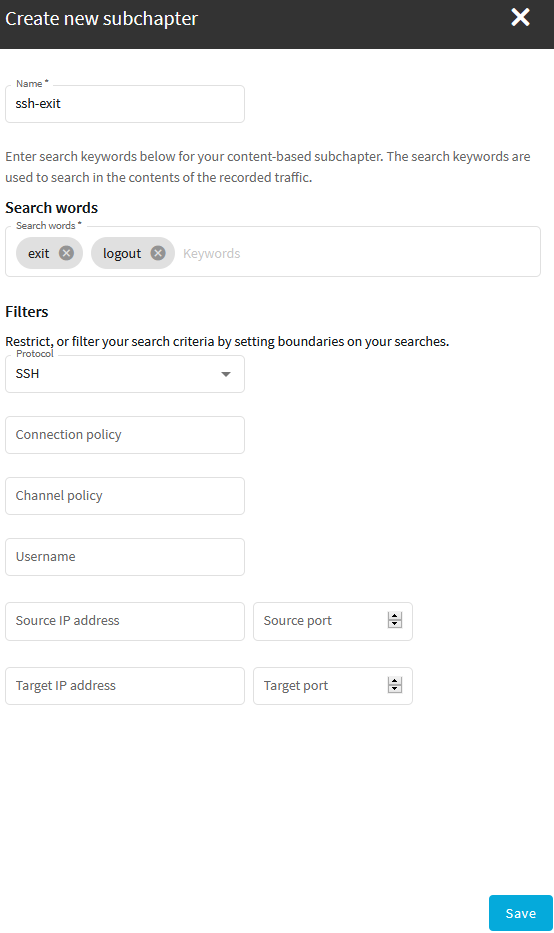
To configure SPS to create reports from the contents of audit trails
-
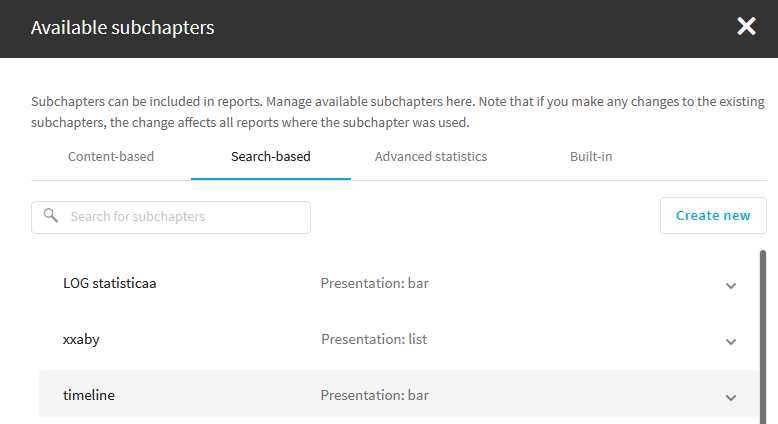
Login to the SPS web interface, and navigate to Reporting > View & edit subchapters > Content-based.
Figure 343: Reporting > View & edit subchapters > Content-based — Configuring audit trail reports
-
Click Create new and enter a name for the subchapter.
-
Enter the search keywords (or parts of the words) into the Search words field. The search keywords are used to search in the contents of the recorded traffic.
Note the following points.
-
Your search expression must be shorter than 255 characters.
-
The search is not case sensitive.
-
Wildcards and regular expressions are not supported.
-
To search for an exact phrase or expression, enclose the keywords in double quotes, for example "program files".
-
-
Configure filters to select the audit trails to index. The following filters are available:
-
Protocol: Process only audit trails of the specified traffic type (for example SSH).
-
Connection policy: Process only audit trails of the specified connection policy.
-
Channel policy: Process only audit trails of the specified channel policy.
-
Username: Process only audit trails where the specified username was used in the connection. Available only for protocols where the username is known (for example SSH).
-
Source IP address: Process only audit trails where the specified client IP address or port was used.
-
Target IP address: Process only audit trails where the specified server IP address or port was used.
NOTE: If you do not configure any filters, every available audit trail will be processed. Audit trails are created only for channels where the Record audit trail option is enabled for the particular channel in the channel policy.
-
-
Click Save.
-
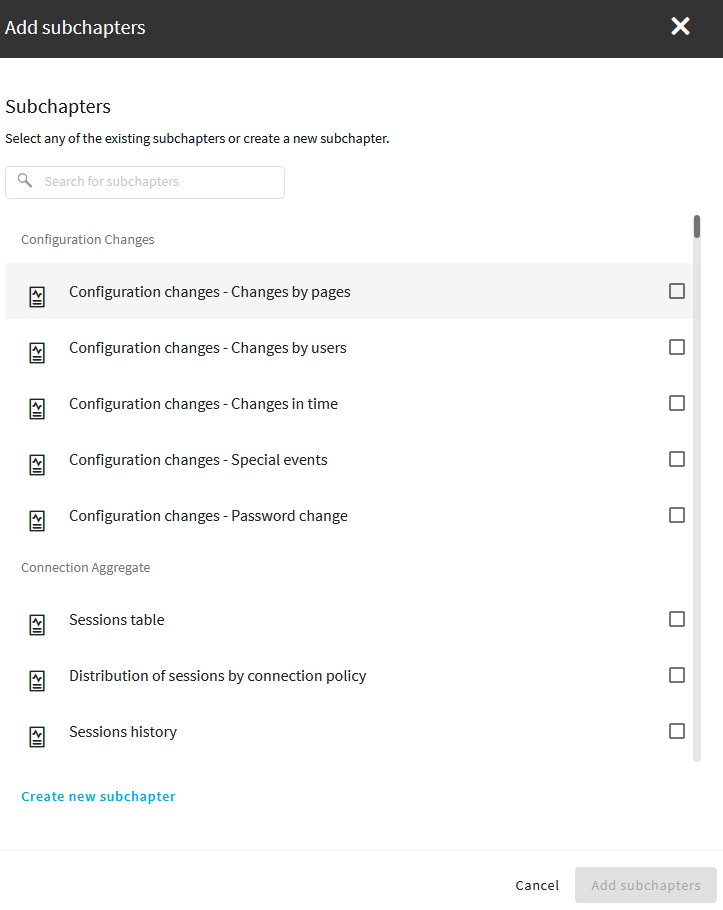
Navigate to Reporting > Create & Manage Reports, and add the new subchapter to an existing report, or create a new report. For more information, see Configuring custom reports.
Figure 344: Reporting > Configuration > Add Subchapter — Adding subchapters to reports
Creating search-based report subchapters from search results
Reports > Creating report subchapters > Creating search-based report subchapters from search results
NOTE: Creating report subchapters from search queries is currently an experimental feature of One Identity Safeguard for Privileged Sessions (SPS), therefore One Identity recommends that only administrators use this feature and only at their own risk.
You can turn any search query or statistics into a subchapter to add to your reports. This is an easy and flexible way of creating reports to monitor traffic, track certain parameters, or get alerted about particular events.
To create a search-based report subchapter from search results
-
Navigate to Search, and perform a query of your choice.
-
Click Search. Search results are displayed.
- Click
Create report. The Create new subchapter page is displayed, with the Query field populated with your query. If the Query field is not populated, enter a valid search query.
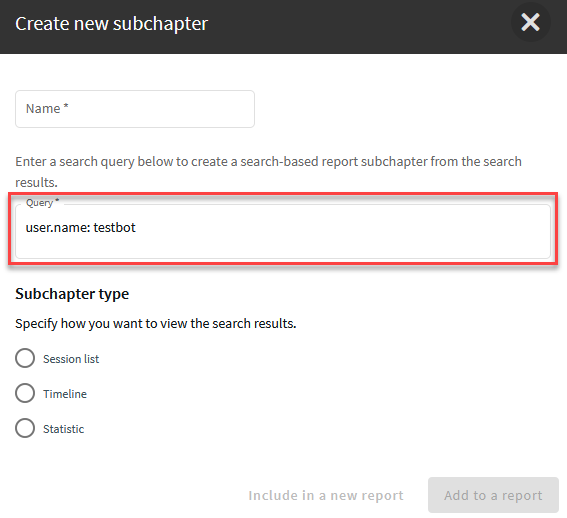
Figure 314: Search > Create report - Example subchapter created from search results with Query field populated
-
In the Name field, add a name to your report.
- In Subchapter type, select the type that fits your query. You can choose from the following types:
- Sessions list: Displays a list of sessions.
Set the number of sessions to show in the report as required.
- Timeline: Visualizes the distribution of sessions within a day/week/month, depending on the time range chosen for the report under Reporting > Configuration > Generate this report every > Day/Week/Month.
- Statistics: Visualizes the distribution of sessions based on the selected metadata.
Select a Statistic presentation for your report, such as List, Pie chart, or Bar chart. Select the field (the metadata) to create your statistics on.
- Sessions list: Displays a list of sessions.
-
To add the subchapter to an existing report, click Add to a report and select from the list of available reports.
Alternatively, to configure a custom report from scratch, click Include in a new report. For more information, see Configuring custom reports.
Creating search-based report subchapters from scratch
NOTE: Creating report subchapters from search queries is currently an experimental feature of One Identity Safeguard for Privileged Sessions (SPS), therefore One Identity recommends that only administrators use this feature and only at their own risk.
The following describes how to create a search-based report subchapter from scratch.
To create a search-based report subchapter from scratch
-
If you have multiple SPS appliances and they are organized into a cluster where one of the nodes is the Search Master (or Central Search) node, log in to that node.
- Navigate to Reporting > View & edit subchapters > Search-based.
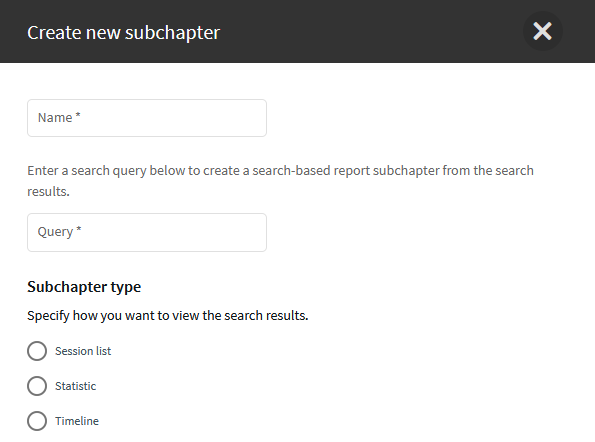
- Click Create new. The Create new subchapter page is displayed.
Figure 315: Reporting > View & edit subchapters > Search-based — Create new subchapter
- In the Name field, add a name to your report.
- In the Query field, type the query that you want to create a report from.
- In Subchapter type, select the type that fits your query. You can choose from the following types:
- Sessions list: Displays a list of sessions.
Set the number of sessions to show in the report as required.
- Timeline: Visualizes the distribution of sessions within a day/week/month, depending on the time range chosen for the report under Reporting > Configuration > Generate this report every > Day/Week/Month.
- Statistics: Visualizes the distribution of sessions based on the selected metadata.
Select a Statistic presentation for your report, such as List, Pie chart, or Bar chart. Select the field (the metadata) to create your statistics on.
- Sessions list: Displays a list of sessions.
- Click Save.
- Click
. Alternatively, navigate to Reporting > Create & Manage Reports.
- Configure a custom report from scratch, or add the subchapter to an existing report. For more information, see Configuring custom reports.
When adding the subchapter you created, look for it under Reporting > View & edit subchapters > Search-based.