The Share connection policy with SPP option enables you to use RDP connection policies in SPP to initiate sessions.
To share an RDP connection policy
-
Navigate to RDP Control > Connections.
Figure 226: RDP Control > Connections — Functions shared with SPP

-
Select Share connection policy with SPP.
NOTE: The Share connection policy with SPP checkbox is enabled only if you have linked an SPP appliance to SPS.
-
Set the following configuration for the RDP connection policy:
-
In Target, select Inband destination selection.
-
Unselect Require Gateway Authentication on the SPS Web Interface.
-
In AA plugin, select SGAA plugin.
NOTE: The SGAA plugin option is available only if you have linked an SPP appliance to SPS.
-
In Credential Store, select SGCredStore.
NOTE: The SGCredStore option is available only if you have linked an SPP appliance to SPS.
-
To save your changes, click Commit.
The following sections describe configuration settings available only for the SSH protocol. Use the following policies to control who, when, and how can access the SSH connection.
-
Host keys and host certificates: One Identity Safeguard for Privileged Sessions (SPS) allows you to set how the identity of the client hosts and servers is verified. For details, see Setting the SSH host keys of the connection.
-
Authentication Policy: Authentication policies describe the authentication methods allowed in a connection. Different methods can be used for the client and server-side connections. For details, see Authentication Policies.
-
User List: A user list is a list of usernames permitted to use — or forbidden from using — the connection. Essentially it is a blacklist or a whitelist. All users matching the other requirements of the connection are accepted by default. For details, see Creating and editing user lists.
-
Channel Policy: The channel policy determines which SSH channels (for example terminal session, SCP, and so on) can be used in the connection, and whether they are audited or not. The different channels may be available only under certain restrictions, as set in the channel policy. For details, see Creating and editing channel policies.
-
SSH settings: SSH settings determine the parameters of the connection on the protocol level, including timeout value and greeting message of the connection. The following parameters determine which algorithms are used in the connections, and can be set independently for the client and the server side: key exchange, host key, cipher, MAC, and compression algorithms. The default values include all possible algorithms. For details, see Creating and editing protocol-level SSH settings.
-
Content Policy: Content policies allow you to inspect the content of the connections for various text patterns, and perform an action if the pattern is found. For example, SPS can send an e-mail alert if a specific command is used in an SSH terminal session. For details, see Creating a new content policy.
-
Authentication and Authorization plugin:
One Identity Safeguard for Privileged Sessions (SPS) provides a plugin framework to integrate SPS to external systems to authenticate or authorize the user before authenticating on the target server. Such plugins can also be used to request additional information from the users, for example, to perform multi-factor authentication.
For details, see Integrating external authentication and authorization systems.
You can specify how SPS verifies the identity of the servers based on their host keys.
By default, SPS automatically records a host key shown by the server on the first connection. SPS will accept only this key from the server in later connections. If a host key is stored on SPS, SPS will accept only the stored key from the server.
The following describes how to set the SSH host keys accepted on the server side.
To set the SSH host keys accepted on the server side
-
Navigate to SSH Control > Connections and click  to display the details of the connection.
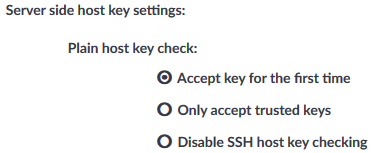
Figure 227: SSH Control > Connections — Server side host key settings
-
Verify the identity of the servers based on their host keys as follows:
-
To automatically record a host key shown by the server on the first connection, select Accept key for the first time.
If no host key is stored on SPS for the target server at the time of a connection, SPS will accept and record any key shown by the server. Otherwise, if one or more host keys are already available on SPS for the target server, only the already recorded host keys are accepted. This is the default behavior of SPS.
NOTE: When your deployment consists of two or more instances of SPS organized into a cluster, the SSH keys recorded on the Managed Host nodes before they were joined to the cluster are overwritten by the keys on the Central Management node.
For more information, see Configuration synchronization and SSH keys.
-
If the keys of the server are already available on SPS, select Only accept trusted keys. SPS will accept only the stored keys from the server.
For more information on setting the host keys of the server, see Server host keys.
NOTE: When your deployment consists of two or more instances of SPS organized into a cluster, the SSH keys recorded on the Managed Host nodes before they were joined to the cluster are overwritten by the keys on the Central Management node.
For more information, see Configuration synchronization and SSH keys.
-
To disable SSH host key verification, select Disable SSH host key checking.
|

|
Caution:
Disabling SSH host key verification makes it impossible for SPS to verify the identity of the server and prevent man-in-the-middle (MITM) attacks. |
