Step 2: Applying the Policy Object
Step 2: Applying the Policy Object
You can apply the Policy Object by using the Enforce Policy page in the New Provisioning Policy Object wizard, or you can complete the wizard and then use the Enforce Policy command on the domain, OU, or Managed Unit where you want to apply the policy.
For more information on how to apply a Policy Object, see Applying Policy Objects and Managing policy scope earlier in this chapter.
E-mail Alias Generation
Policies in this category are intended to automate the assignment of the e-mail alias when designating a user as mailbox-enabled on Microsoft Exchange Server. By default, Microsoft Exchange Server provides for the following recipient e-mail address format: <email alias>@<domain name>
You can use pre-defined rules to generate e-mail aliases, or configure custom rules. For example, you can configure a policy to compose the e-mail alias of the first initial followed by the last name of the user. Custom rules provide for the addition of an incremental numeric value to ensure uniqueness of the alias. You can also specify whether the alias can be modified by the operator who creates or updates the user account.
How this policy works
When making a user mailbox-enabled, Active Roles relies on this policy to assign a certain e-mail alias to the user account. The policy generates the alias based on user properties, such as the pre-Windows 2000 user logon name, first name, initials, and last name. A custom rule can be configured to use other properties.
A custom rule can also be configured to add so-called uniqueness number. A uniqueness number is a numeric value the policy includes into the alias, incrementing that value in the event of an alias naming conflict. For example, the policy can automatically change the generated alias from John.Smith to John1.Smith if a mailbox with the alias John.Smith already exists. If the alias John1.Smith is also in use, the new alias will be changed to John2.Smith, and so on.
The policy configuration provides the option to allow or disallow manual edits of policy-generated aliases. Permission to modify a policy-generated alias can be restricted to the case where the alias is in use by another mailbox.
Some specific features of the policy behavior are as follows:
- With a rule that does not use a uniqueness number, Active Roles simply attempts to assign the generated alias to the user account. The operation may fail if the generated alias is not unique, that is, the alias is already assigned to a different user account. If the policy allows manual edits of policy-generated aliases, the alias can be corrected by the operator who creates the user account.
- With a custom rule that uses a uniqueness number, Active Roles adds a button at the client side, next to the Alias field on the user creation and modification forms.
To generate an alias, the client user (operator) must click that button, which also applies if the generated alias is in use. Clicking the Generate button increases the uniqueness number by one, thereby allowing the alias to be made unique.
- With a custom rule configured to include user properties that are normally not displayed on the user creation forms, an extra page is added to the New Object - User wizard in the Active Roles console, thus making it possible to specify the user properties required to generate the alias.
- The policy defines a list of characters that are unacceptable in
e-mail aliases. Space characters and the following characters are not accepted : @ * + | = \ ; : ? [ ] , < > /
- The policy denies processing of operation requests that assign the empty value to the e-mail alias.
- When checking user accounts for Active Roles policy compliance (described later in this document), Active Roles detects, and reports on, the aliases that are not set up as prescribed by the alias generation policy.
How to configure an E-mail Alias Generation policy
To configure an E-mail Alias Generation policy, select E-mail Alias Generation on the Policy to Configure page in the New Provisioning Policy Object wizard or in the Add Provisioning Policy wizard. Then, click Next to display the E-mail Alias Generation Rule page:
Figure 56: E-mail Alias Generation Rule
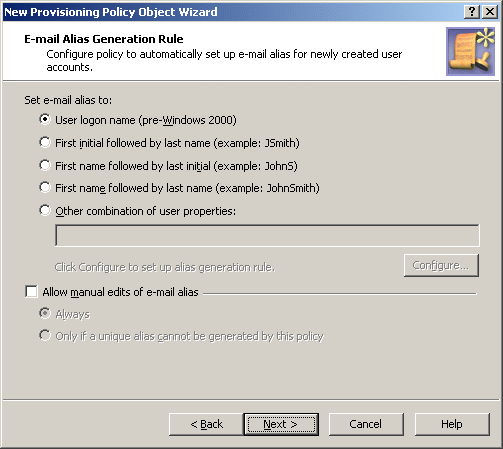
On the E-mail Alias Generation Rule page, you can select a pre-configured rule or create a custom alias-generation rule. The first four options on the page are self-explanatory. For example, the first option makes the e-mail alias the same as the user logon name (pre-Windows 2000). The option Other combination of user properties, discussed later in this section, allows you to configure a custom rule, including the addition of uniqueness number.
By selecting the Allow manual edits of e-mail alias check box, you authorize the operator who creates or updates the user account to make changes to the policy-generated alias. If this check box is cleared, Active Roles displays the Alias field as read-only on the user creation and modification forms.
By selecting the Always option, you authorize the operator to modify the alias at their discretion. With the Only if a unique alias cannot be generated by this policy option, you limit manual changes to the situation where a unique alias cannot be generated in accordance with the policy rules.
