When processing a request to deprovision a group, Active Roles uses this policy to modify the group object in Active Directory so that once the group has been deprovisioned it cannot be used.
A policy can also be configured to update individual properties of groups. Depending on the policy configuration, each policy-based update results in the following:
- Certain portions of group information, such as information about group members, are removed from the directory.
- Certain properties of groups are changed or cleared.
A policy can be configured so that new property values include:
- Properties of the group being deprovisioned, retrieved from the directory prior to starting the process of the group deprovisioning
- Properties of the user who originated the deprovisioning request
- Date and time when the group was deprovisioned
Thus, when deprovisioning a group, Active Roles modifies the group object in Active Directory as determined by the Group Object Deprovisioning policy that is in effect.
To configure a Group Object Deprovisioning policy, select Group Object Deprovisioning on the Policy to Configure page in the New Deprovisioning Policy Object wizard or in the Add Deprovisioning Policy wizard. Then, click Next to display the Disable Group page.
Figure 82: Disable Group
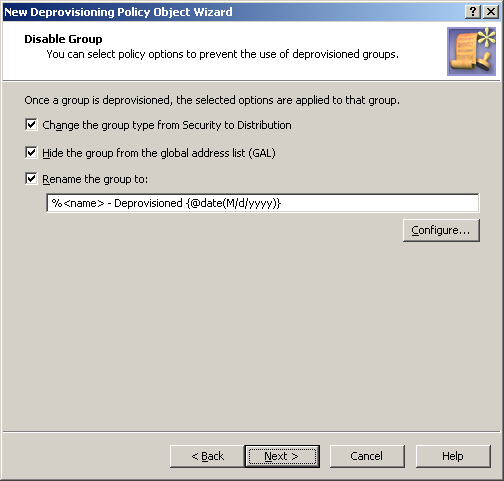
On this page, you can choose from the following options:
- Change the group type from Security to Distribution. Revokes access rights from deprovisioned groups. This option is applicable only to security groups.
- Hide the group from the Global Address List (GAL). Prevents access to deprovisioned groups from Exchange Server client applications. This option is applicable to distribution groups or mail-enabled security groups.
- Rename the group to. Changes the name of the group.
Select the check box next to each option you want the policy to apply.
By selecting the Rename the group to check box, you direct the policy to change the name of the group. This option allows you to configure a property update rule that specifies how to modify the group name. Click the Configure button and follow the instructions provided in the Configuring a property update rule section, earlier in this chapter.
Once you have completed the Disable Group page, click Next to display the Remove Members page.
Figure 83: Remove members

On this page, you can configure a rule on how to remove members from deprovisioned groups.
Select one of these options:
- Click Do not remove members from the group if you want the policy not to remove members from deprovisioned groups.
- Click Remove all members, with optional exceptions if you want the policy to remove members from deprovisioned groups.
With the second option, you can specify whether you want the policy not to remove certain objects from deprovisioned groups. To set up a list of such objects, select the Keep these objects in the group check box, and then click the Add button and select the objects you want to include in the list.
Once you have completed the Remove Members page, click Next to display the Change Properties page.
Figure 84: Change Properties
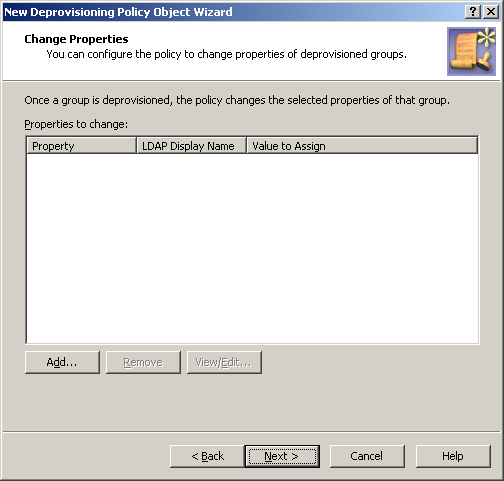
On this page, you can set up a list of group properties you want the policy to update. Each entry in the list includes the following information:
- Property. When deprovisioning a group, Active Roles will update this property of the group object in Active Directory.
- LDAP Display Name. Uniquely identifies the property to be updated.
- Value to Assign. After the deprovisioning operation is completed, the property has the value defined by the rule specified.
You can use these buttons to manage the list on this page:
- Add. Allows you to select a property and configure an update rule for that property. A property update rule specifies how to generate the new value to assign to the property.
- Remove. If you want the policy to no longer update a given property, select the property from the list and click Remove.
- View/Edit. Allows you to modify the update rule for the property you select from the list.
Clicking the Add button displays the Select Object Property dialog box where you can choose group properties you want to the policy to update. To choose a property, select the check box next to the property name, and then click OK.
You can select multiple check boxes. If you do so, the properties you have selected are added to the list on the wizard page, with the update rule configured to clear those properties, that is, to assign them the empty value.
If you select a single property in the Select Object Property dialog box, you are presented with the Add Value dialog box so you can proceed to configuring a property update rule.
Figure 85: Add value
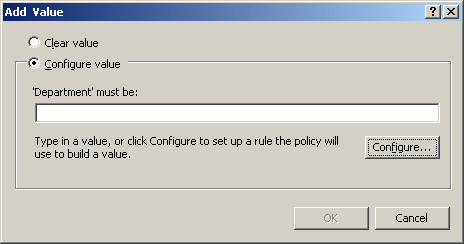
You can select one of these update options:
- Clear value. Causes the policy to assign the “empty” value to the property.
- Configure value. Allows you to configure a value for the ‘property’ must be condition.
With the second option, you must configure a value the policy will assign to the property upon the group deprovisioning. You can configure a value in the same way as you do when configuring a property update rule for the user name: Click the Configure button and follow the instructions provided in the Configuring a property update rule section, earlier in this chapter.
When you are done configuring a value, click OK to close the Add Value dialog box. The property name along with the property update rule is added to the wizard page. If necessary, you can modify the update rule by clicking the View/Edit button beneath the list of properties. This displays a dialog box, similar to the Add Value dialog box, allowing you to choose a different update option or set up a different value for the ‘property’ must be condition.
Once you have set up the list on the wizard page, click Next and follow the instructions in the wizard to create the Policy Object.
To configure a Group Object Deprovisioning policy
- On the Policy to Configure page, select Group Object Deprovisioning, and then click Next.
- On the Disable Group page, select the options you want the policy to apply when deprovisioning a group. You can select any combination of these options to prevent the use of the group:
- Change the group type from Security to Distribution.
- Hide the group from the Global Address List (GAL).
- Rename the group.
- If you selected Rename the group to, click Configure, and then complete the Configure Value dialog box by using the procedure outlined later in this topic, in order to specify how you want the policy to update the group name when deprovisioning a group.
- Click Next.
- On the Remove Members page, do one of the following:
- Click Do not remove members from the group for the policy not to make changes to the membership list of the group.
- Click Remove all members, with optional exceptions for the policy to remove the members from the group.
- If you selected the second option in Step 5, specify whether you want the policy not to remove certain objects from deprovisioned groups. Do the following:
- Select the Keep these objects in the group check box and set up the list of the objects you want the policy not to remove from deprovisioned groups.
- Leave the check box cleared if you want the policy to remove all members from deprovisioned groups.
- On the Change Properties page, specify how you want the policy to update properties of the group object when deprovisioning a group:
- Click Add, and then complete the Select Object Property dialog box by using the procedure outlined later in this topic, in order to add property update rules.
- Use View/Edit to modify existing rules.
- Use Remove to delete existing rules.
- Click Next.
- On the Enforce Policy page, you can specify objects to which this Policy Object is to be applied:
- Click Add, and use the Select Objects dialog box to locate and select the objects you want.
- Click Next, and then click Finish.
To complete the Configure Value dialog box
- Click Add.
- Configure an entry to include in the value (for instructions, see Steps for configuring entries).
- In the Configure Value dialog box, add more entries, delete or edit existing ones, and then click OK.
To complete the Select Object Property dialog box
- From the Object property list, select an object property, and then click OK. The Add Value dialog box appears.
If you select multiple properties, the Add Value dialog box is not displayed. The properties you have selected are added to the list on the Change Properties page, with the update rule configured to clear those properties, that is, to assign them the empty value.
- In the Add Value dialog box, do one of the following:
- Select Clear value if you want the update rule to assign the empty value to the property.
- Select Configure value if you want the update rule to assign a certain, non-empty value to the property. Then, click Configure and complete the Configure Value dialog box by using the instructions given earlier in this topic.
The policy described in this scenario performs the following functions during the group deprovisioning process:
- When deprovisioning a security group, change the type of the group to Distribution.
- When deprovisioning a distribution group, remove the group from the Global Address List.
- Append this suffix to the group name: - Deprovisioned, followed by the date when the group was deprovisioned.
For example, the policy changes the group name of Partner Marketing to Partner Marketing - Deprovisioned 12/11/2013.
To implement this scenario, you must perform the following actions:
- Create and configure the Policy Object that defines the appropriate policy.
- Apply the Policy Object to a domain, OU, or Managed Unit.
As a result, when deprovisioning a group in the container you selected in Step 2, Active Roles disables and renames the group as prescribed by this policy.
The following two sections elaborate on the steps to implement this scenario.
