An audit trail is a file storing the recorded activities of the administrators. Audit trails are not created automatically for every connection: auditing must be enabled manually in the channel policy used in the connection. The available default channel policies enable auditing for the most common channels. Audit trails are automatically compressed, and can be encrypted, timestamped, and signed as well. Audit trails can be replayed using the Safeguard Desktop Player application (for details, see Safeguard Desktop Player User Guide), or directly in your browser (for details, see Replaying audit trails in your browser).
TIP: By default, every connection uses the built-in default audit policy. Unless you use a custom audit policy, modifying the default audit policy will affect every audited channel of the connections passing through One Identity Safeguard for Privileged Sessions (SPS).
|

|
Caution:
In RDP connections, if the client uses the Windows login screen to authenticate on the server, the password of the client is visible in the audit trail. To avoid displaying the password when replaying the audit trail, encrypt the upstream traffic in the audit trail using a separate certificate from the downstream traffic. For details, see "Encrypting audit trails" in the Administration Guide. |
To prevent unauthorized access to the audit trail files, One Identity Safeguard for Privileged Sessions (SPS) can encrypt:
With upstream encryption, the passwords are visible only with the private key of the certificate used for encrypting the upstream traffic.
NOTE: Even if the upstream traffic is encrypted with a separate certificate, only one audit trail file is created for a session.
Encrypting the upstream part has the following limitations:
TIP: For more information on uploading certificates for indexing and replaying audit trails, see:
Encrypting audit trails requires one or more X.509 certificate in PEM format that uses an RSA key, depending on the configuration.
NOTE: Certificates are used as a container and delivery mechanism. For encryption and decryption, only the keys are used.
TIP: One Identity recommends using 2048-bit RSA keys (or stronger).
Use every keypair or certificate only for one purpose. Do not reuse cryptographic keys or certificates (for example, do not use the certificate of the One Identity Safeguard for Privileged Sessions (SPS) webserver to encrypt audit trails, or the same keypair for signing and encrypting data).
The following encryption options are available:
-
Encrypt with a single certificate. This is the most simple approach: SPS uses one certificate to encrypt the audit trails, and anyone who has the private key of that certificate can replay the audit trails. If that key is lost, there is no way to open the audit trails.
-
Encrypt separately with multiple certificates.SPS uses two or more certificates separately to encrypt the audit trails, and anyone who has the private key of one of the encryption certificates can replay the audit trails.
-
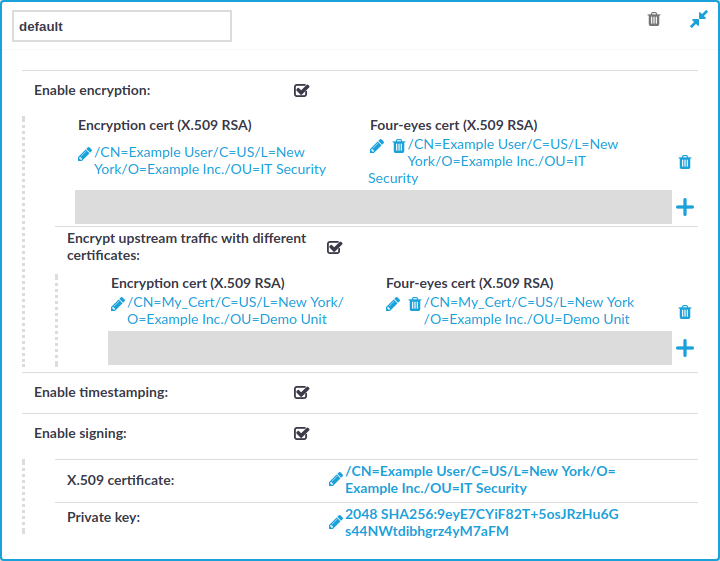
Encrypt jointly with two certificates.SPS uses two certificates together (a certificate-pair) to encrypt the audit trails. The private keys of both encryption certificates are needed to replay the audit trails. This is a kind of "four-eyes in auditing".
You can combine the different encryption methods. For example, you can encrypt the audit trails with multiple certificate-pairs, and replay the trails only if the private keys of a certificate-pair are available. This is true for encrypting the upstream traffic as well. At the extreme, you will need four private keys to fully replay an audit trail: two to open the normal traffic, and two more to display the upstream traffic.
Note that SPS itself cannot create the certificates used to encrypt the audit trails.
TIP: If two certificates are displayed in a row, they are a certificate-pair and you need the private key of both to replay the audit trails. If two certificates are displayed in separate rows, you need the one of the private keys to replay the audit trails. If there are multiple rows containing two certificates, you need the private keys of the certificate(s) listed in any of the rows.
Figure 179: Policies > Audit Policies — Encrypting audit trails: joint encryption with a certificate pair

Each audit policy can have up to 8 lines of certificate pairs.
To encrypt audit trails
-
Navigate to Policies > Audit Policies and select the audit policy you will use in your connections.
TIP: By default, every connection uses the built-in default audit policy. Unless you use a custom audit policy, modifying the default audit policy will affect every audited channel of the connections passing through One Identity Safeguard for Privileged Sessions (SPS).
-
Select the Enable encryption option.
-
To upload a certificate for encrypting the entire trail:
-
Click the  icon under the Encryption cert (X.509 RSA) 4-eyes cert (X.509 RSA) row.
-
Click on the left  icon and upload a certificate to SPS. This certificate will be used to encrypt the audit trails, and it must not include the private key.
NOTE: To replay the audit trails, you need the private key of the certificate on the computer running the Safeguard Desktop Player application.
-
(Optional) To encrypt the audit trails jointly with another certificate, click on the right icon and upload a certificate to SPS. Note that the private key of both certificates will be required to replay the audit trails.
-
Repeat these steps to encrypt the audit trails separately with additional certificates.
-
To upload a certificate for encrypting the upstream traffic:
-
Select Encrypt upstream traffic with different certificates.
-
Click the  icon under the Encryption cert (X.509 RSA) 4-eyes cert (X.509 RSA) row.
-
Click on the left icon and upload a certificate to SPS. This certificate will be used to encrypt the audit trails, and it must not include the private key.
NOTE: To replay the upstream part of the audit trails, you need the private key of the certificate on the computer running the Safeguard Desktop Player application.
-
(Optional) To encrypt the audit trails jointly with another certificate, click on the right icon and upload a certificate to SPS. Note that the private key of both certificates will be required to replay the audit trails.
-
Repeat these steps to encrypt the upstream separately with additional certificates.
-
Click  .
.
The following describes how to add timestamps to the audit trails by using the built-in timestamping service of One Identity Safeguard for Privileged Sessions (SPS).
To add timestamps to the audit trails by using the built-in timestamping service of SPS
-
Configure the timestamping interval. You have to repeat these steps for each protocol (HTTP, ICA, RDP, SSH, Telnet, and VNC) you want to configure:
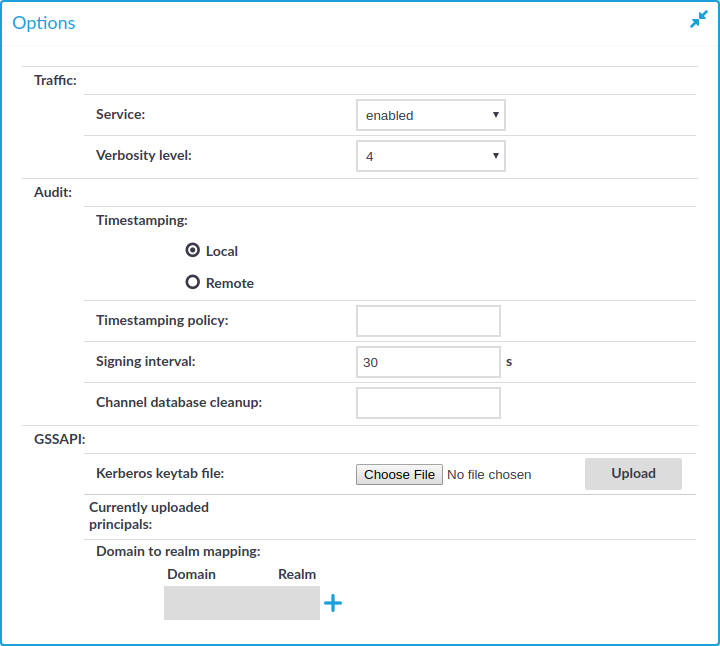
Figure 180: <Protocol name> Control > Global Options —Configuring local timestamping
-
In the protocol control settings, navigate to Global Options > Timestamping (for example, SSH Control > Global Options > Timestamping).
-
Select Local.
NOTE: Make sure that you leave the Timestamping policy field empty. Timestamping policy has relevance only when Timestamping is set to Remote.
-
Set the Signing interval. You can choose any value between 10 and 100 000 seconds.
NOTE: The same interval setting applies to timestamping and signing.
-
Click .
-
Configure audit policies to use timestamping. You have to repeat these steps for each audit policy you want to configure:
-
Navigate to Policies > Audit Policies and select the audit policy you will use in your connections.
TIP: By default, every connection uses the built-in default audit policy. Unless you use a custom audit policy, modifying the default audit policy will affect every audited channel of the connections passing through One Identity Safeguard for Privileged Sessions (SPS).
-
Select the Enable timestamping option.
Figure 181: Policies > Audit Policies — Timestamping audit trails
-
Click . SPS will automatically add timestamps to the audit trails of every connection that is audited and uses this audit policy.
The following describes how to request timestamps from a remote Timestamping Authority (TSA).
To request timestamps from a remote TSA
-
Configure the remote TSA, and the timestamping interval. You have to repeat these steps for each protocol (HTTP, ICA, RDP, SSH, Telnet, and VNC) you want to configure:
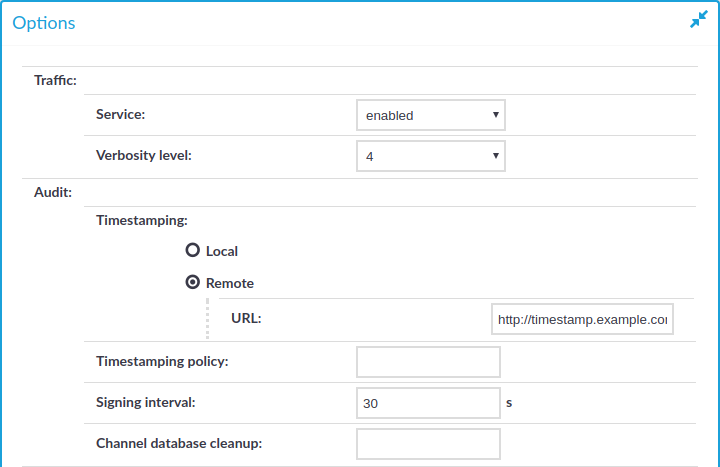
Figure 182: <Protocol name> Control > Global Options — Configuring a remote TSA
-
In the protocol control settings, navigate to Global Options > Timestamping (for example, SSH Control > Global Options > Timestamping).
-
Select Remote.
-
Enter the address of the timestamping server into the URL field. Note that currently only plain HTTP services are supported, password-protected and HTTPS services are not supported.
-
If the Timestamping Server has timestamping policies configured, enter the OID of the policy to use into the Timestamping policy field. One Identity Safeguard for Privileged Sessions (SPS) will include this ID in the timestamping requests sent to the TSA.
-
Set the Signing interval. You can choose any value between 10 and 100 000 seconds.
NOTE: The same interval setting applies to timestamping and signing.
-
Click .
-
Configure audit policies to use timestamping. You have to repeat these steps for each audit policy you want to configure:
-
Navigate to Policies > Audit Policies and select the audit policy you will use in your connections.
TIP: By default, every connection uses the built-in default audit policy. Unless you use a custom audit policy, modifying the default audit policy will affect every audited channel of the connections passing through One Identity Safeguard for Privileged Sessions (SPS).
-
Select the Enable timestamping option.
Figure 183: Policies > Audit Policies — Timestamping audit trails
-
Click . SPS will automatically add timestamps to the audit trails of every connection that is audited and uses this audit policy.
