To convert a basic group to a dynamic group, right-click the group, and then click Convert to Dynamic Group to start the New Membership Rule wizard. The first page of the wizard looks as shown in the following figure.
Figure 107: Convert to dynamic group
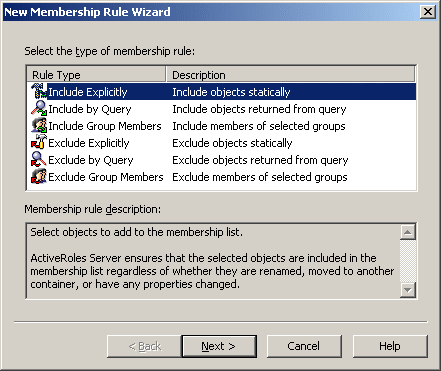
On the first page of the wizard, you can select the type of the membership rule you want to configure. The text under Membership rule description explains which membership rules can be created using the rule type you select.
The Include Explicitly membership rule allows you to select objects to be statically added to the group. Active Roles ensures that the selected objects are included in the group regardless of whether they are renamed, moved to another container, or have any properties changed. With the Include Explicitly rule type the dynamic group behaves like a basic group.
The Include by Query membership rule allows you to define criteria the objects must match to be included in the group. Active Roles dynamically populates the group membership list with the objects that have certain properties. When an object is created, or when its properties are changed, Active Roles adds it to, or removes it from, the group depending on whether the object’s properties match the defined criteria.
The Include Group Members membership rule allows you to select the groups which members you want to include in the dynamic group. Active Roles dynamically populates the group membership list with the objects that belong to the selected groups. When an object is added or removed from the selected groups, Active Roles adds or removes that object from the dynamic group.
The Exclude Explicitly membership rule allows you to select objects to be statically excluded from the group. Active Roles ensures that the selected objects are excluded from the group membership list regardless of whether they are renamed, moved, or have any properties changed. Because the Exclude Explicitly rule takes precedence over all other types of rule, the selected objects will be excluded from the group even if another rule states that they should be included.
The Exclude by Query membership rule allows you to define criteria the objects must match to be excluded from the group. Active Roles ensures that the objects with certain properties are excluded from the group membership list. Active Roles automatically removes objects from the group depending on whether the objects’ properties match the defined criteria.
The Exclude Group Members membership rule allows you to select groups whose members will be excluded from the given group. Active Roles ensures that the members of the selected groups are removed from the group membership list. When an object is added to any one of the selected groups, Active Roles automatically removes that object from the dynamic group.
On the first page of the wizard, select a rule type, and then click Next. On the next page of the wizard, click Add to configure the membership rule.
If you have selected the Include Explicitly or Exclude Explicitly rule type, you are presented with the Select Objects dialog box that lists users, groups, contacts, and computers. Select the objects you want to include or exclude from the dynamic group, click Add, and then click OK.
If you have selected the Include Group Members or Exclude Group Members rule type, the Select Objects dialog box appears. The list of objects in that dialog box consists of groups. Select groups, click Add, and then click OK. All members of the selected groups will be included or excluded from the dynamic group.
If you have selected the Include by Query or Exclude by Query rule type, the Create Membership Rule dialog box, similar to the Find dialog box, is displayed. In that dialog box, define the criteria that objects must match to be included or excluded from the dynamic group.
Click Finish to complete the New Membership Rule wizard.
|

|
NOTE: After you have created a dynamic group with the first rule added to the group, you can add additional rules by managing properties of the group. |
If you add several membership rules and some of them conflict with each other, then the conflict is resolved by a rule that defines the following order of precedence:
- Exclude Explicitly
- Include Explicitly
- Exclude by Query
- Exclude Group Members
- Include by Query
- Include Group Members
According to this, for example, the Exclude Explicitly rule takes precedence over all other types of rule. Therefore, the selected objects will be excluded from the dynamic group even if another rule states that they should be included (for example, the objects that match the criteria defined in the Include by Query membership rule, or members of a group selected in the Include Group Members rule).
For a dynamic group, the Membership Rules tab is added to the Properties dialog box. This tab displays a list of membership rules defined for the group, and allows you to add, remove, and edit the rules.
The Members tab for a dynamic group displays a list of objects that match the criteria specified in the membership rules. On that tab, you cannot add or remove members as you can for a basic group. To add or remove particular members from a dynamic group, you might add an appropriate Include Explicitly or Exclude Explicitly membership rule.
To add a membership rule to a dynamic group, right-click the dynamic group, and then click Add Membership Rule. This starts the New Membership Rule wizard. Complete the wizard as described in Converting a basic group to a dynamic group earlier in this chapter. To add a membership rule to a dynamic group, you can also use the Membership Rules tab in the Properties dialog box.
To add a membership rule to a group
- In the console tree, select the folder that contains the group to which you want to add a membership rule.
- In the details pane, right-click the group, and do one of the following to start the New Membership Rule wizard:
- If the group is a basic group, click Convert to Dynamic Group, and then click Yes.
- If the group is a dynamic group, click Add Membership Rule.
- On the first page of the wizard, select the type of the membership rule you want to create. Do one of the following, and then click Next:
- To create a rule that statically adds members to the group, click Include Explicitly.
- To create a rule that statically excludes members from the group, click Exclude Explicitly.
- To create a rule that adds all members of a certain group to the selected group, click Include Group Members.
- To create a rule that excludes all members of a certain group from the selected group, click Exclude Group Members.
- To create a rule that populates the group with the objects that match certain search criteria, click Include by Query.
- To create a rule that prevents the group from including the objects that match certain search criteria, click Exclude by Query.
- On the next page of the wizard, click Add.
If you selected the Include by Query rule type or the Exclude by Query rule type in Step 3, the Create Membership Rule dialog box appears. Otherwise, the Select Objects dialog box appears.
- Complete the Create Membership Rule or Select Objects dialog box using the procedures outlined below in this section.
- Click Finish to close the wizard.
To complete the Create Membership Rule dialog box
- From the Find list, select the class of objects you want the membership rule to include or exclude from the group. For example, when you select Users, the membership rule includes or excludes the users that match the conditions you specify.
- From the In list, select the domain or folder that holds the objects you want the membership rule to include or exclude from the group. For example, when you select an Organizational Unit, the membership rule includes or excludes only the objects that reside in that Organizational Unit.
To add folders to the In list, click Browse and select folders in the Browse for Container dialog box.
- Define the criteria of the membership rule. For example, to include or exclude the objects that have the letter T at the beginning of the name, type T in Name. You can use an asterisk (*) to represent any string of characters.
- Optionally, click Preview Rule to view a list of objects that match the criteria you have defined.
- Click Add Rule.
To complete the Select Objects dialog box
- In the Look in list, click the domain or folder that holds the objects you want to select. To add a folder to the list, click Browse.
- Do one of the following, and then click OK.
- In the list of objects, double-click the object you want to add.
- In the lower box, type the entire name, or a part of the name, of the object you want to add. Then, click Check Names.
|
|
NOTE:
- The only way to populate dynamic groups is by adding membership rules. The members of a dynamic group are the objects that match the criteria defined by the membership rules.
- To convert a dynamic group back to a basic group, right-click the group, and click Convert to Basic Group. When converting a dynamic group to a basic group, Active Roles removes all membership rules from the group. No changes are made to the list of the current members for that group.
- The Create Membership Rule dialog box is similar to the Find dialog box you use to search for objects in the directory. Once you have specified your search criteria, the Add Rule function saves them as a membership rule. For more information on how to specify search criteria, see Finding objects.
- The Find list includes the Custom Search entry. Selecting that entry displays the Custom Search tab, enabling you to build custom membership rules using advanced options, as well as to build advanced membership rules using the Lightweight Directory Access Protocol (LDAP), which is the primary access protocol for Active Directory. For more information about using advanced search options, see Steps for using advanced search options and Steps for building a custom search.
|
To remove a membership rule from a dynamic group, open the Properties dialog box for the group. On the Membership Rules tab, select the membership rules you want to remove, and click Remove. When finished, click OK to close the Properties dialog box.
|
|
NOTE: Active Roles does not allow members to be removed from a dynamic group by directly managing the membership list of the group. To remove particular members, use Exclude Explicitly rules. |
To remove a membership rule from a group
- In the console tree, locate and select the folder that contains the group from which you want to remove a membership rule.
- In the details pane, right-click the group and click Properties.
- On the Membership Rules tab, select the membership rule, and click Remove.
|
|
NOTE: The Properties dialog box includes the Membership Rules tab if the selected group is a dynamic group. If you do not see the Membership Rules tab, then the selected group is a basic group. |
