Modifying the Exchange properties of a linked mailbox
After Exchange Resource Forest Management (ERFM) is set up for your organization, you can modify the Exchange properties of an existing linked mailbox in the Active Roles Web Interface by selecting the master user account in the account forest, and opening the Exchange Properties window. This is typically required in case of organizational or employment status changes.
When you modify the available Exchange properties this way, Active Roles redirects the change requests of the Exchange mailbox properties from the master account that you have opened to the shadow user account in the Exchange forest.
To view or modify the Exchange properties of a linked mailbox
-
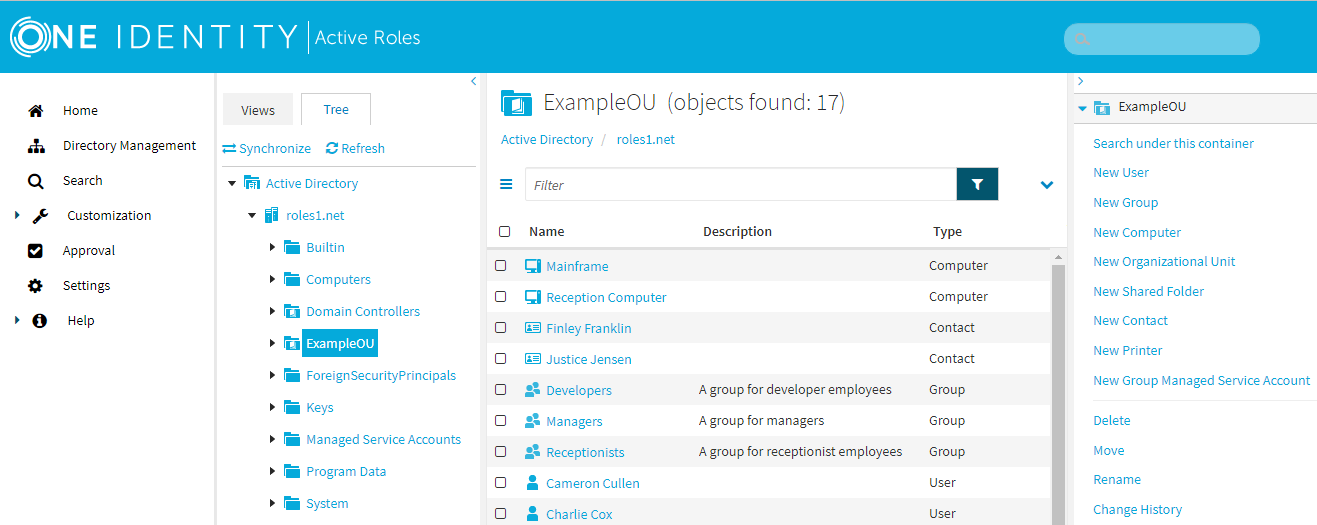
In the Active Roles Web Interface, under Directory Management > Tree > Active Directory, navigate to the OU for which ERFM is configured.
Figure 140: Active Roles Web Interface – Navigating to the OU supporting linked mailboxes
-
Select the master user account whose Exchange properties you want to modify and click Exchange Properties.
-
View or change the following mailbox settings as you need:
-
(Optional) General: View and configure the general email settings, for example the First name, Last name, or User logon name.
-
(Optional) E-mail Addresses: View and configure email addresses for the selected user.
-
(Optional) Mailbox Features: View and configure various Exchange mailbox features for the user, for example, mobile device synchronization features, web application access, or email messaging protocols.
-
(Optional) Mail Flow Settings: View and configure rules for the emails that the user sends or receives via the Exchange server of your organization, for example, message size restrictions or delivery and forwarding settings.
-
(Optional) Mailbox Settings: View and configure Messaging Records Management (MRM) settings for the user.
-
To apply your changes, click Save.
After you save your changes, Active Roles applies the modifications on the shadow user account associated with the master user account.
TIP: To verify if your changes have already been synchronized, in the Active Roles Web Interface, under Directory Management > Tree > Active Directory, navigate to the resource forest, select the shadow account associated with the master account you modified, and click Change History.
Configuring a user with a linked mailbox for managing mail-enabled groups
With Active Roles, you can specify a user for group membership management tasks by selecting the group in the Active Roles Web Interface, and clicking General Properties > Managed by. However, both the group and the user specified as the group manager must be in the same Active Directory (AD) forest.
If Exchange Resource Forest Management (ERFM) is configured for your organization, user accounts and mail-enabled groups may be located in different forests: the user accounts are stored in the account forest, while the mail-enabled groups are in the resource forest. In such cases, you can assign a user for group management by specifying the shadow account of the user as the group manager instead of their master user account.
Doing so will result in Active Roles synchronizing the group management settings of the shadow account to the master account, allowing the master account to add or remove members from the specified group, even if it is located in a different forest.
To configure a user with a linked mailbox for group membership management
-
In the Active Roles Web Interface, under Directory Management > Tree > Active Directory, navigate to the OU for which ERFM is configured.
Figure 141: Active Roles Web Interface – Navigating to the OU supporting linked mailboxes
-
In the container of your users, select the user you want to assign as a group manager.
-
To view the general Exchange settings of the user, click Exchange Properties > Shadow Account > Properties.
-
Open the General Properties > Account tab, and take note of the User logon name (pre-Windows 2000) value of the shadow account. You will need to specify this user logon name for the group later in this procedure.
-
In the Active Roles Web Interface, under Directory Management > Tree > Active Directory, navigate to your resource forest containing the Exchange server and the shadow accounts.
-
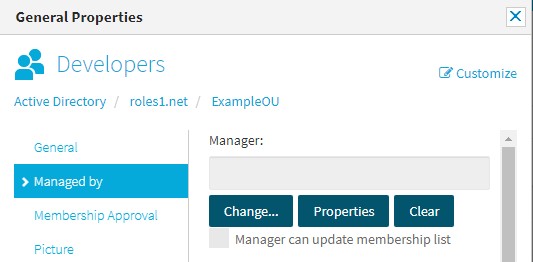
Select the group whose management settings you want to configure. Then, to open the group management settings, click General Properties > Managed by.
Figure 142: Active Roles Web Interface – Opening the group management settings of a group via General Properties > Managed by
-
To specify a new group manager, click Change. This opens the Select Object dialog, allowing you to specify the manager account.
-
In the Select Object dialog, specify the User logon name of the shadow account that you have noted down earlier in the procedure, then click the search button. Once the dialog lists the user, select it and click OK.
TIP: If your search returns no results, then double check that the specified user logon name is correct, and make sure that the Search in drop-down list is set to the resource forest where the shadow account is stored.
-
After the user is displayed in the Manager text box, click Save. Then, to make sure that the user receives all group management permissions, select Manager can update membership list and click Save again.
NOTE: The master account of the specified user will receive the configured group administration permissions during the next run of the ERFM - Mailbox Management scheduled task. To make sure that the group management permissions of the shadow account are immediately synchronized to its master account, run the scheduled task manually. For more information, see Configuring the ERFM Mailbox Management scheduled task.
Converting a user mailbox to a linked mailbox
Once Exchange Resource Forest Management (ERFM) is set up for your organization, you can convert the existing user mailboxes of your users to linked mailboxes. This is typically required if your organization had already contained users with regular Exchange user mailboxes before configuring linked mailboxes with ERFM.
To convert a user mailbox to a linked mailbox
-
In the Active Roles Web Interface, under Directory Management > Tree > Active Directory, navigate to your resource forest containing the Exchange server and the shadow accounts.
-
In the container of your users, select the user whose mailbox you want to convert.
-
To start the mailbox conversion, in the list of actions available for the selected mailbox, click Convert to Linked Mailbox.
-
Under Linked master account, click Change and select the user in the account forest whose mailbox you are converting. To do so, specify the account forest in the Search in field, then enter the name of the user in the Search field. Once the Select Object window lists the user, select it and click OK.
-
To apply your changes, click Finish.
Active Roles then performs the following actions:
-
It changes the specified user mailbox to a linked mailbox.
-
It specifies the user selected in the account forest as the master user account.
-
It changes the user associated with the mailbox in the resource forest to a shadow account.
Converting a linked mailbox to a user mailbox
You can convert existing linked mailboxes configured with Exchange Resource Forest Management (ERFM) to user mailboxes. This is typically required during organizational changes or IT infrastructure migrations.
When you convert an existing linked mailbox to a user mailbox, Active Roles performs the following changes:
-
The former master user account in the account forest becomes an external user, and can no longer access the mailbox.
-
The former shadow account becomes the new user account associated with the mailbox in the resource forest.
To convert a linked mailbox to a user mailbox
-
In the Active Roles Web Interface, under Directory Management > Tree > Active Directory, navigate to your resource forest containing the Exchange server and the shadow accounts.
-
In the container of your users, select the user whose mailbox you want to convert.
-
To start the mailbox conversion, in the list of actions available for the selected mailbox, click Convert to User Mailbox.
-
To apply your changes, click OK.
-
Following the mailbox conversion, the user mailbox will be in a disabled state. To enable it, in the list of actions available for the selected mailbox, click Enable Account.
-
After the account is enabled, you must also reset the account password. To do so, in the list of actions available for the selected mailbox, click Reset Password.
-
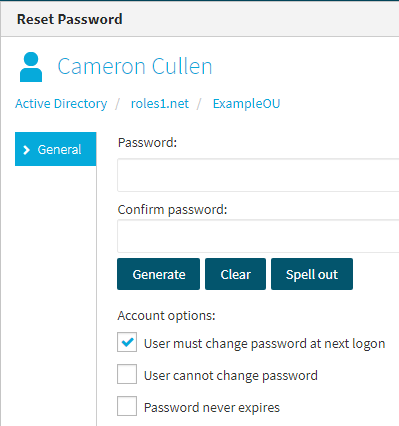
In the Reset Password window, configure the following settings:
Figure 143: Active Roles Web Interface – Resetting the password of a converted user mailbox
-
Password and Confirm password: The initial password of the user and the corresponding password confirmation field. You can specify the password either manually, or Generate one with Active Roles that follows the password policy requirements of your organization.
To clear the specified password, click Clear. To spell out each character of the password for clarification, click Spell out.
Figure 144: Active Roles Web Interface – Spelling out the characters of the generated or specified password

-
Account options: Use these options to specify additional security settings for the user (for example, to have them change the configured password during their next login attempt, or have the configured password expire after some time).
-
To apply your changes, click Finish.
