立即与支持人员聊天
与支持团队交流

Active Roles 8.0 LTS - Administration Guide

Introduction About Active Roles Getting Started Rule-based Administrative Views Role-based Administration
Access Templates as administrative roles Access Template management tasks Examples of use Deployment considerations Windows claims-based Access Rules
Rule-based AutoProvisioning and Deprovisioning
About Policy Objects Policy Object management tasks Policy configuration tasks
Property Generation and Validation User Logon Name Generation Group Membership AutoProvisioning E-mail Alias Generation Exchange Mailbox AutoProvisioning AutoProvisioning for SaaS products OneDrive Provisioning Home Folder AutoProvisioning Script Execution Office 365 and Azure Tenant Selection User Account Deprovisioning Office 365 Licenses Retention Group Membership Removal Exchange Mailbox Deprovisioning Home Folder Deprovisioning User Account Relocation User Account Permanent Deletion Group Object Deprovisioning Group Object Relocation Group Object Permanent Deletion Notification Distribution Report Distribution
Deployment considerations Checking for policy compliance Deprovisioning users or groups Restoring deprovisioned users or groups Container Deletion Prevention policy Picture management rules Policy extensions
Workflows
Understanding workflow Workflow activities overview Configuring a workflow
Creating a workflow definition Configuring workflow start conditions Configuring workflow parameters Adding activities to a workflow Configuring an Approval activity Configuring a Notification activity Configuring a Script activity Configuring an If-Else activity Configuring a Stop/Break activity Configuring an Add Report Section activity Configuring a Search activity Configuring CRUD activities Configuring a Save Object Properties activity Configuring a Modify Requested Changes activity Enabling or disabling an activity Enabling or disabling a workflow Using the initialization script
Example: Approval workflow E-mail based approval Automation workflow Activity extensions
Temporal Group Memberships Group Family Dynamic Groups Active Roles Reporting Management History
Understanding Management History Management History configuration Viewing change history
Workflow activity report sections Policy report items Active Roles internal policy report items
Examining user activity
Entitlement Profile Recycle Bin AD LDS Data Management One Identity Starling Management Managing One Identity Starling Connect Configuring linked mailboxes with Exchange Resource Forest Management Configuring remote mailboxes for on-premises users Azure AD, Office 365, and Exchange Online management
Configuring Active Roles to manage hybrid AD objects Managing Hybrid AD Users Unified provisioning policy for Azure O365 Tenant Selection, Office 365 License Selection, and Office 365 Roles Selection, and OneDrive provisioning Office 365 roles management for hybrid environment users Managing Office 365 Contacts Managing Hybrid AD Groups Managing Microsoft 365 Groups Managing Azure Security Groups Managing cloud-only distribution groups Managing cloud-only Azure users Managing cloud-only Azure guest users Managing cloud-only Azure contacts Changes to Active Roles policies for cloud-only Azure objects Managing room mailboxes Managing cloud-only shared mailboxes
Managing Configuration of Active Roles
Connecting to the Administration Service Adding and removing managed domains Using unmanaged domains Evaluating product usage Creating and using virtual attributes Examining client sessions Monitoring performance Customizing the console Using Configuration Center Changing the Active Roles Admin account Enabling or disabling diagnostic logs Active Roles Log Viewer
SQL Server Replication Appendix A: Using regular expressions Appendix B: Administrative Template Appendix C: Communication ports Appendix D: Active Roles and supported Azure environments Appendix E: Active Roles integration with other One Identity and Quest products Appendix F: Active Roles integration with Duo Appendix G: Active Roles integration with Okta Active Roles Language Pack

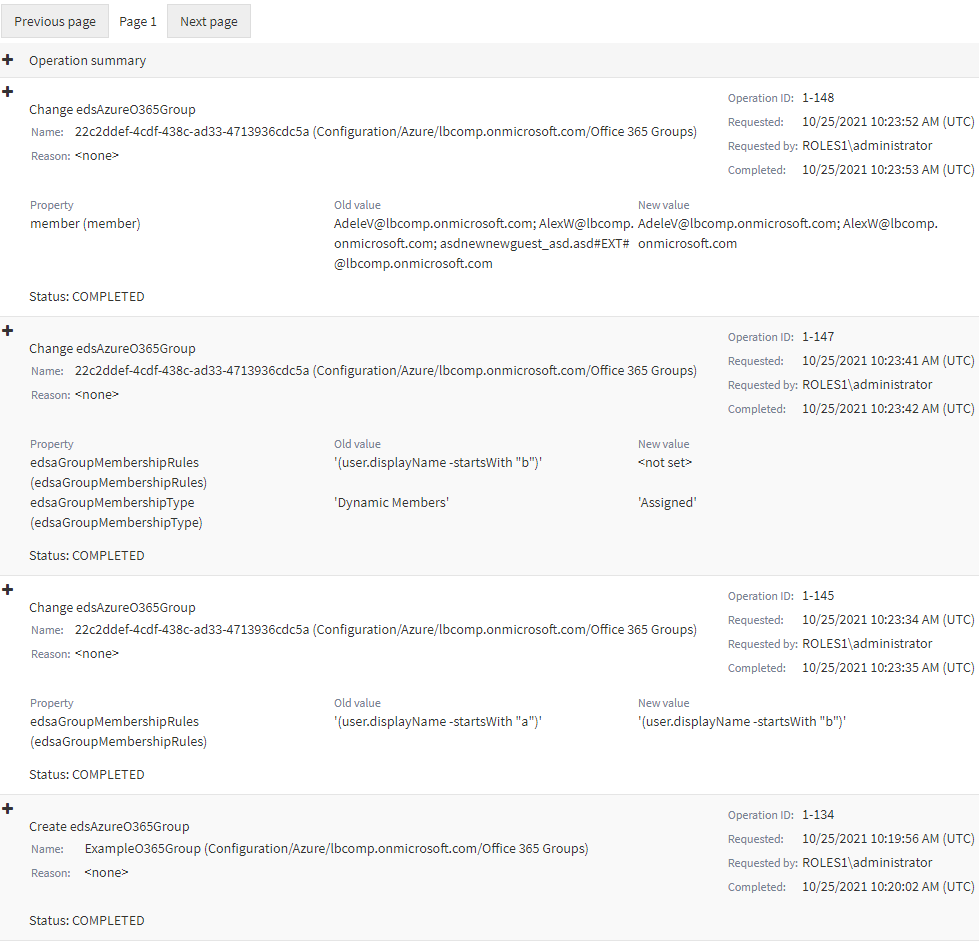
Viewing the change history of an Azure Security Group in the Web Interface

You can check the change history of an Azure Security group with the Active Roles Web Interface. This is useful if you want to view the list of changes that occurred to the selected Azure Security group, such as:

  • Membership changes (that is, added or removed members).

  • Membership type changes (that is, whether the group has been set to assigned or dynamic membership).

NOTE: The Change History option of the Active Roles Web Interface lists only group modifications that were performed in Active Roles. It does not list the changes of the group that were performed outside Active Roles, for example in Azure Portal.

To view the change history of an Azure Security group

  1. Navigate to Directory Management > Tree > Azure > <azure-tenant-name> > Security Groups.

    The list of existing Azure Security groups in the selected Azure tenant appears.

  2. Select the group whose change history you want to check.

  3. In the right-side pane, click Change History.

    The Change History page then appears, with the newest change of the group listed at the top of the page.

  4. To close the Change History window, click any Tree node, or any option listed in the right-side pane.

Deleting an Azure Security Group with the Web Interface

You can use the Active Roles Web Interface to delete an Azure Security group from an Azure tenant. This is typically required when the group becomes redundant or is otherwise no longer required, for example because of a security policy change.

CAUTION: Deleting an Azure Security group is a destructive operation that will delete the group from the Azure tenant on the Azure Portal as well.

To delete an Azure Security group

  1. Navigate to Directory Management > Tree > Azure > <azure-tenant-name> > Security Groups.

    The list of existing Azure Security groups in the selected Azure tenant appears.

  2. Select the group that you want to delete.

  3. In the right-side pane, click Delete.

  4. A confirmation dialog appears. To confirm the deletion of the group, click Yes.

The selected Azure Security group is then deleted from the Azure tenant.

Managing cloud-only distribution groups

You can use distribution groups (also called mail-enabled universal distribution groups) to distribute messages to a group of people.

In the Active Roles Web Interface, you can create, manage or delete cloud-only distribution groups in Directory Management > Tree> Azure > <azure-tenant-name> > Distribution Groups. Distribution groups created in the Active Roles Web Interface are synchronized to the Exchange admin center.

For more information about cloud-only distribution groups, see Create and manage distribution list groups in Exchange Online in the Microsoft Exchange Online documentation.

Creating a new distribution group

You can create a new distribution group with the Create New Distribution Group action of the Active Roles Web Interface.

To create a new distribution group

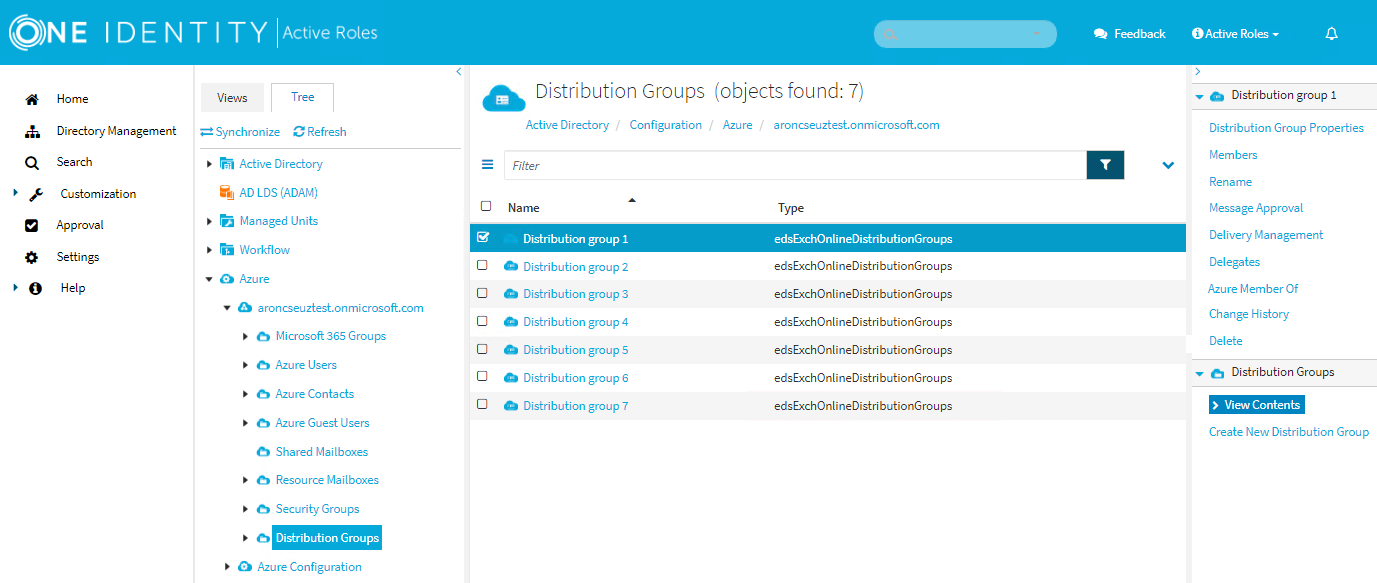
  1. In the Active Roles Web Interface, navigate to Directory Management > Tree > Azure > <azure-tenant-name> > Distribution Groups.

    Figure 165: Directory Management > Tree > Azure > <azure-tenant-name> > Distribution Groups — Listing the Azure distribution groups in the Azure tenant

  2. Click Create New Distribution Group.

  3. In General, configure the settings your organization requires for setting up the distribution group.

    • Enter the Name of the distribution group.

    • (Optional) Enter the Display name of the distribution group.

    • (Optional) Enter a Description for the distribution group.

    • Primary SMTP Address (leave blank for default value): Enter the name and select a domain.

      The default value of the primary SMTP address is the name and the domain name of the mailbox. For example, mailbox1@activeroles.onmicrosoft.com, where mailbox1 is the name and activeroles.onmicrosoft.com is the domain name.

    • (Optional) Hide this group from the global address list (default: selected)

      Select this check box if you do not want the group to appear in the address book and other address lists defined in your Exchange organization.

    • In Joining the group, set who can join the distribution group.

      • Open: Anyone can join this group without owner approval.

      • Closed: Only group owners can add members. All requests to join will be automatically declined.

    • In Leaving the group, set who can leave the distribution group.

      • Open: Anyone can leave this group without owner approval.

      • Closed: Only group owners can remove members. All requests to leave will be automatically declined.

  4. To apply your changes, click Finish.

相关文档

The document was helpful.

选择评级

I easily found the information I needed.

选择评级