Applying Access Templates on a user or group
You can configure permissions for a trustee (typically a user or group) to a securable Active Directory (AD) object via Access Templates (ATs) by selecting the trustee in the Active Roles Console.
To configure permissions with an Access Template from a trustee
-
In the Active Roles Console, in the Active Directory (AD) tree, navigate to the trustee AD object (such as a user or group) for which you want to configure access with an AT or ATs to a securable object.
-
To open the Delegation of Control Wizard, right-click the trustee, then click Delegated Rights > Add.
When the Welcome screen appears, click Next.
-
In the Objects step, specify the securable objects that you want to add to the scope of the AT.
-
To specify a new securable object or objects, click Add. Then, in the Select Objects window, locate and select the securable objects you want to add to the scope of the AT, and click Add.
Once you finalized the list, to close the Select Objects window and apply your selection, click OK.
TIP: If no securable objects appear in the window, use the Click here to display objects link.
Figure 27: Delegation of Control Wizard – Select objects window when specifying securable objects

Figure 28: Delegation of Control Wizard – Selecting securable objects

-
To remove securable objects added earlier to the scope of the AT, select them in the Objects step, and click Remove.
To continue, click Next.
-
In the Access Templates step, specify the ATs you want to assign to the selected trustees for the configured securable object. Expand the containers of the ATs, then select the AT or ATs you want to apply.
Figure 29: Delegation of Control Wizard – Selecting Access Templates
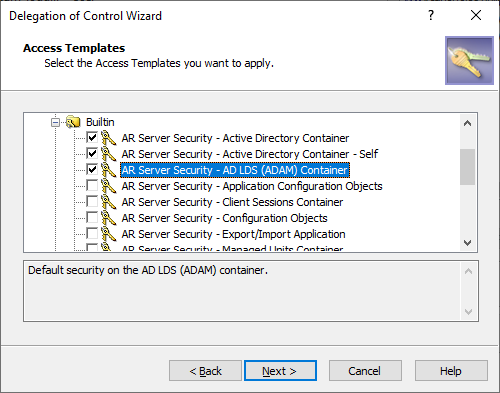
To continue, click Next.
-
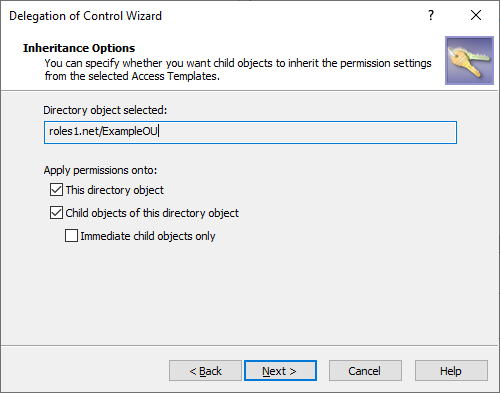
In the Inheritance Options step, specify with the Apply permissions onto setting the scope of securable objects to which Active Roles applies the permissions of the AT:
-
This directory object: Trustees receive the AT permissions only to the selected securable object.
-
Child objects of this directory object: Trustees receive the AT permissions to the children of the securable object. To limit the granted permissions only to the direct children of the object, select Immediate child objects only as well.
Figure 30: Delegation of Control Wizard- Inheritance Options
To continue, click Next.
-
In the Permissions Propagation step, to synchronize the configured permission settings to the native Active Directory (AD) access controls, select Propagate permissions to Active Directory.
Figure 31: Delegation of Control Wizard – Permissions propagation
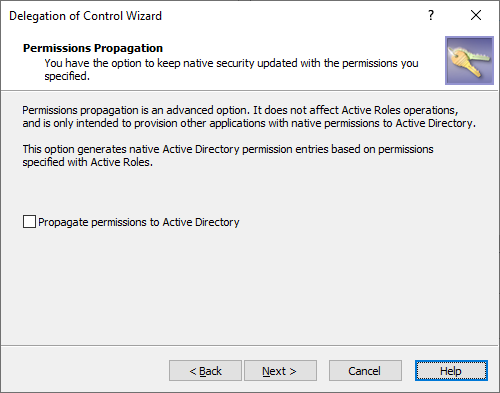
Selecting this setting will modify the authorization information of the AD objects with the permission settings defined in Active Roles, providing more flexibility for users and groups that use native AD management tools besides Active Roles.
IMPORTANT: Selecting this setting will result in trustees keeping their configured permissions outside of the Active Roles environment, with the potential risk of bypassing policies configured and enforced with Active Roles.
Therefore, select this option only if the selected trustees have the required security clearance and/or meet all security guidelines in effect within your organization.
TIP: Once Propagate permissions to Active Directory is selected and configured, you can change this setting at any time with the Active Roles Security > Sync to AD setting, or with the Advanced Details > Sync to AD setting. For more information, see Synchronizing permissions to Active Directory.
To continue, click Next.
-
To complete the wizard, click Finish.
Managing Access Template links
When applying an Access Template, Active Roles creates an Access Template link. Thus, administrative rights are specified by linking Access Templates to securable objects—Managed Units, directory folders (containers), or individual (leaf) objects.
Each Access Template link includes the identifier (SID) of the security principal—user or group—to which the specified administrative rights are assigned. When an Access Template link is created, the user or group becomes a Trustee over the collection of objects or the folder to which the Access Template is linked, with permissions specified by that Access Template.
When an Access Template is modified or no longer applied, the permission information on objects affected by the Access Template changes accordingly.
You can display a list of Access Template links starting from one of the following points:
Another way to see a list of Access Template links is to use the advanced details pane. Ensure that Advanced Details Pane is checked on the View menu, and then select one of the following:
The Active Roles console displays a list of Access Template links in a separate window. Thus, the Active Roles Security window is displayed when you start from a securable object (for example, by clicking a Managed Unit or Organizational Unite and then clicking Delegate Control).
Each entry in the list of the Access Template links includes the following information:
- Trustee The link defines administrative rights of this security principal (group or user).
- Access Template The Access Template that determines the Trustee’s rights.
- Directory Object The link defines the Trustee’s rights to this securable object.
- Sync to Native Security Indicates whether the permissions are synced to Active Directory.
- Disabled Indicates whether the link is disabled. If a link is disabled, the permissions defined by that link have no effect.
- Access Rule Indicates whether an Access Rule is applied to this link (see Windows claims-based Access Rules).
The Active Roles Security window (as well as the Active Roles Security tab in the advanced details pane) lists the links of these categories:
- Direct links Access Template is applied (linked) directly to the securable object you have selected.
- Inherited links Access Template is applied (linked) to a container in the hierarchy of containers above the securable object you have selected, or to a Managed Unit to which the securable object belongs.
The links inherited from parent objects can be filtered out of the list:
- When using the Active Roles Security window, clear the Show inherited check box.
- When using the Active Roles Security tab, right-click the list and then click Show Inherited to uncheck the menu item.
A window or tab that displays Access Template links allows you to manage links. In a window, you can use buttons beneath the list. In a tab, you can right-click a list entry or a blank area, and then use commands on the shortcut menu. For example, the following buttons appear in the Active Roles Security window:
- Add Starts the Delegation of Control wizard to create apply Access Templates.
- Remove Deletes the selected entries from the list of links. Available for direct links only.
- View/Edit Displays the dialog box to view or modify link properties such as permissions inheritance and propagation options.
- Sync to AD Toggles the permissions propagation option of the links selected in the list.
- Disable Disables or enables the link. If a link is disabled, the permissions specified by the link takes no effect.
|

|
TIP: In the Active Roles Security dialog box, the Remove button is available on direct links only. When you need to delete links, it is advisable to manage them using the Links command on the Access Template. |
Steps for managing Access Template links
When you apply an Access Template (see Applying Access Templates earlier in this document), Active Roles creates an object, referred to as an Access Template link, that stores information about the Access Template, the directory object on which the Access Template is applied, and the user or group (Trustee) to whom the permissions are assigned. Basically, the management of permission settings in Active Roles comes to the management of Access Templates and Access Template links. This topic provides some instructions you can use to view or modify Access Template links.
To view or modify Access Template links in which a given Access Template occurs
- Right-click the Access Template, and click Links.
- In the Links dialog box, do the following:
- To create a new link, click Add and follow the steps in the Delegation of Control wizard to apply an Access Template (see Steps for applying an Access Templateearlier in this document).
- To delete a link, select it from the list and click Remove.
- To view or modify the inheritance and synchronization settings for a link, select the link and click View/Edit.
- To change the synchronization setting for a link, select the link and click Sync to AD or Desync to AD.
- To remove or restore the effect of a link, select the link and click Disable or Enable, respectively.
To view or modify Access Template links on a given object
- Open the Active Roles Security dialog box for the object:
- Right-click the object, and click Delegate Control.
OR
- Right-click the object, and click Properties. Then, on the Administration tab in the Properties dialog box, click Security.
- In the Active Roles Security dialog box, do the following:
- To create a new link, click Add and follow the steps in the Delegation of Control wizard to specify permission settings on the object by using an Access Template (for instructions, see Steps for applying an Access Template earlier in this document).
- To delete a link, select it from the list and click Remove.
- To view or modify the inheritance and synchronization settings for a link, select the link and click View/Edit.
- To change the synchronization setting for a link, select the link and click Sync to AD or Desync to AD.
- To remove or restore the effect of a link, select the link and click Disable or Enable, respectively.
To view or modify Access Template links for a given user or group
- Right-click the user or group, and click Delegated Rights.
- In the Delegated Rights dialog box, do the following:
- To create a new link, click Add and follow the steps in the Delegation of Control wizard to specify permissions for the user or group by using an Access Template (for instructions, see Steps for applying an Access Template earlier in this document).
- To delete a link, select it from the list and click Remove.
- To view or modify the inheritance and synchronization settings for a link, select the link and click View/Edit.
- To change the synchronization setting for a link, select the link and click Sync to AD or Desync to AD.
- To remove or restore the effect of a link, select the link and click Disable or Enable, respectively.
|
|
NOTE:
- By default, the Active Roles Security dialog box for an object lists all the links that determine the permission settings on the object, regardless of whether a link was created on the object itself or on a container or Managed Unit that holds the object. To change the display of the list, clear the Show inherited check box.
- In the Active Roles Security dialog box, only direct links can be removed, that is, a link can be removed if the link was created on the object itself (not inherited from a container or Managed Unit). Only direct links are displayed when you clear the Show inherited check box, so you can delete them by clicking Remove.
- In the Active Roles Security dialog box, the Remove button is available only on direct links. When you need to delete links, it is advisable to manage this by using the Links command on the Access Template or by using the Delegated Rights command on the Trustee (user or group). Alternatively, you can delete a link by using View/Edit: Select the link and click View/Edit; then, click Properties next to the Access Template box; then, on the Administration tab, click Links, and, finally, delete the link from the Links dialog box.
- In the Active Roles Security dialog box, the Sync to AD button is available only on direct links. When you need to change synchronization status of a link, it is advisable to manage this by using the Links command on the Access Template or by using the Delegated Rights command on the Trustee (user or group). Alternatively, you can change the synchronization status of a link by using View/Edit: Select the link and click View/Edit; then, on the Synchronization tab, select or clear Propagate permissions to Active Directory.
- Clicking View/Edit displays the Properties dialog box for the selected link. This dialog box can be considered as a focal point for administration of all elements of the link. Thus, from the Properties dialog box, you can access the properties of the directory object, Access Template and Trustee that are covered by the link, view or modify the settings found on the Inheritance Options and Permissions Propagation pages in the Delegation of Control wizard, and enable or disable the link.
- You can also manage Access Template links on the Links or Active Roles Security tab in the advanced details pane, which allows you to perform the same tasks as the Links or Active Roles Security dialog box, respectively. Right-click a link or a blank area on the tab, and use command on the shortcut menu. The Links tab is displayed when you select an Access Template. Otherwise, the Active Roles Security tab is displayed. To display the advanced details pane, check Advanced Details Pane on the View menu (see Advanced pane earlier in this document).
|
Synchronizing permissions to Active Directory
Active Roles provides the option to keep Active Directory native security updated with selected permissions specified using Access Templates. This option, referred to as permissions propagation, is intended to provision users and applications with native permissions to Active Directory. The normal operation of Active Roles does not rely on this option.
You can set the permissions propagation option in these ways:
- When applying Access Templates, you can select the Propagate permissions to Active Directory check box in the Delegation of Control wizard.
- When managing Access Template links, you can use the Sync to AD button in a window that displays a list of links or use the Sync to AD command on a tab that displays a list of links in the advanced details pane.
For example, suppose Active Roles defines certain permissions on an Organizational Unit, and you want to synchronize them to Active Directory. You can accomplish this task as follows.
First, right-click the Organizational Unit and click Delegate Control to display the Active Roles Security window.
Next, in the Access Template links list, select the links that define the permissions you want to synchronize.
Finally, click the Sync to AD button. The Sync to Native Security column in the list displays Yes for the links that you are going to synchronize.
After you click OK, Active Roles creates permission entries in Active Directory so that the Trustee has the same rights in Active Directory as it has in the Active Roles environment in accordance with the Access Template links you have synchronized.
You can stop synchronization of permissions at any time by clicking the Desync to AD button. If you do so, Active Roles deletes all permission entries in Active Directory that were created as a result of synchronization.
|
|
TIP: In the Active Roles Security dialog box, the Sync to AD button is only available on direct links. When you need to synchronize links, it is advisable to manage them using the Links command on the Access Template. |
You can also accomplish this task using the advanced details pane as follows:
- Select the Organizational Unit.
- On the Active Roles Security tab, select the Access Template links that define the permissions you want to synchronize.
- Right-click the selection and click Sync to AD.
You can use the Sync to AD command to stop synchronization: right-click the links you want to no longer be synchronized, and click Desync to AD.
|
|
TIP: On the Active Roles Security tab, the Sync to AD command is available on direct links only. When you need to synchronize links, it is advisable to manage them using the Links tab for the Access Template. |
