You can use the Active Roles Web Interface to create new hybrid Azure users in your organization.
Prerequisites
To create new hybrid Azure users, your organization must meet the following requirements:
-
To enable remote mailboxes, the Exchange management tools of an on-premises Exchange 2013 (or later) installation must be available.
-
The Active Roles service account must be a part of the Recipient Management management role group to run Exchange hybrid commands.
To create a new hybrid user
-
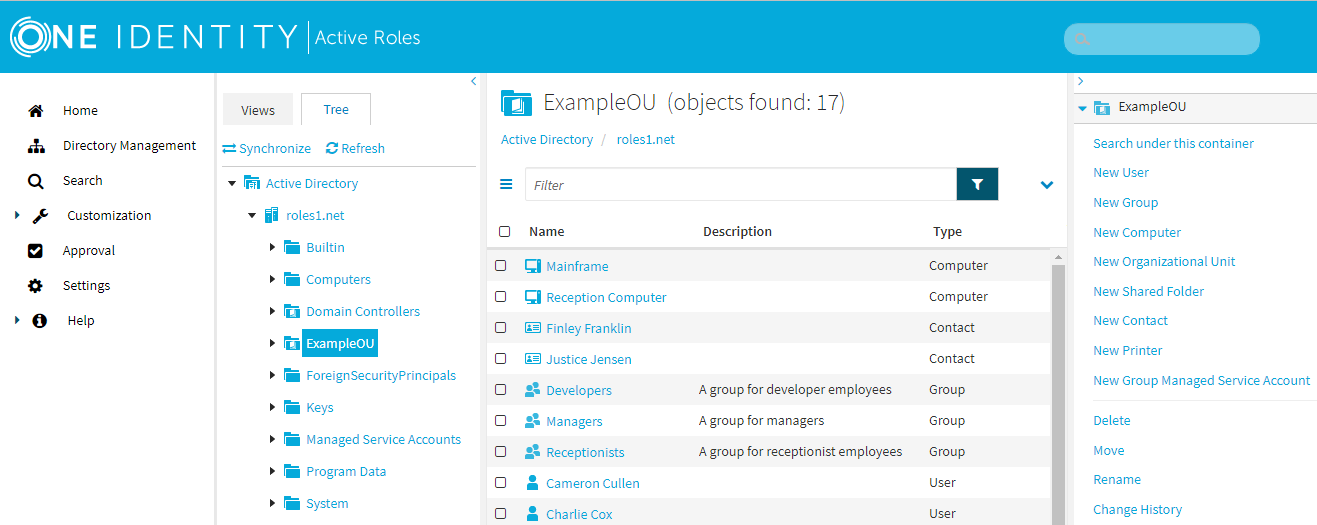
In the Active Roles Web Interface, under Directory Management > Tree > Active Directory, navigate to the OU where you want to create the new hybrid Azure user.
Figure 160: Active Roles Web Interface – Navigating to the OU of the Hybrid Azure user
-
In the list of actions available for the selected OU, click New User.
-
In the General step, specify the following information as required by your organization:
-
First name: The first name of the user.
-
Last name: The last name of the user.
-
(Optional) Initials: The initials of the user.
-
Name: The fully-qualified user name of the user. By default, Active Roles automatically fills this property based on the specified First name, Last name, and Initials.
-
Display name: The name of the user as it will appear in Active Directory. By default, Active Roles automatically fills this property based on the specified Name.
-
User logon name: The user name used to log in to the domain. The User logon name also contains a user principal name (UPN) suffix. To configure the appropriate UPN suffix, use the drop-down button and select the appropriate domain for the user.
NOTE: The list contains:
-
The full DNS name of the current domain.
-
The full DNS name of the root domain of the current forest.
-
Any alternative UPN suffixes created via the Active Directory Domains and Trusts console.
-
(Optional) User logon name (pre-Windows 2000): The user name used to log in to the domain, following the pre-Windows 2000 logon name format: <domain-name>\<user-name>. By default, Active Roles automatically fills this property based on the specified User logon name.
-
In the Account step, specify the security settings of the user:
-
Password and Confirm password: The initial password of the user and the corresponding password confirmation field. You can specify the password either manually, or Generate one with Active Roles that follows the password policy requirements of your organization.
To clear the specified password, click Clear. To spell out each character of the password for clarification, click Spell out.
Figure 161: Active Roles Web Interface – Spelling out the characters of the generated or specified password

-
Account options: Use these options to specify additional security settings for the user (for example, to have them change the configured password during their next login attempt, or have the configured password expire after some time). If you want to enable the created user account later for increased security (for example, because the new user joins later to your organization), select Account is disabled.
-
In the Create Mailbox step, configure whether you want to set up an on-premises Exchange mailbox for the hybrid user, or an Exchange Online mailbox in the cloud:
-
To create a new on-premises Exchange mailbox for the user, keep Create Exchange Mailbox selected.
-
To create a new Exchange Online cloud mailbox for the user, deselect Create Exchange Mailbox.
-
In the Create Azure Account step, to generate the Azure AD account of the hybrid user, select Create Azure Account. This automatically populates all respective fields of the configured hybrid user.
NOTE: Active Roles sets the Temporary Password to the default password of the Active Roles user. You can reset this password for the Azure AD account, if required by the security policies of your organization.
-
From the Tenant drop-down list, select the Azure tenant where you want to store the new hybrid Azure user.
-
From the User Principal Name drop-down list, select the Active Directory (AD) domain with which you want to associate the new hybrid Azure user.
-
In the Usage Location field, select the location where the user is expected to log in from.
NOTE: Local rules and regulations for using products and services associated with the configured user can vary by user location. As a result, the Usage Location field is mandatory: if you do not select a country, Active Roles cannot assign Microsoft licenses to the hybrid Azure user.
-
In the Licenses step, select Exchange Online Plan, and click Finish.
TIP: You can check the licenses assigned to the new user later by selecting the user, then navigating to Azure properties > Licenses.
To convert an existing on-premises user with an Exchange mailbox to a hybrid user with an Exchange Online mailbox, follow the procedure described in Move mailboxes between on-premises and Exchange Online organizations in hybrid deployments in the Microsoft 365 documentation. Describing the procedure in detail is not in the scope of the Active Roles Administration Guide.
NOTE: After the on-premises user mailboxes have been migrated to the Azure cloud, you can enable cloud management in Active Roles by configuring and running the Azure BackSync feature of Active Roles .
For more information on how to set up Azure BackSync, see Configuring Azure BackSync in the Active Roles Administration Guide.
To license a hybrid Azure user for an Exchange Online mailbox, use the Azure Properties action of the Active Roles Web Interface.
To license a hybrid user for an Exchange Online mailbox
-
In the Active Roles Web Interface, under Directory Management > Tree > Active Directory, navigate to the OU where you want to license the on-premises user.
Figure 162: Active Roles Web Interface – Navigating to the OU of the on-premises user
-
Select the user that you want to license, then in the list of actions, click Azure Properties.
-
In the Licenses step, select Exchange Online (Plan 2), and click Finish.
