View Exchange Online Properties for an Office 365 user
You can view or modify the Exchange Online properties of a hybrid Azure user via the Exchange Online Properties window of the Active Roles Web Interface. This is typically required during organizational changes or when the personal information of the user is updated.
NOTE: If the hybrid user is in a Synchronized Identity domain or Federated domain, you can edit most of their Exchange Online attributes in the Exchange Online Properties window of the Active Roles Web Interface. However, you cannot edit the Email address attribute, as that attribute is synchronized only through native Microsoft tools.
To view or change the Exchange Online properties of hybrid Azure user
-
In the Active Roles Web Interface, under Directory Management > Tree > Active Directory, navigate to the OU of the hybrid user whose Exchange Online properties you want to view or modify.
Figure 163: Active Roles Web Interface – Navigating to the OU of the hybrid user
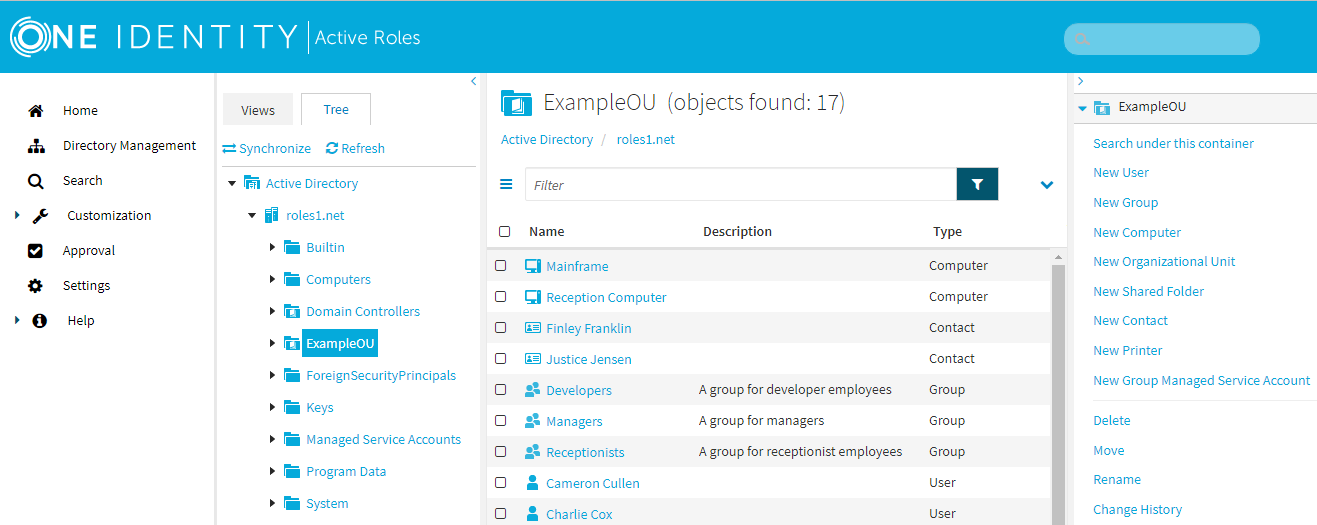
-
Select the user whose Exchange Online properties you want to check, then in the list of actions, click Exchange Online Properties.
-
View or update the applicable settings you want to change:
-
Mail Flow Settings
-
Delegation
-
E-Mail Addresses
-
Mailbox Features
-
Mailbox Settings
-
To apply your changes, click OK, then Finish.
View or modify the message size restrictions
View the Mail Flow settings of an Office 365 User
For an existing Office 365 user, you can use the Mail Flow settings tab in the Exchange Online Properties wizard to view or set the message size restrictions and delivery options.
To view and modify the message size restrictions for an Office 365 user
- In the Exchange Online Properties wizard of an Office 365 user, click Mail Flow Settings.
- Under Mail flow settings, click Message Size Restrictions and then Properties.
The Message Size Restrictions dialog box displays the sending and receiving message size restrictions.
- To set or modify sending and receiving message size restrictions, select one of the following in the Message Size Restrictions dialog box:
- Use default limit – Allows you to set the maximum size for the outgoing or incoming messages to the default value used in Exchange Online, which is applied through the built-in policy "Built-in Policy - Exchange Online - Default Message Size Restrictions" enforced on the container.
- Maximum (KB) – Allows you to specify the maximum value for the outgoing or incoming message size.
- Click Save.
- Close the dialog box and click Save.
|

|
NOTE: The changes made to message size restrictions settings for the Office 365 user can be verified in the Microsoft Office 365 portal. |
View or modify the message delivery options
To view or modify the message delivery options for an Office 365 user
- In the Exchange Online Properties wizard of an Office 365 user, click Mail Flow Settings.
- Under Mail flow settings, click Delivery Options and then Properties.
-
To allow one or more users to send messages on behalf of the Office 365 user, in the Delivery Options dialog box, click Add, select one or more users from the Select Object list, and then click OK.
-
To limit users from sending messages on behalf of the Office 365 user, select the users in the Name list and click Remove.
-
To specify a forwarding address for messages addressed to the Office 365 user, select Forward to, and click Modify.
Alternatively, to change the current forwarding address, click Modify.
-
From the Select Object wizard, select the users to whom the messages addressed to the mailbox can be forwarded and click OK.
- Click Save.
- Close the dialog box and click Save.
|
|
NOTE: The changes made to message delivery options for the Office 365 user can be verified in the Microsoft Office 365 portal. |
View or modify Mailbox delegation settings
For an existing Office 365 user, you can use the MailBox delegation settings tab in the Exchange Online Properties wizard to view or modify other users or groups who can send mails or be provided full access to the user's mailbox.
|
|
NOTE: The modify option is applicable for Office 365 users on all environments, such as, Federated, Synchronized and non-federated. |
To view or modify the MailBox delegation settings for an Office 365 user
- In the Exchange Online Properties wizard of an Office 365 user, click Delegation.
-
To specify or modify the list of users or groups who can send mail from the Office 365 user’s mailbox, under Send as, click Add.
- Select one or more users or groups from the Select Object list, and then click OK.
-
Alternatively, to limit users who can send emails from the Office 365 user’s mailbox, select the users in the Name list and click Remove.
-
Click Properties to view the general properties of the user added under the Send as option.
-
To specify Office 365 users or groups who can be provided full access to the user’s mailbox, under Full Access, click Add, select one or more users or groups from the Select Object list, and then click OK.
-
Alternatively, to limit users who can be provided full access to the user’s mailbox, select the users in the Name list and click Remove.
-
Click Properties to view the general properties of the user added under Full Access option.
- Click Save.
- Close the dialog box and click Save.
|
|
NOTE: The changes made to MailBox delegation settings for the Office 365 user can be verified in the Microsoft Office 365 portal. |
