立即与支持人员聊天
与支持团队交流

Active Roles 8.0 LTS - Administration Guide

Introduction About Active Roles Getting Started Rule-based Administrative Views Role-based Administration
Access Templates as administrative roles Access Template management tasks Examples of use Deployment considerations Windows claims-based Access Rules
Rule-based AutoProvisioning and Deprovisioning
About Policy Objects Policy Object management tasks Policy configuration tasks
Property Generation and Validation User Logon Name Generation Group Membership AutoProvisioning E-mail Alias Generation Exchange Mailbox AutoProvisioning AutoProvisioning for SaaS products OneDrive Provisioning Home Folder AutoProvisioning Script Execution Office 365 and Azure Tenant Selection User Account Deprovisioning Office 365 Licenses Retention Group Membership Removal Exchange Mailbox Deprovisioning Home Folder Deprovisioning User Account Relocation User Account Permanent Deletion Group Object Deprovisioning Group Object Relocation Group Object Permanent Deletion Notification Distribution Report Distribution
Deployment considerations Checking for policy compliance Deprovisioning users or groups Restoring deprovisioned users or groups Container Deletion Prevention policy Picture management rules Policy extensions
Workflows
Understanding workflow Workflow activities overview Configuring a workflow
Creating a workflow definition Configuring workflow start conditions Configuring workflow parameters Adding activities to a workflow Configuring an Approval activity Configuring a Notification activity Configuring a Script activity Configuring an If-Else activity Configuring a Stop/Break activity Configuring an Add Report Section activity Configuring a Search activity Configuring CRUD activities Configuring a Save Object Properties activity Configuring a Modify Requested Changes activity Enabling or disabling an activity Enabling or disabling a workflow Using the initialization script
Example: Approval workflow E-mail based approval Automation workflow Activity extensions
Temporal Group Memberships Group Family Dynamic Groups Active Roles Reporting Management History
Understanding Management History Management History configuration Viewing change history
Workflow activity report sections Policy report items Active Roles internal policy report items
Examining user activity
Entitlement Profile Recycle Bin AD LDS Data Management One Identity Starling Management Managing One Identity Starling Connect Configuring linked mailboxes with Exchange Resource Forest Management Configuring remote mailboxes for on-premises users Azure AD, Office 365, and Exchange Online management
Configuring Active Roles to manage hybrid AD objects Managing Hybrid AD Users Unified provisioning policy for Azure O365 Tenant Selection, Office 365 License Selection, and Office 365 Roles Selection, and OneDrive provisioning Office 365 roles management for hybrid environment users Managing Office 365 Contacts Managing Hybrid AD Groups Managing Microsoft 365 Groups Managing Azure Security Groups Managing cloud-only distribution groups Managing cloud-only Azure users Managing cloud-only Azure guest users Managing cloud-only Azure contacts Changes to Active Roles policies for cloud-only Azure objects Managing room mailboxes Managing cloud-only shared mailboxes
Managing Configuration of Active Roles
Connecting to the Administration Service Adding and removing managed domains Using unmanaged domains Evaluating product usage Creating and using virtual attributes Examining client sessions Monitoring performance Customizing the console Using Configuration Center Changing the Active Roles Admin account Enabling or disabling diagnostic logs Active Roles Log Viewer
SQL Server Replication Appendix A: Using regular expressions Appendix B: Administrative Template Appendix C: Communication ports Appendix D: Active Roles and supported Azure environments Appendix E: Active Roles integration with other One Identity and Quest products Appendix F: Active Roles integration with Duo Appendix G: Active Roles integration with Okta Active Roles Language Pack

Steps for configuring a Group Membership AutoProvisioning policy

To configure a Group Membership AutoProvisioning policy via the Active Roles MMC console, perform the following procedure.

To configure a Group Membership AutoProvisioning policy

  1. Navigate to Configuration > Policies > Administration.

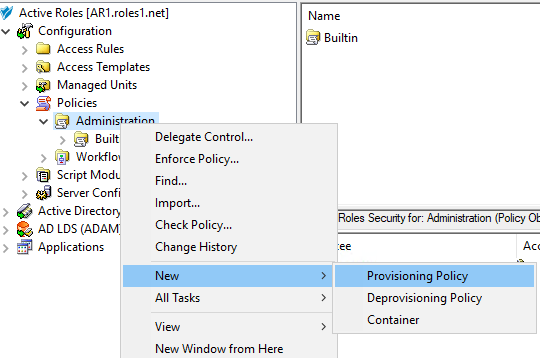
  2. To open the New Provisioning Policy Object Wizard dialog, right-click in the middle pane to open the context menu, and then select New > Provisioning Policy.

  3. On the Name and Description page, provide a unique Name for the new policy object. Optionally, also provide a Description. To continue, click Next.

  4. On the Policy to Configure page, select Group Membership AutoProvisioning, and then click Next.

  5. On the Object Type Selection page, to specify the type of object you want the policy to add or remove from groups, click Select, then click OK.

    TIP: If you do not see the object type you need, expand the list by selecting Show all possible object types.

  6. On the Policy Conditions page, set up conditions that specify how the policy adds or removes the selected object types to or from groups. To create a new condition with the Set Up Condition dialog, click Add.

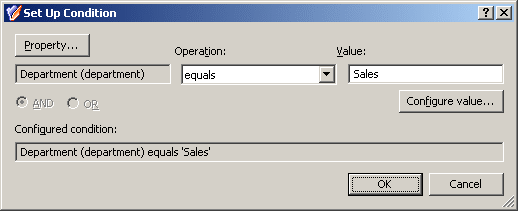
  7. To select the object property on which you want to set up the condition, click Property to open the Object property page.

  8. Select the property you want the condition to check, then click OK.

    TIP: If you do not see the object type you need, expand the list by selecting Show all possible object types.

  9. In Operation, click the operation type you want to assign to the condition.

  10. To specify additional configuration for the condition, enter a variable into the Value field, then click OK to close the Add Value dialog.

    Alternatively, click Configure Value, then click Add, and configure an entry manually in the Add Entry dialog. For more information on manual configuration, see Steps for configuring entries. To close the Add Value dialog, click OK.

  11. (Optional) To modify or remove an existing condition, click View/Edit or Remove on the Policy Conditions page, respectively.

  12. Click Next on the Policy Conditions page to continue onto the Policy Action page.

  13. On the Policy Action page, specify whether you want the policy to add or remove objects if the configured conditions are met.

    • Select Add object to groups if object satisfies policy conditions if you want Active Roles to add the object to the specified group(s) if the configured conditions are met.

    • Select Remove object from groups if object satisfies policy conditions if you want Active Roles to remove the object from the specified group(s) if the configured conditions are met.

    Click Next to continue.

  14. On the Group Selection page, specify the group(s) you want the policy to add the objects to (or remove from, depending on your choice on the Policy Action page). Click Add to open the Select Objects dialog, and then use either the Look in: drop-down or click Browse to specify the group(s). Once you are ready, click Next to continue.

    NOTE: Consider the following limitations when configuring a Group Membership Autoprovisioning policy for cloud-only Azure objects:

    • When provisioning cloud-only Azure users or Azure guest users, you must specify an O365 Group (or O365 Groups) in this step. To do so, click Browse to open the Browse for Container dialog, and then navigate to the following node for the list of O365 Groups in the organization:

      Azure > <azure-tenant-name> > Office 365 Groups

    • The Group Membership AutoProvisioning policy can only add or remove cloud-only Azure users and guest users to or from O365 Groups that are located in the same Azure tenant as the Azure users and guest users. Selecting O365 Groups located in another Azure tenant causes the configured Policy Object to not work properly.

  15. On the Enforce Policy page, specify the objects to which the configured Policy Object will be applied. Click Add, and then use the Select Objects dialog to locate and select the objects.

    TIP: When provisioning cloud-only Azure users or guest users, you can either select the respective object category (such as the Azure user or Azure guest user node) in this step, or the Azure tenant that contains the Azure objects.

  16. Click Next, and then click Finish to create the new policy.

Scenario: Adding users to a specified group

The policy described in this scenario automatically adds user accounts to the specified groups depending on the Department property of user accounts. If the Department property of a user account is set to Sales, the policy adds the account to the Sales group.

To implement this scenario, you must perform the following actions:

  1. Create and configure a Policy Object that defines the appropriate policy.
  2. Apply the Policy Object to a domain, OU, or Managed Unit.

As a result, when a user account in the container you selected in Step 2 has the Department property set to Sales, Active Roles automatically adds that account in the Sales group.

The following two sections elaborate on the steps to implement this scenario.

Step 1: Creating and configuring the Policy Object

Step 1: Creating and configuring the Policy Object

You can create and configure the Policy Object you need by using the New Provisioning Policy Object wizard. For information about the wizard, see Creating a Policy Object in the Policy Object management tasks section earlier in this chapter.

To configure the policy, click Group Memberships AutoProvisioning on the Select Policy Type page of the wizard. Then, click Next.

On the Object Type Selection page, click Next to accept the default setting for the object type—User.

On the Policy Conditions page, click Add to display the Set Up Condition dialog box.

Configure the condition as follows:

  1. Click the Property button; then, select the Department property and click OK.
  2. In the Value box, type Sales.

After you complete these steps, the Set Up Condition dialog box looks as shown in the following figure.

Figure 68: Set up condition

Click OK to close the Set Up Condition dialog box.

On the Policy Conditions page, click Next.

On the Policy Action page, click Add object to groups if object satisfies policy conditions, and then click Next.

On the Group Selection page, click Add and use the Select Objects dialog box to locate the Sales group. After you add the Sales group to the list on the Group Selection page, click Next and follow the instructions in the wizard to create the Policy Object.

Step 2: Applying the Policy Object

Step 2: Applying the Policy Object

You can apply the Policy Object by using the Enforce Policy page in the New Provisioning Policy Object wizard, or you can complete the wizard and then use the Enforce Policy command on the domain, OU, or Managed Unit where you want to apply the policy.

For more information on how to apply a Policy Object, see Applying Policy Objects and Managing policy scope earlier in this chapter.

相关文档

The document was helpful.

选择评级

I easily found the information I needed.

选择评级