立即与支持人员聊天
与支持团队交流

Active Roles 8.0 LTS - Administration Guide

Introduction About Active Roles Getting Started Rule-based Administrative Views Role-based Administration
Access Templates as administrative roles Access Template management tasks Examples of use Deployment considerations Windows claims-based Access Rules
Rule-based AutoProvisioning and Deprovisioning
About Policy Objects Policy Object management tasks Policy configuration tasks
Property Generation and Validation User Logon Name Generation Group Membership AutoProvisioning E-mail Alias Generation Exchange Mailbox AutoProvisioning AutoProvisioning for SaaS products OneDrive Provisioning Home Folder AutoProvisioning Script Execution Office 365 and Azure Tenant Selection User Account Deprovisioning Office 365 Licenses Retention Group Membership Removal Exchange Mailbox Deprovisioning Home Folder Deprovisioning User Account Relocation User Account Permanent Deletion Group Object Deprovisioning Group Object Relocation Group Object Permanent Deletion Notification Distribution Report Distribution
Deployment considerations Checking for policy compliance Deprovisioning users or groups Restoring deprovisioned users or groups Container Deletion Prevention policy Picture management rules Policy extensions
Workflows
Understanding workflow Workflow activities overview Configuring a workflow
Creating a workflow definition Configuring workflow start conditions Configuring workflow parameters Adding activities to a workflow Configuring an Approval activity Configuring a Notification activity Configuring a Script activity Configuring an If-Else activity Configuring a Stop/Break activity Configuring an Add Report Section activity Configuring a Search activity Configuring CRUD activities Configuring a Save Object Properties activity Configuring a Modify Requested Changes activity Enabling or disabling an activity Enabling or disabling a workflow Using the initialization script
Example: Approval workflow E-mail based approval Automation workflow Activity extensions
Temporal Group Memberships Group Family Dynamic Groups Active Roles Reporting Management History
Understanding Management History Management History configuration Viewing change history
Workflow activity report sections Policy report items Active Roles internal policy report items
Examining user activity
Entitlement Profile Recycle Bin AD LDS Data Management One Identity Starling Management Managing One Identity Starling Connect Configuring linked mailboxes with Exchange Resource Forest Management Configuring remote mailboxes for on-premises users Azure AD, Office 365, and Exchange Online management
Configuring Active Roles to manage hybrid AD objects Managing Hybrid AD Users Unified provisioning policy for Azure O365 Tenant Selection, Office 365 License Selection, and Office 365 Roles Selection, and OneDrive provisioning Office 365 roles management for hybrid environment users Managing Office 365 Contacts Managing Hybrid AD Groups Managing Microsoft 365 Groups Managing Azure Security Groups Managing cloud-only distribution groups Managing cloud-only Azure users Managing cloud-only Azure guest users Managing cloud-only Azure contacts Changes to Active Roles policies for cloud-only Azure objects Managing room mailboxes Managing cloud-only shared mailboxes
Managing Configuration of Active Roles
Connecting to the Administration Service Adding and removing managed domains Using unmanaged domains Evaluating product usage Creating and using virtual attributes Examining client sessions Monitoring performance Customizing the console Using Configuration Center Changing the Active Roles Admin account Enabling or disabling diagnostic logs Active Roles Log Viewer
SQL Server Replication Appendix A: Using regular expressions Appendix B: Administrative Template Appendix C: Communication ports Appendix D: Active Roles and supported Azure environments Appendix E: Active Roles integration with other One Identity and Quest products Appendix F: Active Roles integration with Duo Appendix G: Active Roles integration with Okta Active Roles Language Pack

Policy configuration tasks

This section discusses how to configure policies of the following types, grouped by Policy Object category.

Table 15: Policy Configuration Tasks

Policy Object category

Policy type

Provisioning Policy Object


Property Generation and Validation

User Logon Name Generation

Group Membership AutoProvisioning

Email Alias Generation

Exchange Mailbox AutoProvisioning

Home Folder AutoProvisioning

Script Execution

Office 365 and Azure Tenant Selection

AutoProvisioning for SaaS products

Office 365 Licenses Retention

Deprovisioning Policy Object

User Account Deprovisioning

Group Membership Removal

Exchange Mailbox Deprovisioning

Home Folder Deprovisioning

User Account Relocation

User Account Permanent Deletion

Group Object Deprovisioning

Group Object Relocation

Group Object Permanent Deletion

Notification Distribution

Report Distribution

Script Execution

Property Generation and Validation

Property Generation and Validation policies help you automate the configuration of directory object properties. Using this policy, you can:

  • Automatically generate default property values for new directory objects (for example, when creating new user accounts or groups).

  • Automatically check if the configured property values comply with the specified corporate policy rules.

To set up a policy, you can specify conditions that the property values must meet, and can also determine the default value for each property provisioned with the policy. For example, you can configure a policy to enforce a certain type of telephone number formatting in the contact information properties for your directory.

TIP: Consider the following when planning to configure a Property Generation and Validation policy:

  • To help you get started with configuring policy-based administration in your organization, Active Roles includes a set of built-in Policy Objects that offer provisioning and deprovisioning rules to the most typical administrative use cases. To find the built-in Policy Objects, navigate to the following node of the Active Roles MMC console:

    Configuration > Policies > Administration > Builtin

  • If the directory of your organization contains cloud-only Azure objects (Azure users, guest users or contacts), then use the built-in Azure CloudOnly Policy - Default Rules to Generate Properties Policy Object to provision their default properties and accepted values.

NOTE: Policy Object settings specific to Azure cloud-only objects (such as cloud-only Azure users, guest users, or contacts) are available only if your Active Roles deployment is licensed for managing cloud-only Azure objects. Contact One Identity support for more information.

Also, Policy Objects specific to Azure cloud-only objects will work correctly only if an Azure tenant is already configured in the AD of the organization, and Active Roles is already set as a consented Azure application for that Azure tenant. For more information on these settings, see Configuring a new Azure tenant and consenting Active Roles as an Azure application.

How this policy works

When creating or modifying an object, Active Roles checks whether the property values satisfy criteria defined in the policy. If they do not, Active Roles prevents you from the object creation or modification.

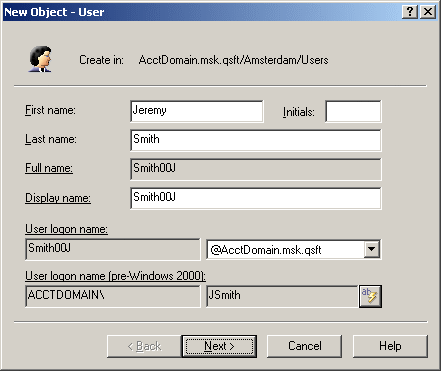
In object creation wizards and properties dialog boxes, the properties that are controlled by the policy are displayed as hyperlinks. If you have a policy configured to populate a property with a certain value (generate the default value), the edit box for the property is unavailable for editing, as shown in the following figure.

Figure 42: Object creation

You can click a hyperlink to display the policy details.

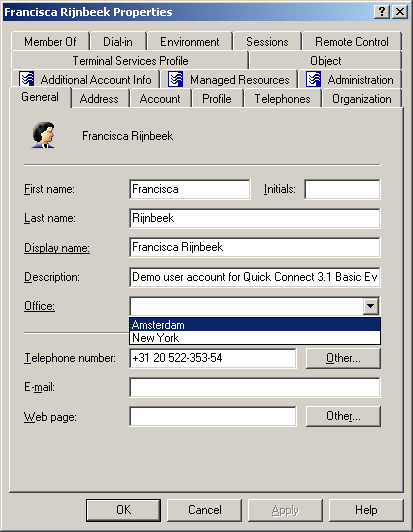
With a policy configured to define a set of acceptable values for a given property, the Active Roles console provides a drop-down list to select a value when modifying that property. The user of the Active Roles console can choose an acceptable value from the list instead of having to type a value in the edit box. This feature is illustrated in the following figure: The Office box provides a list of acceptable values that are prescribed by policy.

Figure 43: Acceptable values for a policy

How to configure a Property Generation and Validation policy

To configure a Property Generation and Validation policy, select Property Generation and Validation on the Policy to Configure page in the New Provisioning Policy Object wizard or in the Add Provisioning Policy wizard. Then, click Next to display the Controlled Property page:

Figure 44: New provisioning policy object wizard

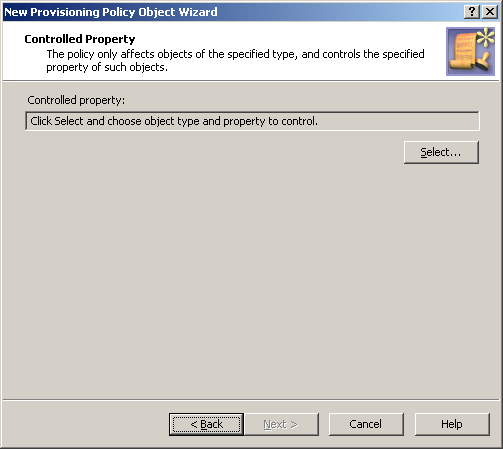
Click Select to choose the object type and object property you want the policy to control. This displays the Select Object Type and Property dialog box.

Figure 45: Select Object type and Property

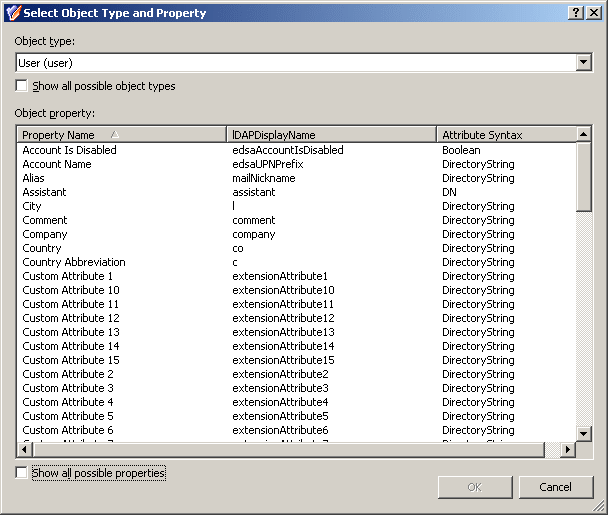
From the Object type list, select the object type. This lets you to specify the type of objects that are subject to the policy control. From the Object property list, select the object property. This lets you to specify the property you want the policy to control. Click OK.

On the Controlled Property page, click Next to display the Configure Policy Rule page:

Figure 46: Configure Policy Rule

This page allows you to determine criteria used to generate and validate values of the controlled property.

To configure a policy rule, first select appropriate check boxes in the upper box on the Configure Policy Rule page. Each check box label is composed of the name of the controlled property followed by a condition. For example, if you select the check box next to must be specified, the policy will force a value to be assigned to the property.

If you want the policy to generate a default value for the controlled property, select the check box next to must be <value> (generates default value).

For the policy not to distinguish between uppercase and lowercase letters, select the check box next to is case insensitive.

After you selected check boxes in the upper box, the lower box prompts you to configure values, as shown in the following figure.

Figure 47: Edit policy rule

In the lower box, click links labeled <click to add value> to configure additional values. If you select several check boxes in the upper box, you must configure value for each condition.

In the Edit policy rule box, you can also:

  • Modify a value. Right-click the value and click Edit. This displays a dialog box similar to the Add Value dialog box, discussed later in this section.
  • Remove a value. Right-click the value and click Remove.
  • Rearrange the list of values (provided that multiple values are specified for a particular condition). Right-click a value and use the Move Up or Move Down command to change position of the value in the list, or click Sort Items Ascending or Sort Items Descending to sort the list accordingly.
  • Import values from a text file. Prepare a text file containing one value per line, right-click any value in the Edit policy rule box, click Import Items, and then open the file you prepared.
  • Export the values to a text file. Right-click any value, click Export Items, and specify a text file to write the values to.
  • Specify whether you want the rule to generate the default value. Click the Yes or No link to toggle this option.

To combine criteria into the policy rule, use the AND or OR operator. The policy will pass if the property value meets all of the specified criteria or any one of them depending on the operator you choose. To change the operator, click the link labeled and or or.

Clicking a link labeled <click to add value> displays a dialog box similar to the following figure.

Figure 48: Add Value

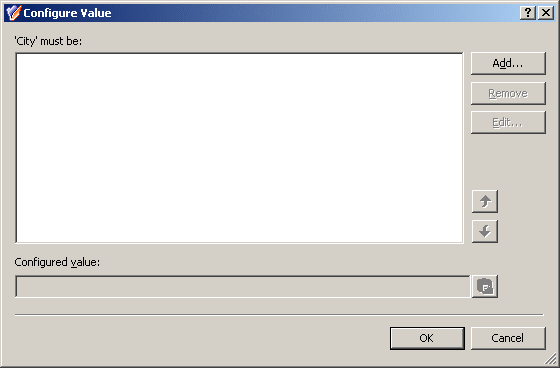
The Add Value dialog box allows you to specify a value for the selected condition. You can type a value in the edit box or use the point-and-click interface to configure a value. Clicking the Configure button displays the Configure Value dialog box, shown in the following figure.

Figure 49: Configure Value

Each value is a concatenation of one or more entries. In the Configure Value dialog box, you can:

  • Add any number of entries to the value. Click Add to display the Add Entry window, discussed later in this section.
  • Remove entries from the value. Select entries from the list and click Remove.
  • Modify entries included in the value. Select an entry and click Edit. This displays a window similar to the Add Entry window, where you can view and modify the entry properties.
  • Move the selected entry up and down in the list, thereby rearranging the entries in the value. Click an entry in the upper box, and then click the arrow buttons next to the box to move the entry.
  • Paste the text from the Clipboard at the end of the value. If the text includes a valid syntax implementing an entry of a type other than Text (see the table below), the syntax is treated accordingly. Copy a text to the Clipboard, and then click the button next to the Configured value box to paste the text at the end of the string in that box.

In the Add Entry window, you can select the type of the entry to add, and then configure the entry. The following table summarizes the available types of entries.

Table 16: Types of entries

Type of entry

Description

Text

Adds a text string to the value.

<Object> Property

Adds a selected property (or a part of a property) of the object being managed by the policy. When displaying this type of entry the console substitutes for the <Object> placeholder the actual category of objects that are subject to the policy control.

For example, with the policy configured to control a certain property of user objects, you can use this type of entry to populate that property of a user object with data stored in other properties of that same user object.

Parent OU Property

Adds a selected property (or a part of a property) of an organizational unit in the hierarchy of containers above the object being managed by this policy.

For example, with the policy configured to control a certain property of user objects, you can use this type of entry to populate that property of a user object with data stored in properties of the organizational unit containing that user object (immediate parent OU).

Parent Domain Property

Adds a selected property (or a part of a property) of the domain of the object being managed by this policy.

For example, with the policy configured to control a certain property of user objects, you can use this type of entry to populate that property of a user object with data stored in properties of the domain in which the user object resides.

Mask

Adds a syntax that determines what characters are allowed in the property controlled by this policy. You can use this type of entry to enforce a data format like numeric, postal/ZIP code, or telephone number.

The steps to configure an entry depend on the type of the entry. The following sections elaborate on the procedures for each of the entry types occurring in the Add Entry window.

相关文档

The document was helpful.

选择评级

I easily found the information I needed.

选择评级