You can delete a shared mailbox in the selected Azure tenant with the Delete option of the Active Roles Web Interface.
To delete a shared mailbox
-
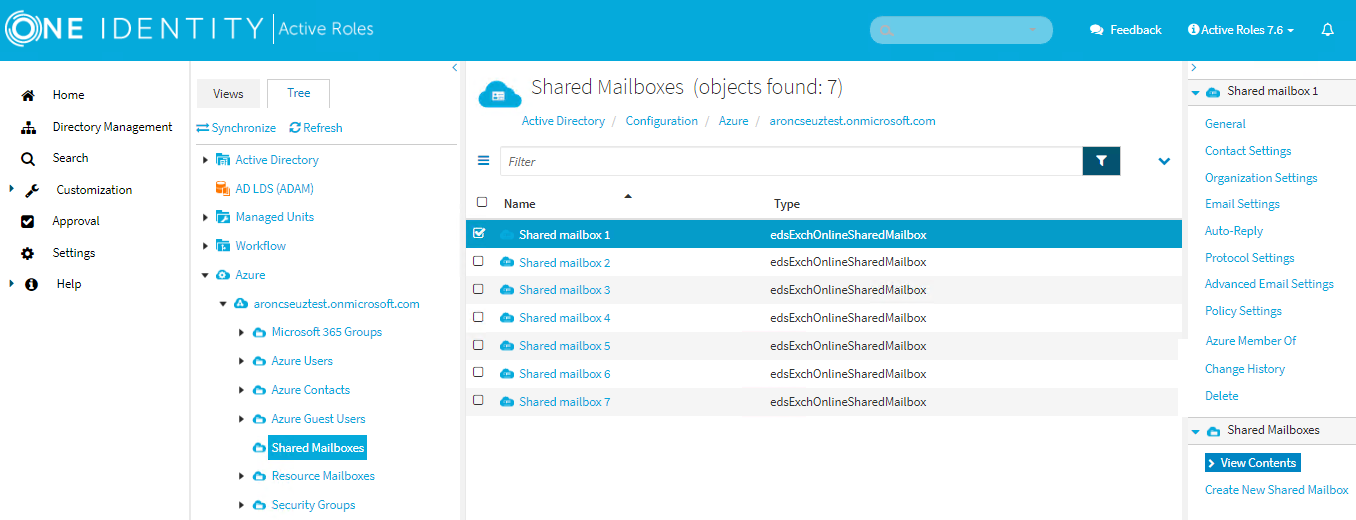
Navigate to Directory Management > Tree > Azure > <azure-tenant-name> > Shared Mailboxes.
Figure 212: Directory Management > Tree > Azure > <azure-tenant-name> > Shared Mailboxes — Listing the shared mailboxes in the tenant
-
Select the shared mailbox that you want to delete.
-
Click Delete.
-
To confirm, click Yes.
This chapter covers the following management activities:
To manage the configuration of Active Roles, you must have the necessary permissions. It is sufficient to be a member of the Active Roles Admin account. The Active Roles Admin account is specified when configuring the Administration Service. It defaults to the Administrators group on the computer running the Administration Service.
The authority to modify the Active Roles configuration can be delegated by applying the Manage Configuration Access Template to the Server Configuration container.
To configure a particular Administration Service using the Active Roles console, you need to manually specify the Administration Service to connect to. Otherwise, the console automatically selects the Administration Service.
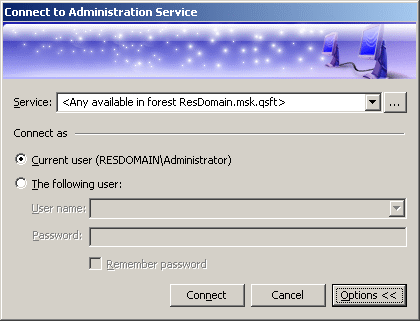
You can use the Connect to Administration Service dialog box to select the appropriate Administration Service. To display this dialog box, right-click Active Roles in the console tree and click Connect. The dialog box looks as shown in the following figure.
Figure 213: Connect to Administration Service

In the Service box, type or select the name of the computer running the Administration Service to connect to, and then click Connect. The Service box provides a list of names that were specified for previous connection sessions. The last selected name is displayed by default.
To select the Administration Service that is not in the list, click the Select button next to the Service box: 
This displays the Select Administration Service dialog box, shown in the following figure.
Figure 214: Select Administration Service

The Select Administration Service dialog box lists the Administration Services that are available in the specified forest. You can choose a different forest by clicking Change. The list items are sorted according to priority, considering site location and service load (less loaded Administration Services are displayed at the top of the list). To add a certain Service to the Connect to Administration Service dialog box, click that Service and then click OK.
If you have connected to a specific Service, the console will attempt to automatically connect to that Service on every subsequent start. If you have selected <Any available Administration Service>, the console will attempt to connect to the nearest, least loaded Service in the specified forest, giving preference to the Services that belong to the same replication group as the Service to which the console was connected in the previous session.
By default, the console connects to the Administration Service in the security context of your logon account (that is, the user account to which you have logged on). This means that you can only use the console to perform the tasks that are delegated to your user account. You have the option to establish a connection using a different account, in order to change the scope of the allowed tasks. Click Options to expand the Connect to Administration Service dialog box, as shown in the following figure.
Figure 215: Connect to Administration Service
Click The following user and specify the user logon name and password of the account to be used for connection. By selecting the Remember password check box you can have the console automatically use the specified user name and password in the future connection sessions. Otherwise, on a subsequent start, the console will prompt you for a password.
By default, on installing Active Roles, all users are allowed to log in to the MMC interface. To manage the MMC interface access for a user, you must configure the options using Configuration Center | MMC Interface Access| Manage settings. Selecting this option restricts all non Active Roles Administrators from using the console. All delegated users are affected, however, it does not apply to Active Roles Administrators.
To be able to log in to the MMC interface, the user must be delegated with the User Interfaces access rights on the User Interfaces container under Server Configuration. User Interfaces Access templates that provide the access rights are available as part of the Active Roles built-in Access templates in the User Interfaces container.
To delegate the control to users in the User Interfaces container you must apply the User Interface Access Template
- In the console tree, expand Active Roles | Configuration | Server Configuration.
- Under Server Configuration, locate the User Interfaces container, right-click it, and click Delegate Control.
-
On the Users or Groups page, click Add, and then select the users or groups to which you want to delegate the control. Click Next.
- On the Access Templates page, expand the Active Directory | User Interfaces folder, and select the check box next to User Interface Management-MMC Full control.
- Click Next and follow the instructions in the wizard, accepting the default settings.
-
After you complete these steps, the users and groups you selected in Step 3 are authorized to log in to the MMC interface.
- Click OK to close the Active Roles Security dialog box.
