The Active Roles console provides separate wizards for creating Policy Objects in each category—provisioning and deprovisioning. You can start the wizards from the Administration container, located under Configuration/Policies in the console tree:
- To configure provisioning policies, right-click Administration in the console tree, and select New | Provisioning Policy.
- To configure deprovisioning policies, right-click Administration in the console tree, and select New | Deprovisioning Policy.
If you need to manage a large number of Policy Objects, it is advisable to create containers that hold only specified Policy Objects for easy location: In the console tree, right-click Administration and select New | Container. Then, you can use wizards to create Policy Objects in that container: Right-click the container and select New | Provisioning Policy or New | Deprovisioning Policy.
On the Welcome page of the wizard, click Next. Then, on the Name and Description page, type a name and description for the new Policy Object. The Active Roles console will display the name and description in the list of Policy Objects in the details pane.
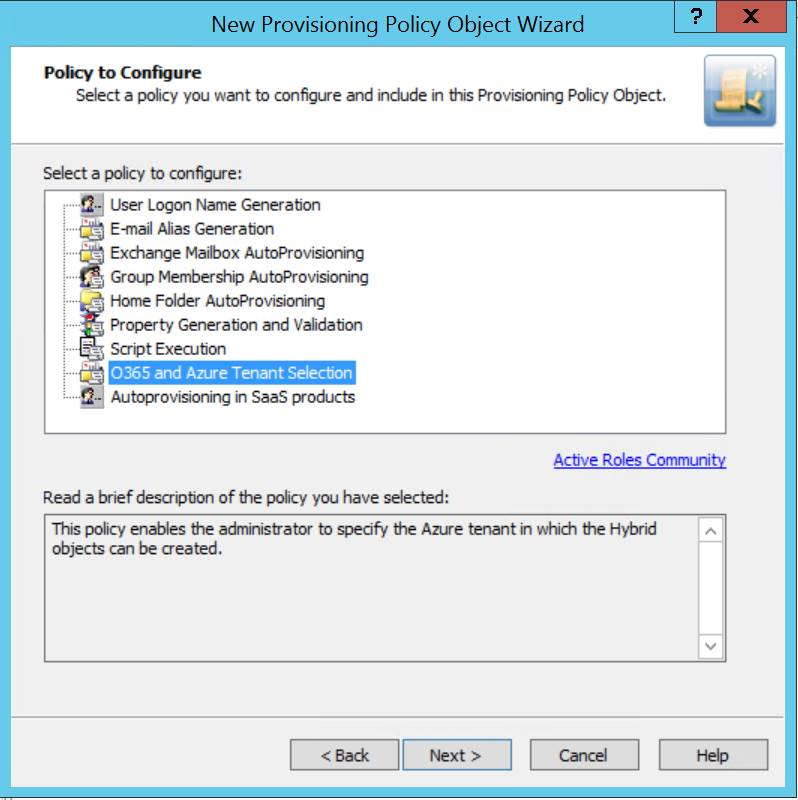
Click Next to continue. This displays a page where you can select the policy you want to configure. The list of policies depends on whether you are creating a Provisioning Policy Object or Deprovisioning Policy Object. For instance, the list of provisioning policies looks as shown in the following figure.
Figure 37: Provisioning policies

On the Policy to Configure page, select the type of policy you want to add to the Policy Object. When the type is selected, its description is displayed in the lower box.
Click Next to configure the policy. The steps involved in configuring a policy depend on the policy type. For instructions on how to configure policies, see Policy configuration tasks later in this chapter.
When you are done with configuring a policy, the wizard presents you with a page where you can specify the policy scope. You have the option to complete a list of containers or Managed Units on which you want the policy to be enforced. This step is optional because you can configure the policy scope after creating the Policy Object (see Applying Policy Objects later in this chapter).
Click Next, and then click Finish to complete the wizard. This creates the new Policy Object.
To create a Policy Object
- In the console tree, under Configuration | Policies | Administration, locate and select the folder in which you want to add the Policy Object.
You can create a new folder as follows: Right-click Administration and select New | Container. Similarly, you can create a sub-folder in a folder: Right-click the folder and select New | Container.
- Right-click the folder, point to New, and then click Provisioning Policy or Deprovisioning Policy.
- On the Welcome page of the wizard, click Next.
- On the Name and Description page, do the following:
- In the Name box, type a name for the Policy Object.
- Under Description, type any optional information about the Policy Object.
Click Next.
- On the Policy to Configure page, select a policy type, and click Next to configure policy settings.
- On the Enforce Policy page, you can specify the objects to which this Policy Object is to be applied:
- Click Add, and use the Select Objects to locate and select the objects you want.
- Click Next, and then click Finish.
|

|
NOTE:
|
Although the New Policy Object wizard makes it possible to configure only one policy, a Policy Object may include multiple policies. You can add policies, remove policies, and modify policy options in an existing Policy Object by managing its properties: Right-click the Policy Object and then click Properties.
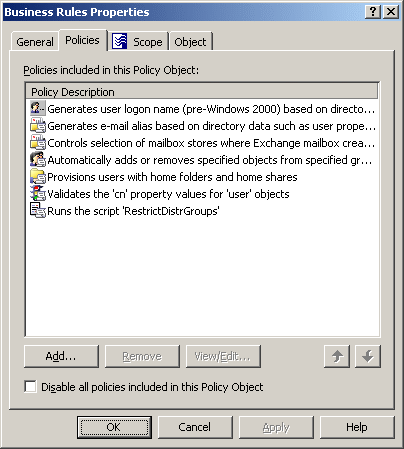
To add, remove, or edit policies in a Policy Object, go to the Policies tab in the Properties dialog box. The tab is shown in the following figure.
Figure 38: Policy Objects Management

The Policies tab displays a list of policies defined in the Policy Object. Each list entry includes an icon denoting policy type and policy description. The policies are executed in the order shown in the list. To change the order, use the arrows in the lower-right corner of the tab.
On the Policies tab, you can perform the following management tasks:
- Disable all policies. For troubleshooting purposes, you may need to stop enforcement of the policies without actually deleting them. To accomplish this, select the Disable all policies included in this policy object check box.
|

|
NOTE: The policies that can be added to a given Policy Object depend on the type of the Policy Object. A Provisioning Policy Object can only include provisioning-related policies whereas a Deprovisioning Policy Object can only include deprovisioning-related policies (see Provisioning Policy Objects and Deprovisioning Policy Objects earlier in this document). |
To add a policy to a Policy Object
- In the console tree, under Configuration | Policies | Administration, locate and select the folder that contains the Policy Object you want to modify.
- In the details pane, right-click the Policy Object, and then click Properties.
- On the Policies tab, click Add to start a wizard that helps you configure a policy.
- On the Welcome page of the wizard, click Next.
- On the Policy to Configure page, select the type of the policy you want to add.
- Configure policy settings. For instructions, see Policy configuration tasks.
|

|
NOTE:
- The Policies tab lists the policies that are configured in the Policy Object. You can use the Policies tab to add, modify, or delete policies from the Policy Object.
- Active Roles processes policies in the order they are listed on the Policies tab. To change the order, select a policy and click
 or or  to move the policy up or down in the list. to move the policy up or down in the list.
- Once a Policy Object is applied within Active Roles to determine policy settings in the directory, any changes to the list of policies in the Policy Object causes the policy settings in the directory to change accordingly.
|


 or
or 