Chat now with support
Chat with Support

Identity Manager 9.1 - Web Designer Web Portal User Guide

General tips and getting started Security keys (WebAuthn) Requests
Setting up and configuring request functions Requesting products Saved for Later list Pending requests Displaying request history Resubmitting requests Canceling requests Renewing products with limit validity periods Unsubscribing products Displaying approvals Undoing approvals Request inquiries Auditing requests Escalated requests
Attestation
Managing attestations Attestors for attestation cases Sending attestation reminders My attestation cases Pending attestations Displaying attestation history Attestation inquiries Auditing attestations Escalation
Compliance Responsibilities
My responsibilities
Specifying keywords for requestable products Managing my departments Managing my application roles Managing my devices Managing my business roles Managing my identities Managing my cost centers Managing my multi-request resources Managing my multi requestable/unsubscribable resources Managing my resources Managing my software applications Managing my locations Managing my system entitlements Managing my system roles Managing my assignment resources
Delegating tasks Ownerships Auditing
Auditing departments Auditing application roles Auditing devices Auditing business roles Auditing identities Auditing cost centers Auditing multi-request resources Auditing multi requestable/unsubscribable resources Auditing resources Auditing software Auditing locations Auditing system roles Auditing system entitlements Auditing assignment resources
Governance administration
Managing departments Managing business roles Managing identities Managing cost centers Managing multi-request resources Managing multi requestable/unsubscribable resources Managing resources Managing locations System entitlements Managing system roles Managing assignment resources
Applications Calls Discovering your statistics on the home page Appendix: Attestation conditions and approval policies from attestation procedures Appendix: Page and menu descriptions
Information (Menu description) My requests (Menu description) Profile (Menu description) Help (Menu description) Request (Menu description) Attestation (Menu description)
My attestation status (page description) My actions (page description)
Pending attestations (page description)
Pending attestations – Attestation policies (page description) Pending attestations: One Identity Manager application roles (page description) Pending attestations: Departments (page description) Pending attestations: System roles (page description) Pending attestations: Locations (page description) Pending attestations: Business roles (page description) Pending attestations: PAM assets (page description) Pending attestations: PAM user accounts (page description) Pending attestations: Employees (page description) Pending attestations: Cost centers (page description) Pending attestations: User accounts (page description) Pending attestations: System entitlements (page description) Pending attestations: Resources (page description) Pending attestations: Assignment resources (page description) Pending attestation: Multi-request resources (page description) Pending attestations: Software (page description) Pending attestations: Multi requestable/unsubscribable resources (page description) Pending attestations: Devices (page description) Pending attestations – approvals (page description)
Attestation history (page description) Attestation inquiries (page description)
Auditing (page description) Governance administration (page description) Attestation escalation approval (page description)
Compliance (Menu description) Responsibilities (Menu description)
My responsibilities (page description)
Identities (page description) System entitlements (page description) Business roles (page description) System roles (page description) Departments (page description) Cost centers (page description) Locations (page description) Application roles (page description) Resources (page description) Assignment resources (page description) Multi-request resources (page description) Software (page description) Multi requestable/unsubscribable resources (page description) Devices (page description)
Delegating tasks (page description) Ownerships (page description) Auditing (page description)
Auditing – Departments (page description) Auditing – Application roles (page description) Auditing – Device (page description) Auditing – Business roles (page description) Auditing – Identity details (page description) Auditing – Cost center (page description) Auditing – Multi-request resources (page description) Auditing – Multi requestable/unsubscribable resources (page description) Auditing - Resources (page description) Auditing – Software (page description) Auditing – Locations (page description) Auditing – System roles (page description) Auditing - Assignment resource (page description) Auditing – Active Directory (page description) Auditing – Azure Active Directory (page description) Auditing – Custom target system group (page description) Auditing – Google Workspace (page description) Auditing – Domino (page description) Auditing – LDAP (page description) Auditing – Oracle E-Business Suite (page description) Auditing – Privileged Account Management (page description) Auditing – SAP R/3 (page description) Auditing – Unix (page description)
Governance administration (page description)
Business roles (page description) Identities (page description) Multi-request resources (page description) Multi requestable/unsubscribable resources (page description) Organization (page description) Resources (page description) System entitlements (page description) System roles (page description) Assignment resources (page description)
Calls (Menu description)

Filtering the calendar function

The "Calendar function" filter is, for example, available in the Request date column of the Request History view.

To apply filter criteria to the calendar function

  1. Select one of the following criteria in the context menu next to the field.

    Table 9: Other criteria for applying filters to the calendar function

    Filter

    Description

    After

    Only displays results after this date.

    Before

    Only displays results before this date.

    Between

    Only displays results between these dates. Another field with calendar icons is displayed with this setting.

    This week

    Only displays results with this week's date.

    Last week

    Only displays results with last week's date.

    This month

    Only displays results with this month's date.

    This year

    Only displays results with this year's date.

  2. Perform one of the following tasks:

    • Click and select a date.

    • Enter the date in the field.

  1. Click Apply.

    The filter is applied. The matching results are displayed in the view.

Delete filter

After setting a filter, you can remove it again manually or it is removed automatically when you change views.

To delete a filter

  • Perform one of the following tasks:

    • Click in the filtered column.

    • Click in the row above the entire table.

Custom filter conditions

In some places in the Web Portal you can create custom filter conditions. The filter conditions are formulated like a condition (WHERE clause) for a database query.

You can use a wizard to formulate the queries. Each condition is displayed in a special control in the wizard.

The wizard is available to you at different places in the Web Portal.

To open the filter wizard

  • Click View settings > Open filter wizard.

Detailed information about this topic

Creating filters using the wizard

To create a filter with the wizard, first select a column, edit the conditions and comparison operators. Once these settings have been configured, you can apply the filter.

To create and apply a filter with the wizard

  1. Click View settings > Open filter wizard.

  2. Select the column for the table in the filter wizard.

    1. Click At least one entry exists and specify whether the column should reference or be referenced from other tables.

      The following views are available.

      Table 10: Views in the filter wizard

      View

      Description

      Value comparison

      Compares the values of the selected columns.

      These columns are part of the table you want to apply the custom filter to.

      The advantage of using the WHERE clause wizard is that you can select all the table's columns as opposed to the filter function, which only provides a default selection of columns.

      References to other objects

      Creates a n:1 relation.

      Select the desired table B in this view. Several data records from table A can be assigned to one data record in table B. A data record in table A cannot be assigned more than one data record from table B.

      References for assignment tables

      Creates a 1:n relation.

      Each data record in table A can be assigned to several data records from table B and vice versa. These relations are realized through a third Table for realizing assignment tables Assignment table only contains the foreign keys of the other tables A and B.

      References from other objects

      Creates a 1:n relation.

      Select the desired table B in this view. Several data records from table B can be assigned to one data record in table A. A data record from table B cannot be assigned to more than one data record from table A.

    2. Select the desired column in the Filter wizard view.

      This inserts a control for the first condition.

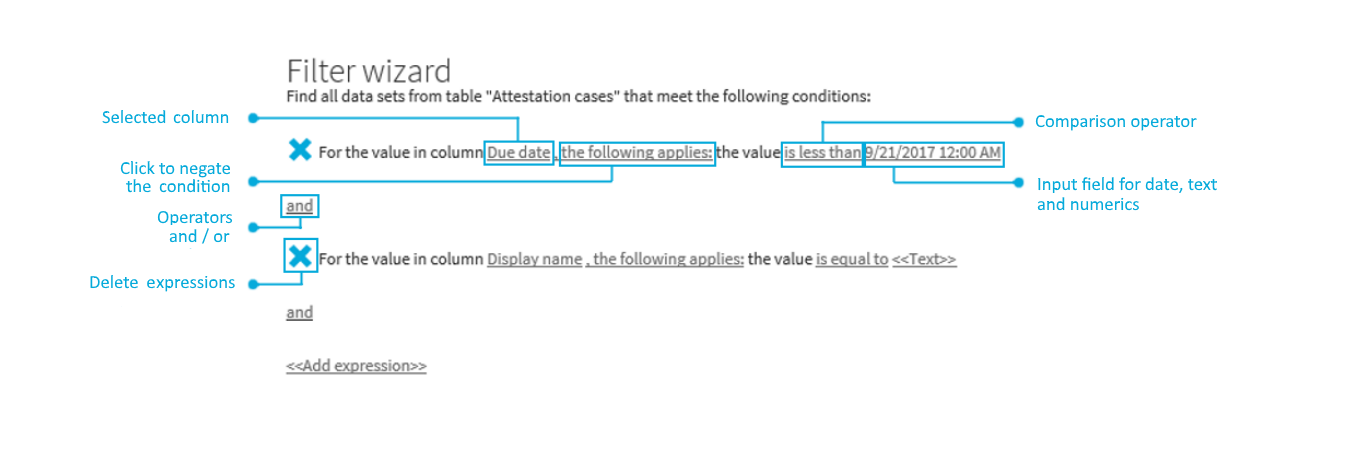
      Figure 1: Filter wizard with example conditions

  3. Enter the condition and configure the following settings:

    1. Enter the comparison value.

      You can enter a date, numeric, or text value. The input of the value type depends on the selected column.

    2. Change the comparison operator.

      To change the comparison operator, click the comparison operator "is less than", for example.

      The type of comparison operator depends on the column type. The following comparison operators are available.

      Table 11: Comparison operators

      Value type

      operator

      Description

      Text value

      is equal to

      Finds the same text value.

      Precedes the word in the alphabet

      Finds all results that occur before the entered text in alphabetical order.

      Follows the word in the alphabet

      Finds all results that occur after the entered text in alphabetical order.

      Not equal

      Finds all results that are not the same as the entered text.

      Is contained in

      Finds all results that contain the text value.

      Contains

      Finds all results that contain the text value.

      Begins with

      Finds all results that begin with the entered text value.

      Ends with

      Finds all results that end with the entered text value.

      Is equal or precedes the word in the alphabet

      Finds all results that either contain the entered text value or occur before the entered text value in alphabetical order.

      Is equal or follows the word in the alphabet

      Finds all results that either contain the entered text value or occur after the entered text value in alphabetical order.

      Numerical value

      Is less than

      Finds all results that are smaller than the entered numerical value.

      Is greater than

      Finds all results that are larger than the entered numerical value.

      is equal to

      Finds all results that are the same as the entered numerical value.

      Is less or equal

      Finds all results that are less than or equal to the entered numerical value.

      Is greater than or equal

      Finds all results that are greater than or equal to the entered numerical value.

      Not equal

      Finds all results that are not the same as the entered numerical value.

    3. Change the Boolean value if the option is available in the selected column.

      The value false is selected by default. If you change the value to true, data appears that matches the content of this column.

    4. To negate the defined condition, click applies.

      The condition statement is reversed and the data displayed after filtering, does not match this condition. This setting is not available if the Boolean option can be set.

    5. Use the operators and or or when applying multiple conditions.

      NOTE: Remove the control by clicking .

  4. Insert another expression with <<Add expression>> and repeat this step if required.

  5. Perform one of the following tasks:

    • Apply the filter by clicking Apply.

      This returns you to the original view where a message alerts you to the active filter wizard.

    • Close the wizard with Close.

Related Documents

The document was helpful.

Select Rating

I easily found the information I needed.

Select Rating