Chatta subito con l'assistenza
Chat con il supporto

Active Roles 8.1.1 - Administration Guide

Introduction Getting started Rule-based administrative views Role-based administration
Access Templates as administrative roles Access Template management tasks Examples of use Deployment considerations Windows claims-based access rules
Rule-based autoprovisioning and deprovisioning
Provisioning Policy Objects Deprovisioning Policy Objects How Policy Objects work Policy Object management tasks Policy configuration tasks
Property Generation and Validation User Logon Name Generation Group Membership AutoProvisioning Exchange Mailbox AutoProvisioning AutoProvisioning in SaaS products OneDrive Provisioning Home Folder AutoProvisioning Script Execution Microsoft 365 and Azure Tenant Selection E-mail Alias Generation User Account Deprovisioning Office 365 Licenses Retention Group Membership Removal Exchange Mailbox Deprovisioning Home Folder Deprovisioning User Account Relocation User Account Permanent Deletion Group Object Deprovisioning Group Object Relocation Group Object Permanent Deletion Notification Distribution Report Distribution
Deployment considerations Checking for policy compliance Deprovisioning users or groups Restoring deprovisioned users or groups Container Deletion Prevention policy Picture management rules Policy extensions
Using rule-based and role-based tools for granular administration Workflows
Key workflow features and definitions About workflow processes Workflow processing overview Workflow activities overview Configuring a workflow
Creating a workflow definition for a workflow Configuring workflow start conditions Configuring workflow parameters Adding activities to a workflow Configure an Approval activity Configuring a Notification activity Configuring a Script activity Configuring an If-Else activity Configuring a Stop/Break activity Configuring an Add Report Section activity Configuring a Search activity Configuring CRUD activities Configuring a Save Object Properties activity Configuring a Modify Requested Changes activity Enabling or disabling an activity Enabling or disabling a workflow Using the initialization script
Approval workflow Email-based approval Automation workflow Activity extensions
Temporal Group Memberships Group Family Dynamic groups Active Roles Reporting Management History Entitlement profile Recycle Bin AD LDS data management One Identity Starling Join and configuration through Active Roles Managing One Identity Starling Connect Configuring linked mailboxes with Exchange Resource Forest Management Configuring remote mailboxes for on-premises users Azure AD, Microsoft 365, and Exchange Online Management
Configuring Active Roles to manage Hybrid AD objects Managing Hybrid AD users
Creating a new Azure AD user with the Web Interface Viewing or updating the Azure AD user properties with the Web Interface Viewing or modifying the manager of a hybrid Azure user Disabling an Azure AD user Enabling an Azure AD user Deprovisioning of an Azure AD user Undo deprovisioning of an Azure AD user Adding an Azure AD user to a group Removing an Azure AD user from a group View the change history and user activity for an Azure AD user Deleting an Azure AD user with the Web Interface Creating a new hybrid Azure user with the Active Roles Web Interface Converting an on-premises user with an Exchange mailbox to a hybrid Azure user Licensing a hybrid Azure user for an Exchange Online mailbox Viewing or modifying the Exchange Online properties of a hybrid Azure user Creating a new Azure AD user with Management Shell Updating the Azure AD user properties with the Management Shell Viewing the Azure AD user properties with the Management Shell Delete an Azure AD user with the Management Shell Assigning Microsoft 365 licenses to new hybrid users Assigning Microsoft 365 licenses to existing hybrid users Modifying or removing Microsoft 365 licenses assigned to hybrid users Updating Microsoft 365 licenses display names
Unified provisioning policy for Azure M365 Tenant Selection, Microsoft 365 License Selection, Microsoft 365 Roles Selection, and OneDrive provisioning Microsoft 365 roles management for hybrid environment users Managing Microsoft 365 contacts Managing Hybrid AD groups Managing Microsoft 365 Groups Managing cloud-only distribution groups Managing cloud-only dynamic distribution groups Managing Azure security groups Managing cloud-only Azure users Managing cloud-only Azure guest users Managing cloud-only Azure contacts Changes to Active Roles policies for cloud-only Azure objects Managing room mailboxes Managing cloud-only shared mailboxes
Modern Authentication Managing the configuration of Active Roles
Connecting to the Administration Service Managed domains Using unmanaged domains Evaluating product usage Creating and using virtual attributes Examining client sessions Monitoring performance Customizing the Console Using Configuration Center Changing the Active Roles Admin account Enabling or disabling diagnostic logs Active Roles Log Viewer
SQL Server replication Using regular expressions Administrative Template Communication ports Active Roles and supported Azure environments Integrating Active Roles with other products and services Active Roles Language Pack Active Roles Diagnostic Tools Active Roles Add-on Manager

How to configure a Group Object Permanent Deletion policy

To configure a Group Object Permanent Deletion policy, select Group Object Permanent Deletion on the Policy to Configure page in the New Deprovisioning Policy Object Wizard or in the Add Deprovisioning Policy Wizard. Then, click Next to display the Deletion Options page.

Figure 102: Deletion Options

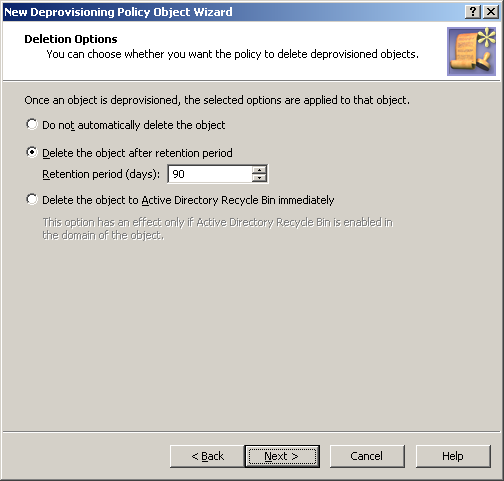
On this page, you can choose whether you want the policy to schedule deprovisioned groups for deletion, and specify the number of days to retain deprovisioned group objects.

First, select one of these options:

  • Click Do not automatically delete the object if you want the policy not to delete deprovisioned groups.

  • Click Delete the object after retention period if you want the policy to schedule deprovisioned groups for deletion.

  • Click Delete the object to Active Directory Recycle Bin immediately if you want the policy to move deprovisioned group objects to Recycle Bin.

If you select the second option, you must specify a number of days in the box beneath that option. Once a group has been deprovisioned, and the specified number of days has passed, the policy causes Active Roles to delete the group object in Active Directory.

If you select the third option, you should apply this policy to domains that have Active Directory Recycle Bin enabled; otherwise, the policy will have no effect. With this option, once a group has been deprovisioned, the policy causes Active Roles to delete the group object immediately. In a domain where Active Directory Recycle Bin is enabled, this deletion merely means that the object is marked as deleted and moved to a certain container from which it can be restored, if necessary, without any data loss.

Configuring a Group Object Permanent Deletion policy

To configure a Group Object Permanent Deletion policy

  1. On the Policy to Configure page, select Group Object Permanent Deletion and the click Next.

  2. On the Deletion Options page, do one the following:

    • Click Do not automatically delete the object if you want the policy not to delete deprovisioned groups.

    • Click Delete the object after retention period if you want the policy to schedule deprovisioned groups for deletion. Then, in Retention period (days), specify the number of days to retain the deprovisioned group before it is deleted.

    • Click Delete the object to Active Directory Recycle Bin immediately if you want the policy to move deprovisioned group objects to Recycle Bin.

    Click Next.

    If you select the third option, you should apply this policy to domains that have Active Directory Recycle Bin enabled; otherwise, the policy will have no effect. With this option, once a group has been deprovisioned, Active Roles deletes the deprovisioned group immediately. In a domain where Active Directory Recycle Bin is enabled, this means that the group object is marked as deleted and moved to a certain container from which it can be restored, if necessary, without any data loss.

  3. On the Enforce Policy window, you can specify objects to which this Policy Object is to be applied:

    • Click Add, and use the Select Objects dialog to locate and select the objects you want.

  4. Click Next, and then click Finish.

Scenario: Deleting deprovisioned groups

This scenario describes how to configure a policy so that Active Roles permanently deletes deprovisioned groups after the 90-day retention period.

To implement this scenario, you must perform the following actions:

  1. Create and configure the Policy Object that defines the appropriate policy.

  2. Apply the Policy Object to a domain, OU, or Managed Unit.

As a result, after deprovisioning a group, Active Roles retains the deprovisioned group object for 90 days and then it deletes that object.

Step 1: Creating and configuring the Policy Object

You can create and configure the Policy Object you need by using the New Deprovisioning Policy Object Wizard. For more information about the wizard, see Creating a Policy Object.

To configure the policy, click User Account Permanent Deletion on the Select Policy Type page of the wizard. Then, click Next.

On the Deletion Options page, click Delete the object after retention period. Then, in the box beneath that option, type 90.

When you are done, click Next and follow the instructions in the wizard to create the Policy Object.

Related Documents

The document was helpful.

Seleziona valutazione

I easily found the information I needed.

Seleziona valutazione