Chatta subito con l'assistenza
Chat con il supporto

Active Roles 8.1.1 - Administration Guide

Introduction Getting started Rule-based administrative views Role-based administration
Access Templates as administrative roles Access Template management tasks Examples of use Deployment considerations Windows claims-based access rules
Rule-based autoprovisioning and deprovisioning
Provisioning Policy Objects Deprovisioning Policy Objects How Policy Objects work Policy Object management tasks Policy configuration tasks
Property Generation and Validation User Logon Name Generation Group Membership AutoProvisioning Exchange Mailbox AutoProvisioning AutoProvisioning in SaaS products OneDrive Provisioning Home Folder AutoProvisioning Script Execution Microsoft 365 and Azure Tenant Selection E-mail Alias Generation User Account Deprovisioning Office 365 Licenses Retention Group Membership Removal Exchange Mailbox Deprovisioning Home Folder Deprovisioning User Account Relocation User Account Permanent Deletion Group Object Deprovisioning Group Object Relocation Group Object Permanent Deletion Notification Distribution Report Distribution
Deployment considerations Checking for policy compliance Deprovisioning users or groups Restoring deprovisioned users or groups Container Deletion Prevention policy Picture management rules Policy extensions
Using rule-based and role-based tools for granular administration Workflows
Key workflow features and definitions About workflow processes Workflow processing overview Workflow activities overview Configuring a workflow
Creating a workflow definition for a workflow Configuring workflow start conditions Configuring workflow parameters Adding activities to a workflow Configure an Approval activity Configuring a Notification activity Configuring a Script activity Configuring an If-Else activity Configuring a Stop/Break activity Configuring an Add Report Section activity Configuring a Search activity Configuring CRUD activities Configuring a Save Object Properties activity Configuring a Modify Requested Changes activity Enabling or disabling an activity Enabling or disabling a workflow Using the initialization script
Approval workflow Email-based approval Automation workflow Activity extensions
Temporal Group Memberships Group Family Dynamic groups Active Roles Reporting Management History Entitlement profile Recycle Bin AD LDS data management One Identity Starling Join and configuration through Active Roles Managing One Identity Starling Connect Configuring linked mailboxes with Exchange Resource Forest Management Configuring remote mailboxes for on-premises users Azure AD, Microsoft 365, and Exchange Online Management
Configuring Active Roles to manage Hybrid AD objects Managing Hybrid AD users
Creating a new Azure AD user with the Web Interface Viewing or updating the Azure AD user properties with the Web Interface Viewing or modifying the manager of a hybrid Azure user Disabling an Azure AD user Enabling an Azure AD user Deprovisioning of an Azure AD user Undo deprovisioning of an Azure AD user Adding an Azure AD user to a group Removing an Azure AD user from a group View the change history and user activity for an Azure AD user Deleting an Azure AD user with the Web Interface Creating a new hybrid Azure user with the Active Roles Web Interface Converting an on-premises user with an Exchange mailbox to a hybrid Azure user Licensing a hybrid Azure user for an Exchange Online mailbox Viewing or modifying the Exchange Online properties of a hybrid Azure user Creating a new Azure AD user with Management Shell Updating the Azure AD user properties with the Management Shell Viewing the Azure AD user properties with the Management Shell Delete an Azure AD user with the Management Shell Assigning Microsoft 365 licenses to new hybrid users Assigning Microsoft 365 licenses to existing hybrid users Modifying or removing Microsoft 365 licenses assigned to hybrid users Updating Microsoft 365 licenses display names
Unified provisioning policy for Azure M365 Tenant Selection, Microsoft 365 License Selection, Microsoft 365 Roles Selection, and OneDrive provisioning Microsoft 365 roles management for hybrid environment users Managing Microsoft 365 contacts Managing Hybrid AD groups Managing Microsoft 365 Groups Managing cloud-only distribution groups Managing cloud-only dynamic distribution groups Managing Azure security groups Managing cloud-only Azure users Managing cloud-only Azure guest users Managing cloud-only Azure contacts Changes to Active Roles policies for cloud-only Azure objects Managing room mailboxes Managing cloud-only shared mailboxes
Modern Authentication Managing the configuration of Active Roles
Connecting to the Administration Service Managed domains Using unmanaged domains Evaluating product usage Creating and using virtual attributes Examining client sessions Monitoring performance Customizing the Console Using Configuration Center Changing the Active Roles Admin account Enabling or disabling diagnostic logs Active Roles Log Viewer
SQL Server replication Using regular expressions Administrative Template Communication ports Active Roles and supported Azure environments Integrating Active Roles with other products and services Active Roles Language Pack Active Roles Diagnostic Tools Active Roles Add-on Manager

Group naming rule

On the next page of the wizard, you can view or modify the group naming rules used by the Group Family.

When creating a new group, the Group Family generates the group naming properties such as Group name, Display name, Group name (pre-Windows 2000) and, optionally, E-mail alias. Unless otherwise specified, the Group Family uses a certain default rule to generate those properties based on the values of the group-by properties, see Configuring a Property Generation and Validation policy.

Figure 148: Group naming rule

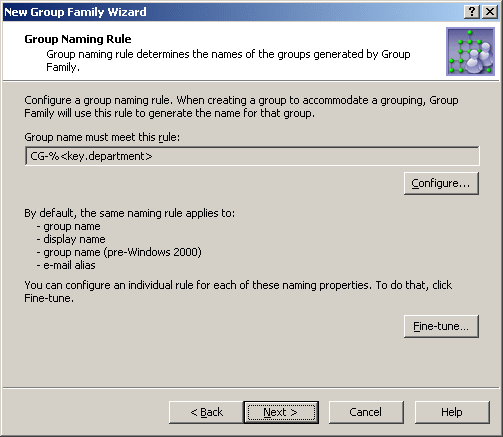
By default, the Group Family generates the group naming properties based on the following syntax: CG-%<key.property1>-%<key.property2>, and so on. In this syntax, CG is the abbreviation for Controlled Group, whereas each of the %<...> entries is used to represent a value of a certain group-by property. When creating a group for a given grouping, the Group Family substitutes the grouping-specific value of the group-by property for the entry containing the name of that property. For example, with a grouping identified by the Operations value of the Department property, the group name is set to CG-Operations. With two group-by properties, such as Department and City, an example of the group name could be CG-Operations-London.

You can modify the group naming rule by clicking Configure. This displays the Configure Value dialog. For more information, see Configuring a Property Generation and Validation policy. You can use that dialog to set up a value for the ‘name’ must be condition, in the same way as you do when configuring a Property Generation and Validation policy.

A value is a concatenation of one or more entries. The Configure Value dialog provides the Add, Edit, and Remove buttons for managing the list of entries. Clicking Add displays the Add Entry window.

In the Add Entry window, you can select the type of the entry to add, and then configure the entry. The available types of entries are as follows:

  • Text: Adds a text string to the group naming rule.

  • Group-by Property: Adds a group-by property or a part of a group-by property to the group naming rule.

To add a text string, you simply type a text in Add Entry window. The next subsection elaborates on the Group-by Property entry.

Group-by Property entry type

When you select Group-by Property under Entry type in the Add Entry window, the Entry properties area looks similar to the following figure.

Figure 149: Group-by property

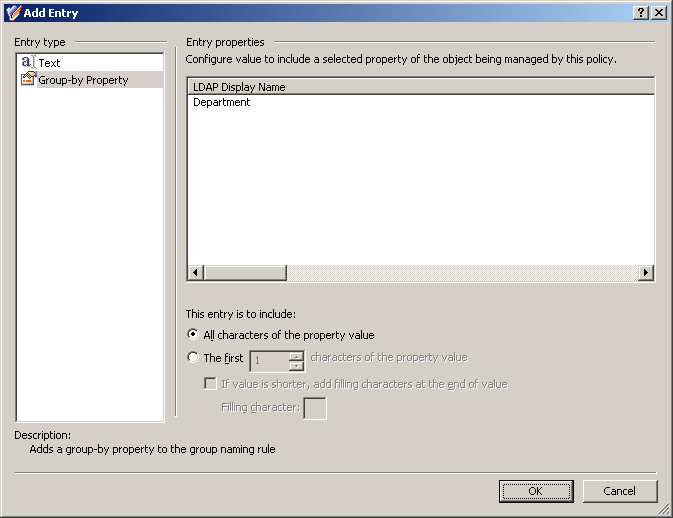
Using the Group-by Property entry type, you can add an entry representing a value (or a part of a value) of a group-by property. Select a group-by property from the list, and then do one of the following:

  • If you want the entry to include the entire value of the property, click All characters of the property value.
  • If you want the entry to include a part of the property value, click The first, and specify the number of characters to include in the entry.

If you choose the second option, you can select the If value is shorter, add filling characters at the end of value check box, and type a character in the Filling character box. This character will fill the missing characters in the value of the property if the value is shorter than specified in the box next to The first. For example, if you specify The first 12 characters and enter 0 as the filling character, the Accounting property value results in the Accounting00 entry.

When you are done configuring an entry, click OK to close the Add Entry window. The entry is added to the Configure Value dialog. When you have completed the list of entries, click OK to close that dialog.

NOTE: The naming rule must include an entry for each of the group-by properties.

Separate rule for each naming property

By default, the same rule applies to these naming properties:

  • Group name

  • Group name (pre-Windows 2000)

  • Group display name

You have the option to configure an individual rule for each of these naming properties. To do so, click Fine-tune on the Group Naming Rule page. This displays a window where you can select a naming property and configure a rule for that property the same way as you do for Group name. The window looks similar to the following figure.

Figure 150: Fine-tune naming rule

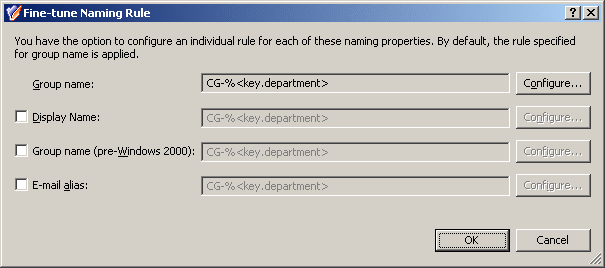
You may need to configure a separate rule for a certain property, considering restrictions imposed on that property. For example, Group name (pre-Windows 2000) must be less than 20 characters. In order to meet this requirement, select the Group name (pre-Windows 2000) check box and click Configure to set up an appropriate rule. When configuring entries to include group-by properties, limit the number of characters in each entry by using the option The first in the Add Entry window.

Group type and scope

On the next page, you can specify the group scope and group type you want to be assigned to the groups generated by the Group Family.

Figure 151: Group type and scope

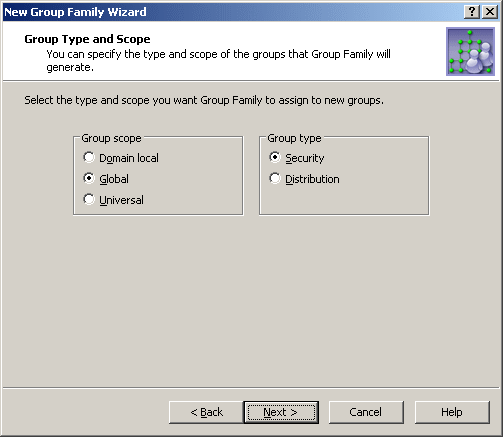
Available are the standard options for the group scope and group type. The Group Family creates groups of the scope and type you select.

Related Documents

The document was helpful.

Seleziona valutazione

I easily found the information I needed.

Seleziona valutazione