Chatta subito con l'assistenza
Chat con il supporto

Active Roles 8.1.1 - Administration Guide

Introduction Getting started Rule-based administrative views Role-based administration
Access Templates as administrative roles Access Template management tasks Examples of use Deployment considerations Windows claims-based access rules
Rule-based autoprovisioning and deprovisioning
Provisioning Policy Objects Deprovisioning Policy Objects How Policy Objects work Policy Object management tasks Policy configuration tasks
Property Generation and Validation User Logon Name Generation Group Membership AutoProvisioning Exchange Mailbox AutoProvisioning AutoProvisioning in SaaS products OneDrive Provisioning Home Folder AutoProvisioning Script Execution Microsoft 365 and Azure Tenant Selection E-mail Alias Generation User Account Deprovisioning Office 365 Licenses Retention Group Membership Removal Exchange Mailbox Deprovisioning Home Folder Deprovisioning User Account Relocation User Account Permanent Deletion Group Object Deprovisioning Group Object Relocation Group Object Permanent Deletion Notification Distribution Report Distribution
Deployment considerations Checking for policy compliance Deprovisioning users or groups Restoring deprovisioned users or groups Container Deletion Prevention policy Picture management rules Policy extensions
Using rule-based and role-based tools for granular administration Workflows
Key workflow features and definitions About workflow processes Workflow processing overview Workflow activities overview Configuring a workflow
Creating a workflow definition for a workflow Configuring workflow start conditions Configuring workflow parameters Adding activities to a workflow Configure an Approval activity Configuring a Notification activity Configuring a Script activity Configuring an If-Else activity Configuring a Stop/Break activity Configuring an Add Report Section activity Configuring a Search activity Configuring CRUD activities Configuring a Save Object Properties activity Configuring a Modify Requested Changes activity Enabling or disabling an activity Enabling or disabling a workflow Using the initialization script
Approval workflow Email-based approval Automation workflow Activity extensions
Temporal Group Memberships Group Family Dynamic groups Active Roles Reporting Management History Entitlement profile Recycle Bin AD LDS data management One Identity Starling Join and configuration through Active Roles Managing One Identity Starling Connect Configuring linked mailboxes with Exchange Resource Forest Management Configuring remote mailboxes for on-premises users Azure AD, Microsoft 365, and Exchange Online Management
Configuring Active Roles to manage Hybrid AD objects Managing Hybrid AD users
Creating a new Azure AD user with the Web Interface Viewing or updating the Azure AD user properties with the Web Interface Viewing or modifying the manager of a hybrid Azure user Disabling an Azure AD user Enabling an Azure AD user Deprovisioning of an Azure AD user Undo deprovisioning of an Azure AD user Adding an Azure AD user to a group Removing an Azure AD user from a group View the change history and user activity for an Azure AD user Deleting an Azure AD user with the Web Interface Creating a new hybrid Azure user with the Active Roles Web Interface Converting an on-premises user with an Exchange mailbox to a hybrid Azure user Licensing a hybrid Azure user for an Exchange Online mailbox Viewing or modifying the Exchange Online properties of a hybrid Azure user Creating a new Azure AD user with Management Shell Updating the Azure AD user properties with the Management Shell Viewing the Azure AD user properties with the Management Shell Delete an Azure AD user with the Management Shell Assigning Microsoft 365 licenses to new hybrid users Assigning Microsoft 365 licenses to existing hybrid users Modifying or removing Microsoft 365 licenses assigned to hybrid users Updating Microsoft 365 licenses display names
Unified provisioning policy for Azure M365 Tenant Selection, Microsoft 365 License Selection, Microsoft 365 Roles Selection, and OneDrive provisioning Microsoft 365 roles management for hybrid environment users Managing Microsoft 365 contacts Managing Hybrid AD groups Managing Microsoft 365 Groups Managing cloud-only distribution groups Managing cloud-only dynamic distribution groups Managing Azure security groups Managing cloud-only Azure users Managing cloud-only Azure guest users Managing cloud-only Azure contacts Changes to Active Roles policies for cloud-only Azure objects Managing room mailboxes Managing cloud-only shared mailboxes
Modern Authentication Managing the configuration of Active Roles
Connecting to the Administration Service Managed domains Using unmanaged domains Evaluating product usage Creating and using virtual attributes Examining client sessions Monitoring performance Customizing the Console Using Configuration Center Changing the Active Roles Admin account Enabling or disabling diagnostic logs Active Roles Log Viewer
SQL Server replication Using regular expressions Administrative Template Communication ports Active Roles and supported Azure environments Integrating Active Roles with other products and services Active Roles Language Pack Active Roles Diagnostic Tools Active Roles Add-on Manager

Deleting an Azure AD user with the Web Interface

You can use the Active Roles Web Interface to delete a user for logon to Azure.

Prerequisites

Only Global Admins can delete Azure users with any roles assigned to them.

CAUTION: Hazard of data loss!

Deleting a user is an irreversible operation. A new user with the same name as a deleted user does not automatically assume the permissions and memberships of the deleted account. For this reason, it is advisable to disable rather than delete accounts.

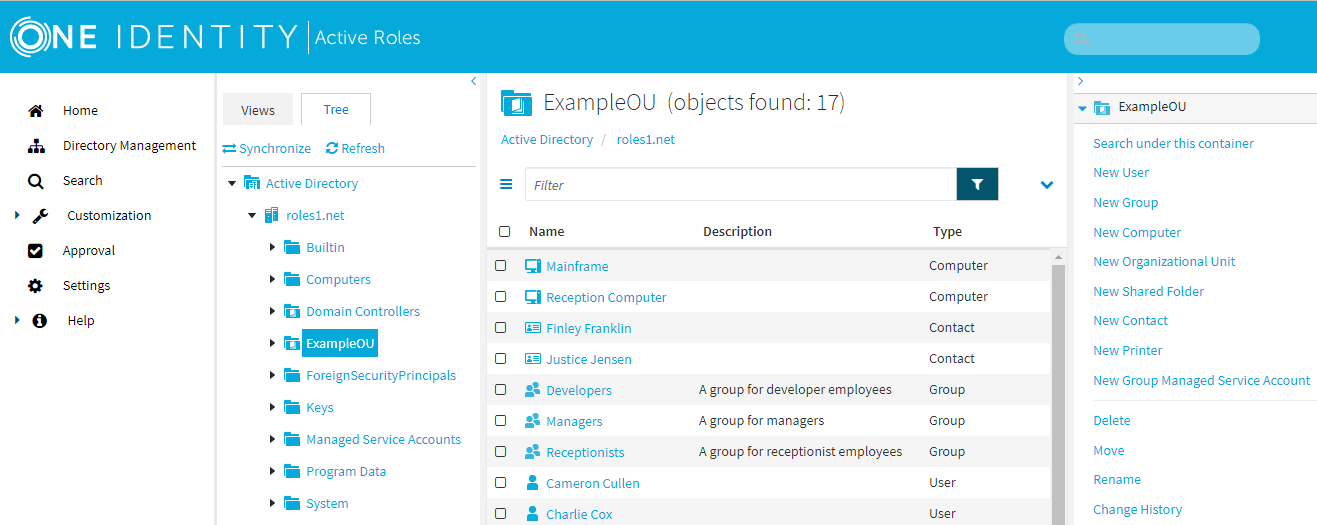
To delete an Azure AD user with the Web Interface

  1. On the Active Roles Web Interface navigation bar, click Directory Management.
  2. On the Views tab in the Browse pane, click Active Directory.

    The list of Active Directory domains is displayed.

  3. Click the specific domain, container or the Organizational Unit, and then the specific user that you want to delete.

  4. In the Command pane, click Delete.

    The account is deleted.

Note: In a hybrid environment, the user must be deleted in the on-premises AD first and then the changes must be synchronized with Azure AD. In case, the user is deleted in Azure AD first, the Active Roles Web Interface still displays the Azure properties link for the deleted user but with no information. Further modification of the Azure properties for the deleted user will not be valid.

Creating a new hybrid Azure user with the Active Roles Web Interface

You can use the Active Roles Web Interface to create new hybrid Azure users in your organization.

Prerequisites

To create new hybrid Azure users, your organization must meet the following requirements:

  • To enable remote mailboxes, the Exchange management tools of an on-premises Exchange 2013 (or later) installation must be available.

  • The Active Roles service account must be a part of the Recipient Management management role group to run Exchange hybrid commands.

To create a new hybrid user

  1. In the Active Roles Web Interface, under Directory Management > Tree > Active Directory, navigate to the OU where you want to create the new hybrid Azure user.

    Figure 195: Active Roles Web Interface – Navigating to the OU of the Hybrid Azure user

  2. In the list of actions available for the selected OU, click New User.

  3. In the General step, specify the following information as required by your organization:

    • First name: The first name of the user.

    • Last name: The last name of the user.

    • (Optional) Initials: The initials of the user.

    • Name: The fully-qualified user name of the user. By default, Active Roles automatically fills this property based on the specified First name, Last name, and Initials.

    • Display name: The name of the user as it will appear in Active Directory. By default, Active Roles automatically fills this property based on the specified Name.

    • User logon name: The user name used to log in to the domain. The User logon name also contains a user principal name (UPN) suffix. To configure the appropriate UPN suffix, use the drop-down button and select the appropriate domain for the user.

      NOTE: The list contains:

      • The full DNS name of the current domain.

      • The full DNS name of the root domain of the current forest.

      • Any alternative UPN suffixes created via the Active Directory Domains and Trusts console.

    • (Optional) User logon name (pre-Windows 2000): The user name used to log in to the domain, following the pre-Windows 2000 logon name format: <domain-name>\<user-name>. By default, Active Roles automatically fills this property based on the specified User logon name.

  4. In the Account step, specify the security settings of the user:

    • Password and Confirm password: The initial password of the user and the corresponding password confirmation field. You can specify the password either manually, or Generate one with Active Roles that follows the password policy requirements of your organization.

      To clear the specified password, click Clear. To spell out each character of the password for clarification, click Spell out.

      Figure 196: Active Roles Web Interface – Spelling out the characters of the generated or specified password

    • Account options: Use these options to specify additional security settings for the user (for example, to have them change the configured password during their next login attempt, or have the configured password expire after some time). If you want to enable the created user account later for increased security (for example, because the new user joins later to your organization), select Account is disabled.

  5. In the Create Mailbox step, configure whether you want to set up an on-premises Exchange mailbox for the hybrid user, or an Exchange Online mailbox in the cloud:

    • To create a new on-premises Exchange mailbox for the user, keep Create Exchange Mailbox selected.

    • To create a new Exchange Online cloud mailbox for the user, deselect Create Exchange Mailbox.

  6. In the Create Azure Account step, to generate the Azure AD account of the hybrid user, select Create Azure Account. This automatically populates all respective fields of the configured hybrid user.

    NOTE: Active Roles sets the Temporary Password to the default password of the Active Roles user. You can reset this password for the Azure AD account, if required by the security policies of your organization.

  7. From the Tenant drop-down list, select the Azure tenant where you want to store the new hybrid Azure user.

  8. From the User Principal Name drop-down list, select the Active Directory (AD) domain with which you want to associate the new hybrid Azure user.

  9. In the Usage Location field, enter the two-letter county code of the location where the user is expected to log in from.

    NOTE: Local rules and regulations for using products and services associated with the configured user may vary by user location. As a result, the Usage Location field is required, as Active Roles cannot assign Microsoft licenses to the hybrid Azure user if no country code is set here.

  10. In the Licenses step, select Exchange Online (Plan 2), and click Finish.

    TIP: You can check the licenses assigned to the new user later by selecting the user, then navigating to Azure properties > Licenses.

Converting an on-premises user with an Exchange mailbox to a hybrid Azure user

To convert an existing on-premises user with an Exchange mailbox to a hybrid user with an Exchange Online mailbox, follow the procedure described in Move mailboxes between on-premises and Exchange Online organizations in hybrid deployments in the Microsoft 365 documentation. Describing the procedure in detail is not in the scope of the Active Roles Administration Guide.

NOTE: After the on-premises user mailboxes have been migrated to the Azure cloud, you can enable cloud management in Active Roles by configuring and running the Azure BackSync feature of Active Roles Synchronization Service.

For more information on how to set up Azure BackSync, see Configuring Azure BackSync in the Active Roles Synchronization Service Administration Guide.

Licensing a hybrid Azure user for an Exchange Online mailbox

To license a hybrid Azure user for an Exchange Online mailbox, use the Azure Properties action of the Active Roles Web Interface.

To license a hybrid user for an Exchange Online mailbox

  1. In the Active Roles Web Interface, under Directory Management > Tree > Active Directory, navigate to the OU where you want to license the on-premises user.

    Figure 197: Active Roles Web Interface – Navigating to the OU of the on-premises user

  2. Select the user that you want to license, then in the list of actions, click Azure Properties.

  3. In the Licenses step, select Exchange Online (Plan 2), and click Finish.

Related Documents

The document was helpful.

Seleziona valutazione

I easily found the information I needed.

Seleziona valutazione