Chatta subito con l'assistenza
Chat con il supporto

Active Roles 8.1.1 - Administration Guide

Introduction Getting started Rule-based administrative views Role-based administration
Access Templates as administrative roles Access Template management tasks Examples of use Deployment considerations Windows claims-based access rules
Rule-based autoprovisioning and deprovisioning
Provisioning Policy Objects Deprovisioning Policy Objects How Policy Objects work Policy Object management tasks Policy configuration tasks
Property Generation and Validation User Logon Name Generation Group Membership AutoProvisioning Exchange Mailbox AutoProvisioning AutoProvisioning in SaaS products OneDrive Provisioning Home Folder AutoProvisioning Script Execution Microsoft 365 and Azure Tenant Selection E-mail Alias Generation User Account Deprovisioning Office 365 Licenses Retention Group Membership Removal Exchange Mailbox Deprovisioning Home Folder Deprovisioning User Account Relocation User Account Permanent Deletion Group Object Deprovisioning Group Object Relocation Group Object Permanent Deletion Notification Distribution Report Distribution
Deployment considerations Checking for policy compliance Deprovisioning users or groups Restoring deprovisioned users or groups Container Deletion Prevention policy Picture management rules Policy extensions
Using rule-based and role-based tools for granular administration Workflows
Key workflow features and definitions About workflow processes Workflow processing overview Workflow activities overview Configuring a workflow
Creating a workflow definition for a workflow Configuring workflow start conditions Configuring workflow parameters Adding activities to a workflow Configure an Approval activity Configuring a Notification activity Configuring a Script activity Configuring an If-Else activity Configuring a Stop/Break activity Configuring an Add Report Section activity Configuring a Search activity Configuring CRUD activities Configuring a Save Object Properties activity Configuring a Modify Requested Changes activity Enabling or disabling an activity Enabling or disabling a workflow Using the initialization script
Approval workflow Email-based approval Automation workflow Activity extensions
Temporal Group Memberships Group Family Dynamic groups Active Roles Reporting Management History Entitlement profile Recycle Bin AD LDS data management One Identity Starling Join and configuration through Active Roles Managing One Identity Starling Connect Configuring linked mailboxes with Exchange Resource Forest Management Configuring remote mailboxes for on-premises users Azure AD, Microsoft 365, and Exchange Online Management
Configuring Active Roles to manage Hybrid AD objects Managing Hybrid AD users
Creating a new Azure AD user with the Web Interface Viewing or updating the Azure AD user properties with the Web Interface Viewing or modifying the manager of a hybrid Azure user Disabling an Azure AD user Enabling an Azure AD user Deprovisioning of an Azure AD user Undo deprovisioning of an Azure AD user Adding an Azure AD user to a group Removing an Azure AD user from a group View the change history and user activity for an Azure AD user Deleting an Azure AD user with the Web Interface Creating a new hybrid Azure user with the Active Roles Web Interface Converting an on-premises user with an Exchange mailbox to a hybrid Azure user Licensing a hybrid Azure user for an Exchange Online mailbox Viewing or modifying the Exchange Online properties of a hybrid Azure user Creating a new Azure AD user with Management Shell Updating the Azure AD user properties with the Management Shell Viewing the Azure AD user properties with the Management Shell Delete an Azure AD user with the Management Shell Assigning Microsoft 365 licenses to new hybrid users Assigning Microsoft 365 licenses to existing hybrid users Modifying or removing Microsoft 365 licenses assigned to hybrid users Updating Microsoft 365 licenses display names
Unified provisioning policy for Azure M365 Tenant Selection, Microsoft 365 License Selection, Microsoft 365 Roles Selection, and OneDrive provisioning Microsoft 365 roles management for hybrid environment users Managing Microsoft 365 contacts Managing Hybrid AD groups Managing Microsoft 365 Groups Managing cloud-only distribution groups Managing cloud-only dynamic distribution groups Managing Azure security groups Managing cloud-only Azure users Managing cloud-only Azure guest users Managing cloud-only Azure contacts Changes to Active Roles policies for cloud-only Azure objects Managing room mailboxes Managing cloud-only shared mailboxes
Modern Authentication Managing the configuration of Active Roles
Connecting to the Administration Service Managed domains Using unmanaged domains Evaluating product usage Creating and using virtual attributes Examining client sessions Monitoring performance Customizing the Console Using Configuration Center Changing the Active Roles Admin account Enabling or disabling diagnostic logs Active Roles Log Viewer
SQL Server replication Using regular expressions Administrative Template Communication ports Active Roles and supported Azure environments Integrating Active Roles with other products and services Active Roles Language Pack Active Roles Diagnostic Tools Active Roles Add-on Manager

Removing an Azure tenant

You can use the Active Roles Configuration Center to delete an Azure tenant. This is typically required when an Azure tenant and its directory objects become obsolete because of organizational reasons.

To remove an Azure tenant

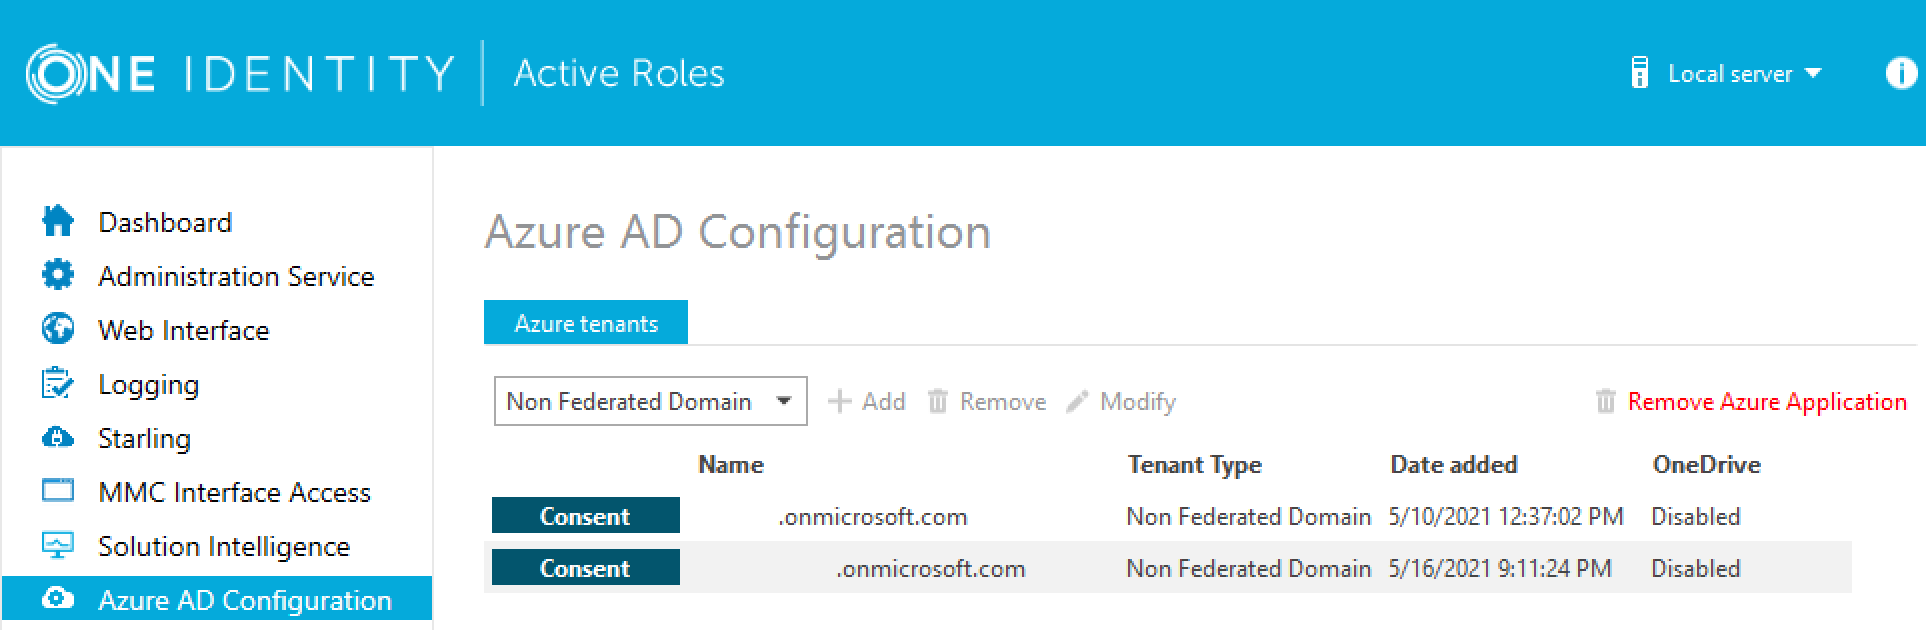
  1. In the Active Roles Configuration Center, on the left pane, click Azure AD Configuration.

    The list of existing Azure tenants appears.

  2. On the Azure AD Configuration page, from the list of Azure tenants, select the tenant that you want to remove.

  3. Click Remove.

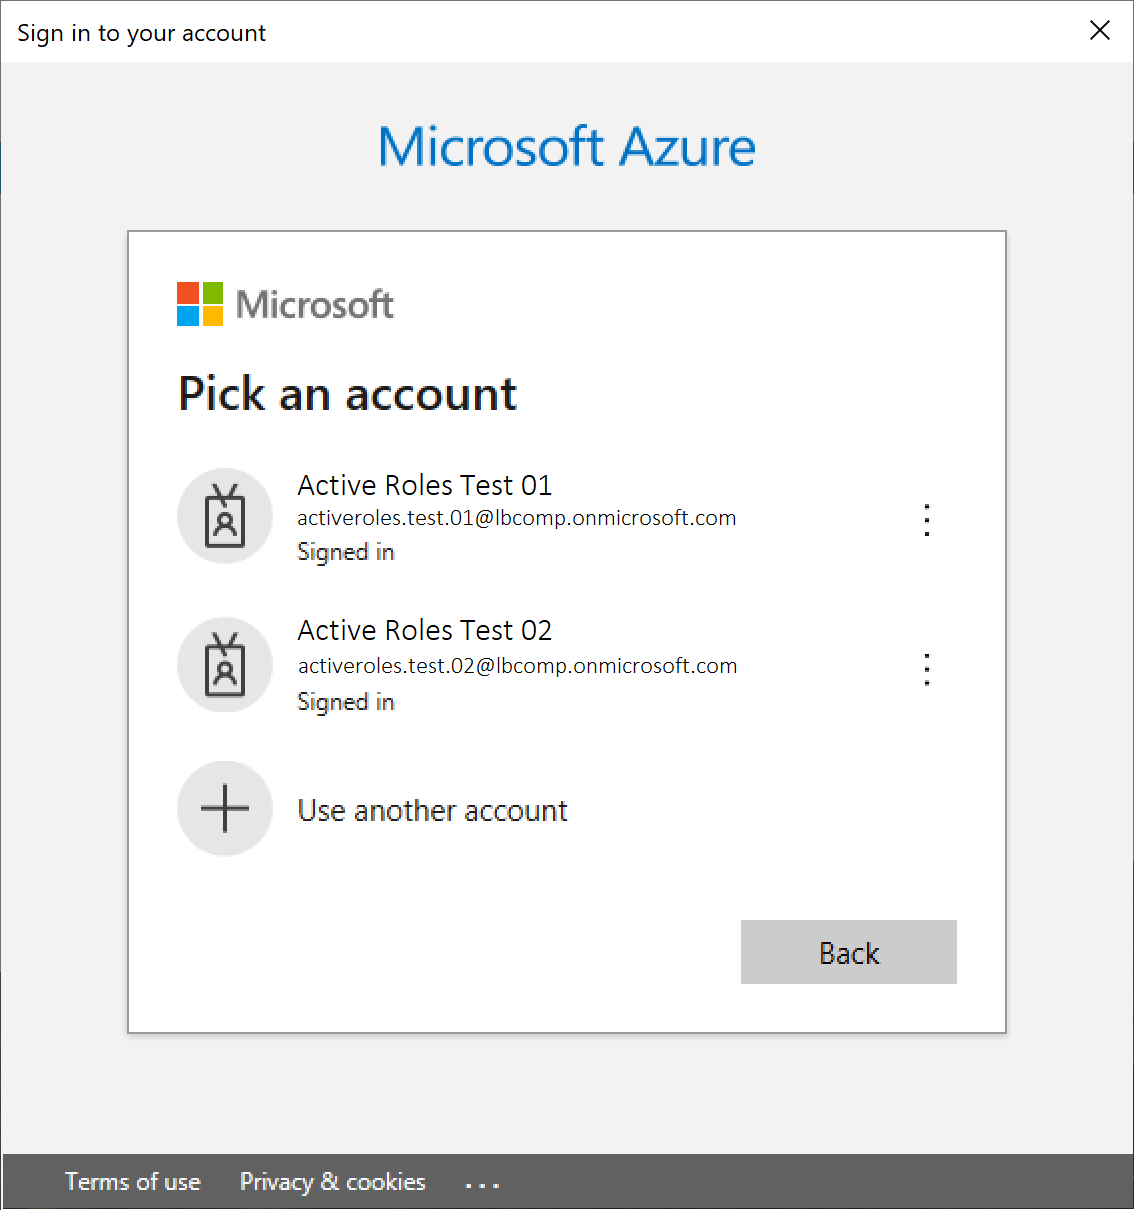
  4. Authenticate your Azure AD administrator account.

    • If you already used one or more Azure AD administrator accounts on your PC, select your account from the Pick an account list, then provide the account password. If you do not find your account in the list, specify your account by clicking Use another account.

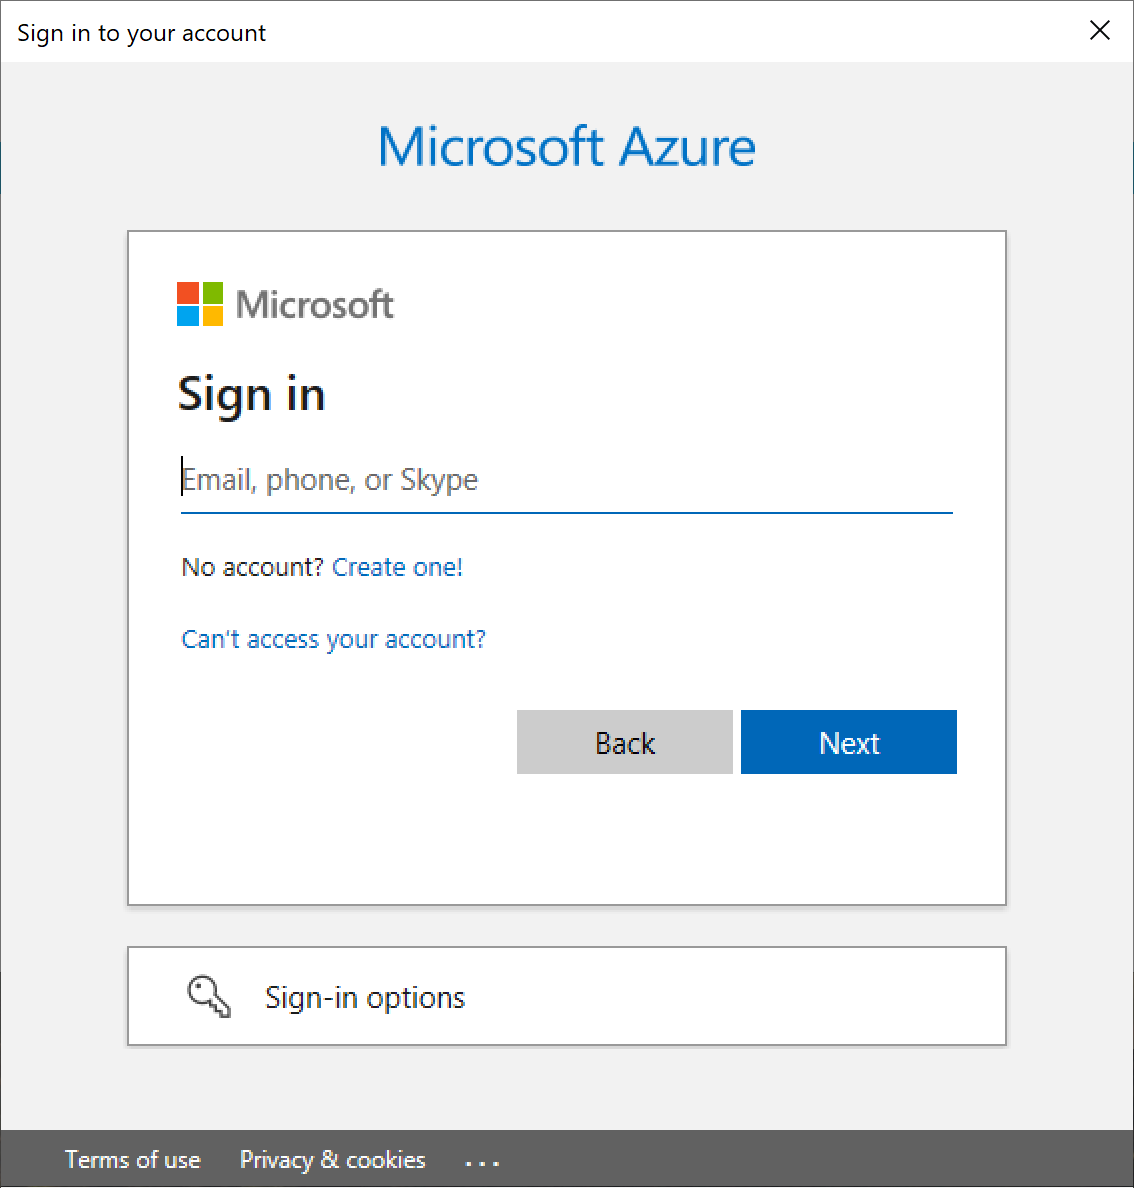
    • If you have not used any Azure AD administrator accounts yet on the PC (for example, because you are configuring a fresh Active Roles installation), specify your account user name in the Sign in field, then provide your password.

    NOTE: Make sure to specify the account used for adding the Azure tenant (that is, the account name listed under the Name column of the Azure tenant). Authenticating with another account will result in an error.

  5. The Azure tenant and all the related domains and applications are then deleted upon successful login.

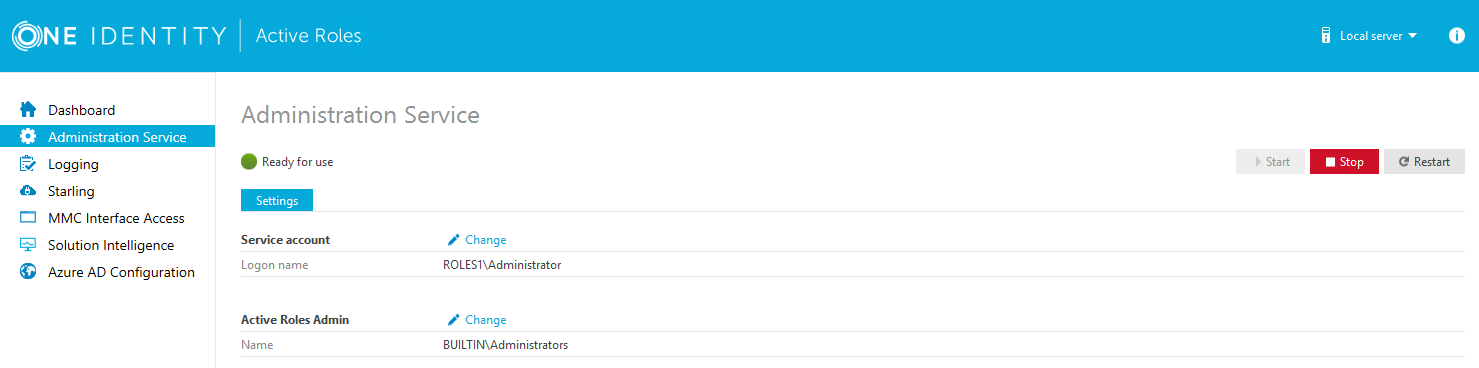
  6. To apply the changes, you must restart the Administration Service. To restart the Administration Service, open the Configuration Center, click Administration Service on the left pane, then either click Restart, or first click Stop and then Start.

  7. (Optional) If you want to force the deletion of the Active Roles Azure application on the Azure Portal for the removed Azure tenant, click Remove Azure Application and log in with the credentials of the removed Azure tenant.

    This is typically recommended as an extra housekeeping and security measure if the removed Azure tenant has been previously managed either in earlier Active Roles versions or on other machines as well, but the Azure tenant has not been removed from those Active Roles installations prior to uninstalling them (leaving their client secret intact on the Azure Portal).

    CAUTION: Using the Remove Azure Application option will result in all Active Roles installations losing access to the specified Azure tenant. If this happens, users managing the Azure tenant in another Active Roles installation (for example, on another machine) can regain access to the Azure tenant if they:

    1. Remove the Azure tenant in the Azure AD Configuration tab of the Active Roles Configuration Center.

    2. Add the Azure tenant again, as described in Configuring a new Azure tenant and consenting Active Roles as an Azure application.

  8. To confirm removal, check if the removed Azure tenant has disappeared from the list of Azure tenants in the Azure AD Configuration page of the Active Roles Configuration Center, and from the Directory Management > Tree > Azure node of the Active Roles Web Interface.

Viewing the Azure Health status for Azure tenants and applications

You can view the Azure Health Check status of your configured Azure tenants and Azure applications in the Active Roles Web Interface. This informs you about the connection status of Active Roles to your Azure AD deployment, and the health status of your Azure AD deployment itself.

To view the Azure AD health status in Active Roles

  1. On the Active Roles Web Interface, navigate to Directory Management > Views > Azure > Azure Configuration > Azure Health Check.

  2. In the Tenant drop-down list, select the Azure tenant for which you want to view the Azure health status.

Active Roles then shows the following health status information:

  • Graph Connectivity: Indicates if Active Roles is connected to the Microsoft Graph API. Successful connection is indicated with a green status.

  • Tenant Connectivity Indicates if the Azure tenant user name and password credentials are validated. Successful connection is indicated with a green status.

    NOTE: Active Roles can establish Tenant Connectivity only if Graph Connectivity is established successfully.

  • Azure Application Connectivity Indicates if Active Roles is consented, validated and verified as an Azure AD application. Successful connection is indicated with a green status.

    NOTE: Active Roles can establish Azure Application Connectivity only if Tenant Connectivity and Graph Connectivity are established successfully.

Viewing the Azure Licenses Report of an Azure tenant

You can view the Azure Licenses Report of an Azure tenant in the Active Roles Web Interface. Use this feature to check the Office 365 (O365) licenses available in an Azure tenant and assigned to the (guest) users of the Azure tenant.

To view the Azure AD licenses report of an Azure tenant

  1. On the Active Roles Web Interface, navigate to Directory Management > Views > Azure > Azure Configuration > Azure Licenses Report.

  2. In the Tenant drop-down list, select the Azure tenant for which you want to view the Azure licenses report.

Active Roles then shows the list of O365 licenses available in the Azure AD domain with the following information:

  • Valid: The total number of a specific O365 license available for the Azure AD domain.

  • Expired: The number of licenses for a specific O365 license that are in renewal period or have expired.

  • Assigned: The number of licenses for a specific O365 license that have been assigned to any users in the domain.

Viewing the Office 365 Roles Report of an Azure tenant

You can view the Office 365 Roles Report of an Azure tenant in the Active Roles Web Interface. Use this feature to check the Office 365 (O365) roles that are available and assigned to the users within your Azure tenant.

To view the Office 365 roles report

  1. On the Active Roles Web Interface, navigate to Directory Management > Views > Azure > Azure Configuration > Office 365 Rules Report.

  2. In the Tenant drop-down list, select the Azure tenant for which you want to view the O365 roles report.

The O365 Roles Report wizard then appears, showing the list of available O365 roles and the users assigned with those roles in the Azure AD domain.

Related Documents

The document was helpful.

Seleziona valutazione

I easily found the information I needed.

Seleziona valutazione