Chatta subito con l'assistenza
Chat con il supporto

Active Roles 8.1.1 - Administration Guide

Introduction Getting started Rule-based administrative views Role-based administration
Access Templates as administrative roles Access Template management tasks Examples of use Deployment considerations Windows claims-based access rules
Rule-based autoprovisioning and deprovisioning
Provisioning Policy Objects Deprovisioning Policy Objects How Policy Objects work Policy Object management tasks Policy configuration tasks
Property Generation and Validation User Logon Name Generation Group Membership AutoProvisioning Exchange Mailbox AutoProvisioning AutoProvisioning in SaaS products OneDrive Provisioning Home Folder AutoProvisioning Script Execution Microsoft 365 and Azure Tenant Selection E-mail Alias Generation User Account Deprovisioning Office 365 Licenses Retention Group Membership Removal Exchange Mailbox Deprovisioning Home Folder Deprovisioning User Account Relocation User Account Permanent Deletion Group Object Deprovisioning Group Object Relocation Group Object Permanent Deletion Notification Distribution Report Distribution
Deployment considerations Checking for policy compliance Deprovisioning users or groups Restoring deprovisioned users or groups Container Deletion Prevention policy Picture management rules Policy extensions
Using rule-based and role-based tools for granular administration Workflows
Key workflow features and definitions About workflow processes Workflow processing overview Workflow activities overview Configuring a workflow
Creating a workflow definition for a workflow Configuring workflow start conditions Configuring workflow parameters Adding activities to a workflow Configure an Approval activity Configuring a Notification activity Configuring a Script activity Configuring an If-Else activity Configuring a Stop/Break activity Configuring an Add Report Section activity Configuring a Search activity Configuring CRUD activities Configuring a Save Object Properties activity Configuring a Modify Requested Changes activity Enabling or disabling an activity Enabling or disabling a workflow Using the initialization script
Approval workflow Email-based approval Automation workflow Activity extensions
Temporal Group Memberships Group Family Dynamic groups Active Roles Reporting Management History Entitlement profile Recycle Bin AD LDS data management One Identity Starling Join and configuration through Active Roles Managing One Identity Starling Connect Configuring linked mailboxes with Exchange Resource Forest Management Configuring remote mailboxes for on-premises users Azure AD, Microsoft 365, and Exchange Online Management
Configuring Active Roles to manage Hybrid AD objects Managing Hybrid AD users
Creating a new Azure AD user with the Web Interface Viewing or updating the Azure AD user properties with the Web Interface Viewing or modifying the manager of a hybrid Azure user Disabling an Azure AD user Enabling an Azure AD user Deprovisioning of an Azure AD user Undo deprovisioning of an Azure AD user Adding an Azure AD user to a group Removing an Azure AD user from a group View the change history and user activity for an Azure AD user Deleting an Azure AD user with the Web Interface Creating a new hybrid Azure user with the Active Roles Web Interface Converting an on-premises user with an Exchange mailbox to a hybrid Azure user Licensing a hybrid Azure user for an Exchange Online mailbox Viewing or modifying the Exchange Online properties of a hybrid Azure user Creating a new Azure AD user with Management Shell Updating the Azure AD user properties with the Management Shell Viewing the Azure AD user properties with the Management Shell Delete an Azure AD user with the Management Shell Assigning Microsoft 365 licenses to new hybrid users Assigning Microsoft 365 licenses to existing hybrid users Modifying or removing Microsoft 365 licenses assigned to hybrid users Updating Microsoft 365 licenses display names
Unified provisioning policy for Azure M365 Tenant Selection, Microsoft 365 License Selection, Microsoft 365 Roles Selection, and OneDrive provisioning Microsoft 365 roles management for hybrid environment users Managing Microsoft 365 contacts Managing Hybrid AD groups Managing Microsoft 365 Groups Managing cloud-only distribution groups Managing cloud-only dynamic distribution groups Managing Azure security groups Managing cloud-only Azure users Managing cloud-only Azure guest users Managing cloud-only Azure contacts Changes to Active Roles policies for cloud-only Azure objects Managing room mailboxes Managing cloud-only shared mailboxes
Modern Authentication Managing the configuration of Active Roles
Connecting to the Administration Service Managed domains Using unmanaged domains Evaluating product usage Creating and using virtual attributes Examining client sessions Monitoring performance Customizing the Console Using Configuration Center Changing the Active Roles Admin account Enabling or disabling diagnostic logs Active Roles Log Viewer
SQL Server replication Using regular expressions Administrative Template Communication ports Active Roles and supported Azure environments Integrating Active Roles with other products and services Active Roles Language Pack Active Roles Diagnostic Tools Active Roles Add-on Manager

Using predefined Access Templates

Active Roles offers an extensive suite of preconfigured Access Templates that represent typical administrative roles, enabling the correct level of administrative authority to be delegated quickly and consistently.

The predefined Access Templates are located in containers under Configuration > Access Templates in the Active Roles Console. You can display a list of Access Templates in the details pane by expanding Configuration > Access Templates and then selecting one of these containers in the Console tree:

  • Active Directory

  • AD LDS (ADAM)

  • Azure

  • Builtin

  • Computer Resources

  • Configuration

  • Exchange

  • Skype for Business Server

  • Starling

  • User Interfaces

  • User Self-management

For more information on predefined Access Templates and their recommended use, see the Active Roles Built-in Access Templates Reference Guide.

Creating an Access Template

The Active Roles Console provides the New Object - Access Template wizard for creating Access Templates. To start the wizard, right-click Access Templates in the Console tree, and select New > Access Template. In this case, the wizard adds an Access Template to the Access Templates container.

NOTE: One Identity recommends storing custom Access Templates in a separate container. To create a new container, right-click Access Templates in the Console tree, and select New > Access Template Container. After creating a new container, you can add new Access Templates to that container instead of the default Access Templates container by right-clicking the container in the Console tree and selecting New > Access Template.

The first page of the wizard looks as shown in the following figure.

Figure 13: Creating a new Access Template

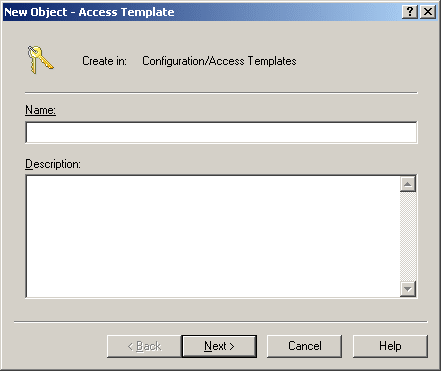
On this page, type a name and description for the new Access Template. The Active Roles Console will display the name and description in the list of Access Templates in the details pane.

Click Next. The second page of the wizard looks as shown in the following figure.

Figure 14: Access Template permission entries

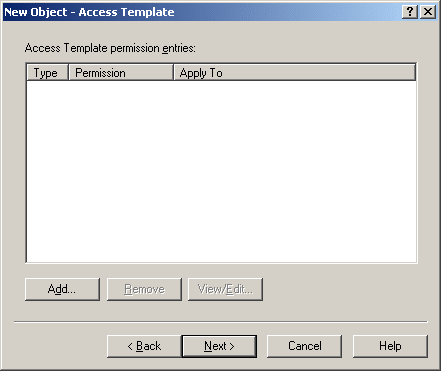
This page prompts you to configure a list of Access Template permission entries. You can use the Add, Remove and View/Edit buttons to add, remove and modify an entry, respectively. Clicking Add starts the Add Permission Entries Wizard that helps you configure permission entries. The wizard is discussed later in this section.

After you have completed the list of permission entries, click Next, and then click Finish. The new Access Template is created.

Add Permission Entries wizard

The Add Permission Entries Wizard lets you specify the permission to be added into the Access Template. The first page of the wizard looks as shown in the following figure.

Figure 15: Add Permission Entries

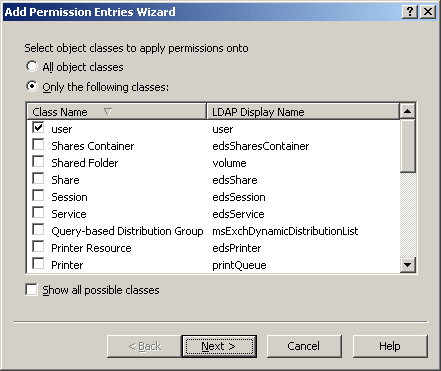
On this page, you select the types of objects to which you want the permission to allow (or deny) access. You can select one of these options:

  • All object classes: With this option, the permission controls access to objects of any type.

  • Only the following classes: With this option, the permission controls access to objects of the type you choose by selecting the appropriate check boxes in the list.

NOTE: By default, all object classes are not displayed in the list. To display all object classes, select the Show all possible classes check box.

After you have selected the object classes you want, click Next. The next page of the wizard looks as shown in the following figure.

Figure 16: Permission category

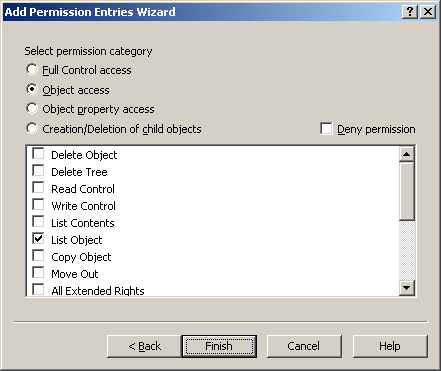
On this page, you select a permission category, and specify whether you want the permission to allow or deny certain administrative actions.

You can select one of the following permission categories:

  • Full Control access: Allows or denies all administrative actions on an object.

  • Object access: Controls how an object is accessed and controlled.

  • Object property access: Controls access to an object’s attributes.

  • Creation/Deletion of child objects: Allows or denies creation or deletion of objects in a container.

If you want the permission to deny certain administrative actions, select the Deny permission check box.

The following sections elaborate on the permission categories you can select in the Add Permission Entries Wizard.

Full Control access

Permissions in this category grant access to all object (and object property) administrative operations for the classes selected in the previous step of the Add Permission Entries Wizard.

After you select Full Control access and click Finish, the permission is added to the newly-created Access Template.

Related Documents

The document was helpful.

Seleziona valutazione

I easily found the information I needed.

Seleziona valutazione