Chatta subito con l'assistenza
Chat con il supporto

Active Roles 8.1.1 - Administration Guide

Introduction Getting started Rule-based administrative views Role-based administration
Access Templates as administrative roles Access Template management tasks Examples of use Deployment considerations Windows claims-based access rules
Rule-based autoprovisioning and deprovisioning
Provisioning Policy Objects Deprovisioning Policy Objects How Policy Objects work Policy Object management tasks Policy configuration tasks
Property Generation and Validation User Logon Name Generation Group Membership AutoProvisioning Exchange Mailbox AutoProvisioning AutoProvisioning in SaaS products OneDrive Provisioning Home Folder AutoProvisioning Script Execution Microsoft 365 and Azure Tenant Selection E-mail Alias Generation User Account Deprovisioning Office 365 Licenses Retention Group Membership Removal Exchange Mailbox Deprovisioning Home Folder Deprovisioning User Account Relocation User Account Permanent Deletion Group Object Deprovisioning Group Object Relocation Group Object Permanent Deletion Notification Distribution Report Distribution
Deployment considerations Checking for policy compliance Deprovisioning users or groups Restoring deprovisioned users or groups Container Deletion Prevention policy Picture management rules Policy extensions
Using rule-based and role-based tools for granular administration Workflows
Key workflow features and definitions About workflow processes Workflow processing overview Workflow activities overview Configuring a workflow
Creating a workflow definition for a workflow Configuring workflow start conditions Configuring workflow parameters Adding activities to a workflow Configure an Approval activity Configuring a Notification activity Configuring a Script activity Configuring an If-Else activity Configuring a Stop/Break activity Configuring an Add Report Section activity Configuring a Search activity Configuring CRUD activities Configuring a Save Object Properties activity Configuring a Modify Requested Changes activity Enabling or disabling an activity Enabling or disabling a workflow Using the initialization script
Approval workflow Email-based approval Automation workflow Activity extensions
Temporal Group Memberships Group Family Dynamic groups Active Roles Reporting Management History Entitlement profile Recycle Bin AD LDS data management One Identity Starling Join and configuration through Active Roles Managing One Identity Starling Connect Configuring linked mailboxes with Exchange Resource Forest Management Configuring remote mailboxes for on-premises users Azure AD, Microsoft 365, and Exchange Online Management
Configuring Active Roles to manage Hybrid AD objects Managing Hybrid AD users
Creating a new Azure AD user with the Web Interface Viewing or updating the Azure AD user properties with the Web Interface Viewing or modifying the manager of a hybrid Azure user Disabling an Azure AD user Enabling an Azure AD user Deprovisioning of an Azure AD user Undo deprovisioning of an Azure AD user Adding an Azure AD user to a group Removing an Azure AD user from a group View the change history and user activity for an Azure AD user Deleting an Azure AD user with the Web Interface Creating a new hybrid Azure user with the Active Roles Web Interface Converting an on-premises user with an Exchange mailbox to a hybrid Azure user Licensing a hybrid Azure user for an Exchange Online mailbox Viewing or modifying the Exchange Online properties of a hybrid Azure user Creating a new Azure AD user with Management Shell Updating the Azure AD user properties with the Management Shell Viewing the Azure AD user properties with the Management Shell Delete an Azure AD user with the Management Shell Assigning Microsoft 365 licenses to new hybrid users Assigning Microsoft 365 licenses to existing hybrid users Modifying or removing Microsoft 365 licenses assigned to hybrid users Updating Microsoft 365 licenses display names
Unified provisioning policy for Azure M365 Tenant Selection, Microsoft 365 License Selection, Microsoft 365 Roles Selection, and OneDrive provisioning Microsoft 365 roles management for hybrid environment users Managing Microsoft 365 contacts Managing Hybrid AD groups Managing Microsoft 365 Groups Managing cloud-only distribution groups Managing cloud-only dynamic distribution groups Managing Azure security groups Managing cloud-only Azure users Managing cloud-only Azure guest users Managing cloud-only Azure contacts Changes to Active Roles policies for cloud-only Azure objects Managing room mailboxes Managing cloud-only shared mailboxes
Modern Authentication Managing the configuration of Active Roles
Connecting to the Administration Service Managed domains Using unmanaged domains Evaluating product usage Creating and using virtual attributes Examining client sessions Monitoring performance Customizing the Console Using Configuration Center Changing the Active Roles Admin account Enabling or disabling diagnostic logs Active Roles Log Viewer
SQL Server replication Using regular expressions Administrative Template Communication ports Active Roles and supported Azure environments Integrating Active Roles with other products and services Active Roles Language Pack Active Roles Diagnostic Tools Active Roles Add-on Manager

Configuring email settings

When you click Settings, the Console displays the Properties dialog for the selected email configuration, with the Mail Setup tab that looks like the following figure.

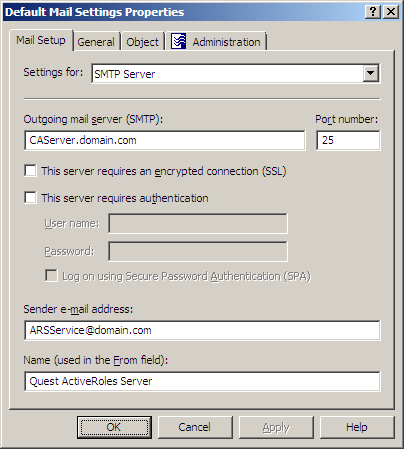
Figure 103: Mail Setup

On this tab, you can configure the following email settings:

  • Outgoing mail server (SMTP): Specify the fully qualified address of the SMTP server to use, such as smtp.mycompany.com.

  • Port number: Specify the port number to connect to on the SMTP server. Normally, the SMTP server has this port number set to 25.

  • This server requires an encrypted connection (SSL): Select this check box if the SMTP server requires that its clients use Secure Sockets Layer (SSL) when posting messages over the network.

  • This server requires authentication: Select this check box if the SMTP server is configured to use Basic Authentication or Integrated Windows Authentication. Then, type the user name and password in the boxes beneath this option. By default, the Outgoing mail server (SMTP) list includes a single entry. You can add more entries to the list using the Active Roles Console. In the Console tree, expand Configuration/Server Configuration, right-click Mail Configuration, select New > Mail Configuration, and then follow the instructions in the wizard. passes these credentials to the SMTP server when establishing a connection.

  • Log on using Secure Password Authentication (SPA): Select this check box if the SMTP server is configured to use Integrated Windows Authentication, in order not to transmit the actual user password across the network.

  • Sender email address: The default email address of the message sender. A valid email address must be specified. Normally, this is the email address of the service account used by the Administration Service.

  • Name (used in the From field): Specify the default name of the message sender, to be displayed in the From field of messages sent by using this email configuration.

When you are done configuring the email server-related settings, click OK to close the Properties dialog box the email configuration. Then, click Next and follow the instructions in the wizard to create the Policy Object.

Steps for configuring a Notification Distribution policy

To configure a Notification Distribution policy

  1. On the Policy to Configure page, select Notification Distribution Policy, and then click Next.

  2. On the Notification Recipients and Message page, do the following, and then click Next:

    • Click the button next to Notification recipients, and select one or more email recipients.

    • In Message Subject, type the subject of the message that the specified recipients will receive upon a request to perform a deprovisioning operation.

    • Under Message Body, type any information regarding the deprovisioning operation.

  3. On the Outgoing Mail Server page, select the email configuration you want the policy to use. In the Outgoing mail server (SMTP) list, click the appropriate mail settings.

  4. If you want to view or modify the selected mail settings, click Settings, and use the Mail Setup tab. For more information, see Configuring email settings.

  5. Click Next.

  6. On the Enforce Policy page, you can specify objects to which this Policy Object is to be applied:

    • Click Add, and use the Select Objects dialog to locate and select the objects you want.

  7. Click Next, and then click Finish.

Scenario: Sending deprovisioning notification

This scenario describes how to configure a policy so that the administrator is notified of deprovisioning objects in any domain registered with Active Roles (managed domain).

To implement this scenario, you must perform the following actions:

  1. Create the appropriate e-mail configuration.
  2. Create, configure, and apply the Policy Object that defines the appropriate policy.

As a result, upon a request to deprovision an object such as a user or group in any managed domain, the administrator receives an e-mail message informing of the deprovisioning request. The message includes the name of the object to deprovision.

The following two sections elaborate on the steps to implement this scenario.

Step 1: Creating the email configuration

This scenario assumes that your SMTP server:

  • Runs on the server smtp.mycompany.com.

  • Uses the default port number (25).

  • Allows anonymous access.

  • Allows non-encrypted connections.

Additionally, the service account of the Administration Service is assumed to have a mailbox with the email address of ARSService@mycompany.com.

Create the email configuration by using the Active Roles Console:

  1. In the Console tree, expand Configuration > Server Configuration, right-click Mail Configuration, and then select New > Mail Configuration to start the New Mail Configuration Wizard.

  2. Click Next.

  3. In Name, type Deprovisioning Notification Distribution.

  4. Click Next.

  5. In Outgoing mail server (SMTP), type smtp.mycompany.com.

  6. In Sender e-mail address, type the email address of the service account: ARSService@mycompany.com.

  7. In Name (used in the From field), type Active Roles.

  8. Click Next, and then click Finish.

Related Documents

The document was helpful.

Seleziona valutazione

I easily found the information I needed.

Seleziona valutazione