Chatta subito con l'assistenza
Chat con il supporto

Active Roles 8.1.1 - Administration Guide

Introduction Getting started Rule-based administrative views Role-based administration
Access Templates as administrative roles Access Template management tasks Examples of use Deployment considerations Windows claims-based access rules
Rule-based autoprovisioning and deprovisioning
Provisioning Policy Objects Deprovisioning Policy Objects How Policy Objects work Policy Object management tasks Policy configuration tasks
Property Generation and Validation User Logon Name Generation Group Membership AutoProvisioning Exchange Mailbox AutoProvisioning AutoProvisioning in SaaS products OneDrive Provisioning Home Folder AutoProvisioning Script Execution Microsoft 365 and Azure Tenant Selection E-mail Alias Generation User Account Deprovisioning Office 365 Licenses Retention Group Membership Removal Exchange Mailbox Deprovisioning Home Folder Deprovisioning User Account Relocation User Account Permanent Deletion Group Object Deprovisioning Group Object Relocation Group Object Permanent Deletion Notification Distribution Report Distribution
Deployment considerations Checking for policy compliance Deprovisioning users or groups Restoring deprovisioned users or groups Container Deletion Prevention policy Picture management rules Policy extensions
Using rule-based and role-based tools for granular administration Workflows
Key workflow features and definitions About workflow processes Workflow processing overview Workflow activities overview Configuring a workflow
Creating a workflow definition for a workflow Configuring workflow start conditions Configuring workflow parameters Adding activities to a workflow Configure an Approval activity Configuring a Notification activity Configuring a Script activity Configuring an If-Else activity Configuring a Stop/Break activity Configuring an Add Report Section activity Configuring a Search activity Configuring CRUD activities Configuring a Save Object Properties activity Configuring a Modify Requested Changes activity Enabling or disabling an activity Enabling or disabling a workflow Using the initialization script
Approval workflow Email-based approval Automation workflow Activity extensions
Temporal Group Memberships Group Family Dynamic groups Active Roles Reporting Management History Entitlement profile Recycle Bin AD LDS data management One Identity Starling Join and configuration through Active Roles Managing One Identity Starling Connect Configuring linked mailboxes with Exchange Resource Forest Management Configuring remote mailboxes for on-premises users Azure AD, Microsoft 365, and Exchange Online Management
Configuring Active Roles to manage Hybrid AD objects Managing Hybrid AD users
Creating a new Azure AD user with the Web Interface Viewing or updating the Azure AD user properties with the Web Interface Viewing or modifying the manager of a hybrid Azure user Disabling an Azure AD user Enabling an Azure AD user Deprovisioning of an Azure AD user Undo deprovisioning of an Azure AD user Adding an Azure AD user to a group Removing an Azure AD user from a group View the change history and user activity for an Azure AD user Deleting an Azure AD user with the Web Interface Creating a new hybrid Azure user with the Active Roles Web Interface Converting an on-premises user with an Exchange mailbox to a hybrid Azure user Licensing a hybrid Azure user for an Exchange Online mailbox Viewing or modifying the Exchange Online properties of a hybrid Azure user Creating a new Azure AD user with Management Shell Updating the Azure AD user properties with the Management Shell Viewing the Azure AD user properties with the Management Shell Delete an Azure AD user with the Management Shell Assigning Microsoft 365 licenses to new hybrid users Assigning Microsoft 365 licenses to existing hybrid users Modifying or removing Microsoft 365 licenses assigned to hybrid users Updating Microsoft 365 licenses display names
Unified provisioning policy for Azure M365 Tenant Selection, Microsoft 365 License Selection, Microsoft 365 Roles Selection, and OneDrive provisioning Microsoft 365 roles management for hybrid environment users Managing Microsoft 365 contacts Managing Hybrid AD groups Managing Microsoft 365 Groups Managing cloud-only distribution groups Managing cloud-only dynamic distribution groups Managing Azure security groups Managing cloud-only Azure users Managing cloud-only Azure guest users Managing cloud-only Azure contacts Changes to Active Roles policies for cloud-only Azure objects Managing room mailboxes Managing cloud-only shared mailboxes
Modern Authentication Managing the configuration of Active Roles
Connecting to the Administration Service Managed domains Using unmanaged domains Evaluating product usage Creating and using virtual attributes Examining client sessions Monitoring performance Customizing the Console Using Configuration Center Changing the Active Roles Admin account Enabling or disabling diagnostic logs Active Roles Log Viewer
SQL Server replication Using regular expressions Administrative Template Communication ports Active Roles and supported Azure environments Integrating Active Roles with other products and services Active Roles Language Pack Active Roles Diagnostic Tools Active Roles Add-on Manager

Wildcards

You can also add wildcards and conditions to a search filter. The following examples show substrings that can be used to search the directory.

Get all entries:

(objectClass=*)

Get entries containing “bob” somewhere in the common name:

(cn=*bob*)

Get entries with a common name greater than or equal to “bob”:

(cn>='bob')

Get all users with an e-mail attribute:

(&(objectClass=user)(mail=*))

Get all user entries with an e-mail attribute and a surname equal to “smith”:

(&(sn=smith)(objectClass=user)(mail=*))

Get all user entries with a common name that starts with “andy”, “steve”, or “margaret”:

(&(objectClass=user) | (cn=andy*)(cn=steve)(cn=margaret))

Get all entries without an e-mail attribute:

(!(mail=*))

Special characters

If any of the following special characters must appear in the search filter as literals, they must be replaced by the listed escape sequence.

Table 7: Special characters in Search filter

ASCII Character

Escape Sequence Substitute

*

\2a

(

\28

)

\29

\

\5c

NUL

\00

In addition, arbitrary binary data may be represented using the escape sequence syntax by encoding each byte of binary data with the backslash (\) followed by two hexadecimal digits. For example, the four-byte value 0x00000004 is encoded as \00\00\00\04 in a filter string.

Displaying members of a Managed Unit

Members of a Managed Unit are objects that match the criteria specified in the membership rules for the Managed Unit.

To display the members of a Managed Unit, expand Configuration/Managed Units in the Console tree, and then click a Managed Unit in the Console tree. Members of the Managed Unit are displayed in the details pane.

For each Managed Unit, it is possible to preset an individual set of columns to display in the details pane. This allows you to customize administrative views on a per-Managed Unit basis.

To preset columns in the details pane for a given Managed Unit, right-click the Managed Unit, click Properties, and go to the Default Columns tab. The tab is similar to the following figure.

Figure 3: Managed Unit - Preset columns

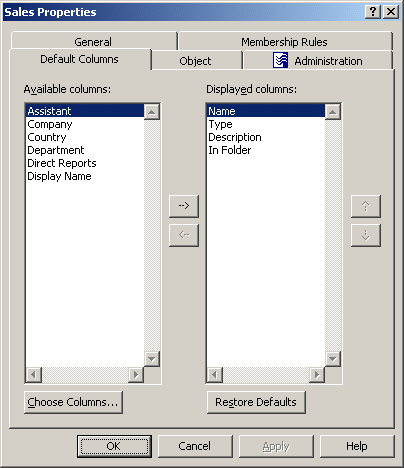
You can add a column to display by double-clicking its name in the Available columns list. To add columns to the Available Columns list, click Choose Columns. In the Choose Columns dialog box, you can select columns and, if necessary, modify the names to be displayed in column headings.

Double-clicking a column name in Available Columns adds the name to the Displayed Columns list. Click OK. The new column is displayed in the details pane after refreshing the view. Right-click Managed Units in the console tree and click Refresh; then, select the Managed Unit in the Console tree: the new column appears in the details pane.

Steps for displaying members of a Managed Unit

To display the members of a Managed Unit

  1. In the Console tree, expand Active Roles > Configuration > Managed Units.

  2. Under Managed Units, locate and select the Managed Unit.

    The members of the Managed Unit are listed in the details pane.

To customize the list of Managed Unit members in the details pane

  1. Right-click the Managed Unit, and click Properties.

  2. In the Properties dialog box, click the Default Columns tab.

  3. On the Default Columns tab, add or remove column names from the Displayed Columns list.

  4. Click OK.

NOTE:

  • For each Managed Unit, it is possible to configure an individual list of the default columns to display in the details pane, so you can perform the customization on a per-Managed Unit basis.

  • You can populate the Displayed columns list by double-clicking column names in the Available columns list on the Default Columns tab. You can remove columns by double-clicking column names in the Displayed columns list.

  • To add column items to the Available Columns list, click Choose Columns. In the Choose Columns dialog box, you can select columns and, if necessary, modify column names.

  • For your changes to the Displayed columns list to take effect, the details pane needs to be refreshed: Right-click Managed Units in the console tree and click Refresh.

Related Documents

The document was helpful.

Seleziona valutazione

I easily found the information I needed.

Seleziona valutazione