Chatta subito con l'assistenza
Chat con il supporto

Active Roles 8.1.1 - Administration Guide

Introduction Getting started Rule-based administrative views Role-based administration
Access Templates as administrative roles Access Template management tasks Examples of use Deployment considerations Windows claims-based access rules
Rule-based autoprovisioning and deprovisioning
Provisioning Policy Objects Deprovisioning Policy Objects How Policy Objects work Policy Object management tasks Policy configuration tasks
Property Generation and Validation User Logon Name Generation Group Membership AutoProvisioning Exchange Mailbox AutoProvisioning AutoProvisioning in SaaS products OneDrive Provisioning Home Folder AutoProvisioning Script Execution Microsoft 365 and Azure Tenant Selection E-mail Alias Generation User Account Deprovisioning Office 365 Licenses Retention Group Membership Removal Exchange Mailbox Deprovisioning Home Folder Deprovisioning User Account Relocation User Account Permanent Deletion Group Object Deprovisioning Group Object Relocation Group Object Permanent Deletion Notification Distribution Report Distribution
Deployment considerations Checking for policy compliance Deprovisioning users or groups Restoring deprovisioned users or groups Container Deletion Prevention policy Picture management rules Policy extensions
Using rule-based and role-based tools for granular administration Workflows
Key workflow features and definitions About workflow processes Workflow processing overview Workflow activities overview Configuring a workflow
Creating a workflow definition for a workflow Configuring workflow start conditions Configuring workflow parameters Adding activities to a workflow Configure an Approval activity Configuring a Notification activity Configuring a Script activity Configuring an If-Else activity Configuring a Stop/Break activity Configuring an Add Report Section activity Configuring a Search activity Configuring CRUD activities Configuring a Save Object Properties activity Configuring a Modify Requested Changes activity Enabling or disabling an activity Enabling or disabling a workflow Using the initialization script
Approval workflow Email-based approval Automation workflow Activity extensions
Temporal Group Memberships Group Family Dynamic groups Active Roles Reporting Management History Entitlement profile Recycle Bin AD LDS data management One Identity Starling Join and configuration through Active Roles Managing One Identity Starling Connect Configuring linked mailboxes with Exchange Resource Forest Management Configuring remote mailboxes for on-premises users Azure AD, Microsoft 365, and Exchange Online Management
Configuring Active Roles to manage Hybrid AD objects Managing Hybrid AD users
Creating a new Azure AD user with the Web Interface Viewing or updating the Azure AD user properties with the Web Interface Viewing or modifying the manager of a hybrid Azure user Disabling an Azure AD user Enabling an Azure AD user Deprovisioning of an Azure AD user Undo deprovisioning of an Azure AD user Adding an Azure AD user to a group Removing an Azure AD user from a group View the change history and user activity for an Azure AD user Deleting an Azure AD user with the Web Interface Creating a new hybrid Azure user with the Active Roles Web Interface Converting an on-premises user with an Exchange mailbox to a hybrid Azure user Licensing a hybrid Azure user for an Exchange Online mailbox Viewing or modifying the Exchange Online properties of a hybrid Azure user Creating a new Azure AD user with Management Shell Updating the Azure AD user properties with the Management Shell Viewing the Azure AD user properties with the Management Shell Delete an Azure AD user with the Management Shell Assigning Microsoft 365 licenses to new hybrid users Assigning Microsoft 365 licenses to existing hybrid users Modifying or removing Microsoft 365 licenses assigned to hybrid users Updating Microsoft 365 licenses display names
Unified provisioning policy for Azure M365 Tenant Selection, Microsoft 365 License Selection, Microsoft 365 Roles Selection, and OneDrive provisioning Microsoft 365 roles management for hybrid environment users Managing Microsoft 365 contacts Managing Hybrid AD groups Managing Microsoft 365 Groups Managing cloud-only distribution groups Managing cloud-only dynamic distribution groups Managing Azure security groups Managing cloud-only Azure users Managing cloud-only Azure guest users Managing cloud-only Azure contacts Changes to Active Roles policies for cloud-only Azure objects Managing room mailboxes Managing cloud-only shared mailboxes
Modern Authentication Managing the configuration of Active Roles
Connecting to the Administration Service Managed domains Using unmanaged domains Evaluating product usage Creating and using virtual attributes Examining client sessions Monitoring performance Customizing the Console Using Configuration Center Changing the Active Roles Admin account Enabling or disabling diagnostic logs Active Roles Log Viewer
SQL Server replication Using regular expressions Administrative Template Communication ports Active Roles and supported Azure environments Integrating Active Roles with other products and services Active Roles Language Pack Active Roles Diagnostic Tools Active Roles Add-on Manager

Step 1: Preparing a helpdesk Access Template

For the purposes of this scenario, you can use the predefined Access Template Users – Help Desk, located in the Configuration > Access Templates > Active Directory container. The Users – Help Desk Access Template specifies the necessary permissions to reset user passwords, unlock user accounts, and view properties of user accounts.

If you want to add or remove permissions from the Users – Help Desk Access Template, you need to first create a copy of that Access Template and then modify and apply the copy.

This scenario assumes that you apply the predefined Access Template Users – Help Desk.

Step 2: Creating a helpdesk group

To create a group, right-click an Organization Unit (OU) in the Console tree, select New > Group, and follow the instructions of the New Object - Group wizard. The wizard includes the page where you can add members (in this case, helpdesk operators) to the group you are creating.

Step 3: Applying the Help Desk Access Template

You can apply the Access Template using the Delegation of Control Wizard.

First, you start the wizard on the Sales Organizational Unit: right-click the Organizational Unit, click Delegate Control, and then, in the Active Roles Security window, click Add.

Next, on the Users or Groups page of the wizard, add the Help Desk group to the list.

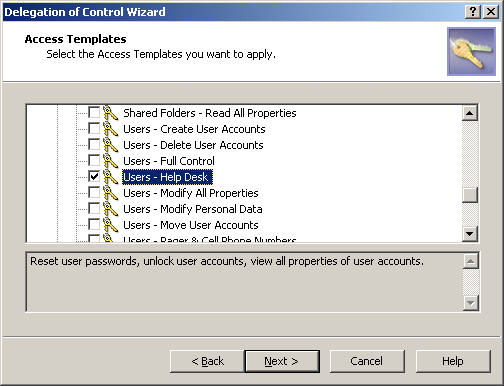
Next, on the Access Templates page of the wizard, expand Access Templates > Active Directory and select the check box next to Users - Help Desk, as shown in the following figure.

Figure 36: Access Template – Delegation of control

Click Next and accept the default settings in the wizard. On the completion page, click Finish. Finally, click OK to close the Active Roles Security window.

For more information about the Delegation of Control Wizard, see Applying Access Templates earlier in this chapter.

Scenario 2: Implementing Self-Administration

This scenario shows how to use an Access Template that allows users to modify certain portions of their personal information in Active Directory.

The Active Roles Web Interface provides the Site for Self-Administration to manage user accounts. The site displays users their personal information, such as the first and last names, address information, phone numbers, and other data. By default, Web Interface users are only authorized to view their personal information. To enable the users to also modify their personal information, you must give them additional permissions.

Suppose you need to authorize the users in the Sales Organizational Unit to perform self-administration. To implement this scenario, you should perform the following steps:

  1. Prepare a Self-Administration Access Template that defines the appropriate permissions on user accounts.

  2. Apply the Self-Administration Access Template to the Sales Organizational Unit, selecting the Self object as a Trustee.

As a result of these steps, users from the Sales Organizational Unit are authorized to perform self-management tasks on their personal accounts. The Self-Administration Access Template determines what data the users are permitted to modify. Users can manage their personal information via the Site for Self-Administration. For information about the Site for Self-Administration, refer to the Active Roles Web Interface User Guide.

The following sections elaborate on the steps involved in this scenario.

Related Documents

The document was helpful.

Seleziona valutazione

I easily found the information I needed.

Seleziona valutazione