Chatta subito con l'assistenza
Chat con il supporto

Active Roles 8.1.1 - Administration Guide

Introduction Getting started Rule-based administrative views Role-based administration
Access Templates as administrative roles Access Template management tasks Examples of use Deployment considerations Windows claims-based access rules
Rule-based autoprovisioning and deprovisioning
Provisioning Policy Objects Deprovisioning Policy Objects How Policy Objects work Policy Object management tasks Policy configuration tasks
Property Generation and Validation User Logon Name Generation Group Membership AutoProvisioning Exchange Mailbox AutoProvisioning AutoProvisioning in SaaS products OneDrive Provisioning Home Folder AutoProvisioning Script Execution Microsoft 365 and Azure Tenant Selection E-mail Alias Generation User Account Deprovisioning Office 365 Licenses Retention Group Membership Removal Exchange Mailbox Deprovisioning Home Folder Deprovisioning User Account Relocation User Account Permanent Deletion Group Object Deprovisioning Group Object Relocation Group Object Permanent Deletion Notification Distribution Report Distribution
Deployment considerations Checking for policy compliance Deprovisioning users or groups Restoring deprovisioned users or groups Container Deletion Prevention policy Picture management rules Policy extensions
Using rule-based and role-based tools for granular administration Workflows
Key workflow features and definitions About workflow processes Workflow processing overview Workflow activities overview Configuring a workflow
Creating a workflow definition for a workflow Configuring workflow start conditions Configuring workflow parameters Adding activities to a workflow Configure an Approval activity Configuring a Notification activity Configuring a Script activity Configuring an If-Else activity Configuring a Stop/Break activity Configuring an Add Report Section activity Configuring a Search activity Configuring CRUD activities Configuring a Save Object Properties activity Configuring a Modify Requested Changes activity Enabling or disabling an activity Enabling or disabling a workflow Using the initialization script
Approval workflow Email-based approval Automation workflow Activity extensions
Temporal Group Memberships Group Family Dynamic groups Active Roles Reporting Management History Entitlement profile Recycle Bin AD LDS data management One Identity Starling Join and configuration through Active Roles Managing One Identity Starling Connect Configuring linked mailboxes with Exchange Resource Forest Management Configuring remote mailboxes for on-premises users Azure AD, Microsoft 365, and Exchange Online Management
Configuring Active Roles to manage Hybrid AD objects Managing Hybrid AD users
Creating a new Azure AD user with the Web Interface Viewing or updating the Azure AD user properties with the Web Interface Viewing or modifying the manager of a hybrid Azure user Disabling an Azure AD user Enabling an Azure AD user Deprovisioning of an Azure AD user Undo deprovisioning of an Azure AD user Adding an Azure AD user to a group Removing an Azure AD user from a group View the change history and user activity for an Azure AD user Deleting an Azure AD user with the Web Interface Creating a new hybrid Azure user with the Active Roles Web Interface Converting an on-premises user with an Exchange mailbox to a hybrid Azure user Licensing a hybrid Azure user for an Exchange Online mailbox Viewing or modifying the Exchange Online properties of a hybrid Azure user Creating a new Azure AD user with Management Shell Updating the Azure AD user properties with the Management Shell Viewing the Azure AD user properties with the Management Shell Delete an Azure AD user with the Management Shell Assigning Microsoft 365 licenses to new hybrid users Assigning Microsoft 365 licenses to existing hybrid users Modifying or removing Microsoft 365 licenses assigned to hybrid users Updating Microsoft 365 licenses display names
Unified provisioning policy for Azure M365 Tenant Selection, Microsoft 365 License Selection, Microsoft 365 Roles Selection, and OneDrive provisioning Microsoft 365 roles management for hybrid environment users Managing Microsoft 365 contacts Managing Hybrid AD groups Managing Microsoft 365 Groups Managing cloud-only distribution groups Managing cloud-only dynamic distribution groups Managing Azure security groups Managing cloud-only Azure users Managing cloud-only Azure guest users Managing cloud-only Azure contacts Changes to Active Roles policies for cloud-only Azure objects Managing room mailboxes Managing cloud-only shared mailboxes
Modern Authentication Managing the configuration of Active Roles
Connecting to the Administration Service Managed domains Using unmanaged domains Evaluating product usage Creating and using virtual attributes Examining client sessions Monitoring performance Customizing the Console Using Configuration Center Changing the Active Roles Admin account Enabling or disabling diagnostic logs Active Roles Log Viewer
SQL Server replication Using regular expressions Administrative Template Communication ports Active Roles and supported Azure environments Integrating Active Roles with other products and services Active Roles Language Pack Active Roles Diagnostic Tools Active Roles Add-on Manager

Example: Configuring high granularity by hiding a specific Azure group

This scenario describes how to use the Managed Units (MUs) and Access Templates (ATs) of the Active Roles Console together to configure Azure group administration permissions with high granularity. In this example, the MUs and ATs are used to deny the read access of a group of helpdesk users to a specific Azure Microsoft 365 (M365) group. You can achieve this by:

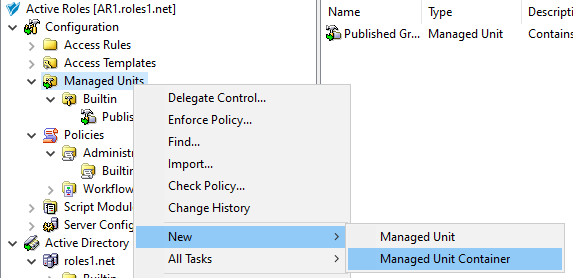
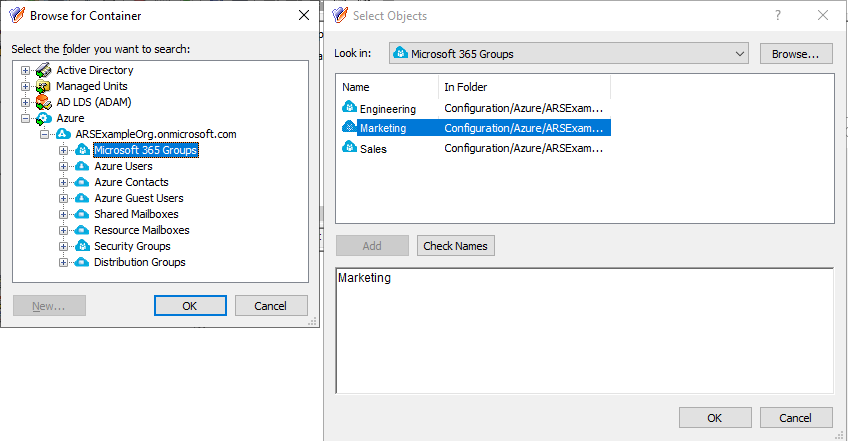
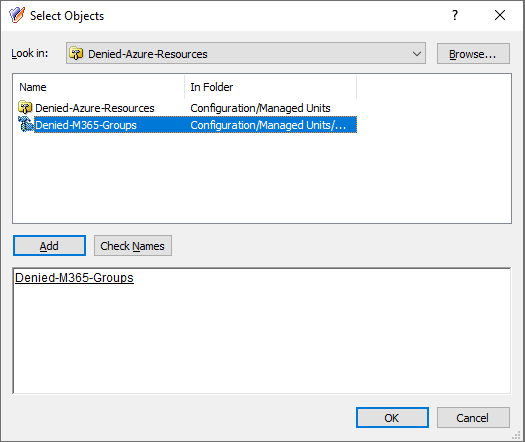
  1. Configuring an MU containing the M365 group that the helpdesk users should not access. For more information on this procedure, see Configuring a Managed Unit to hide specific Microsoft 365 groups.

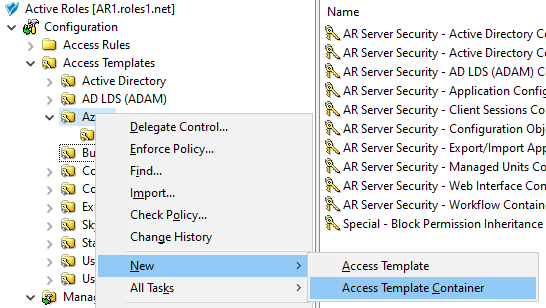
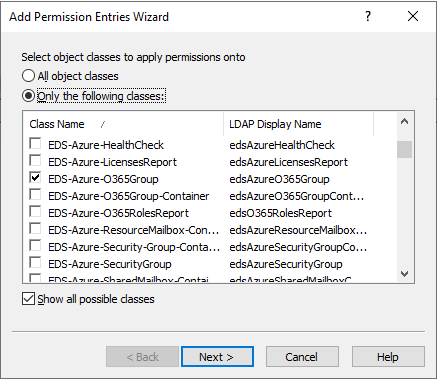
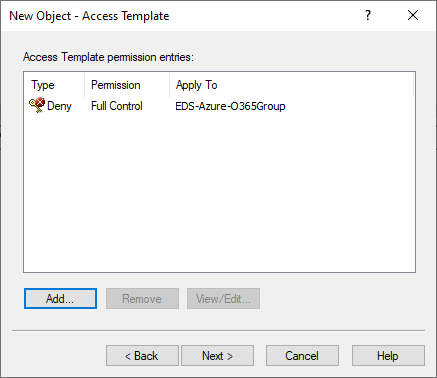
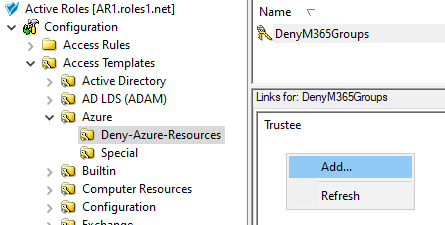
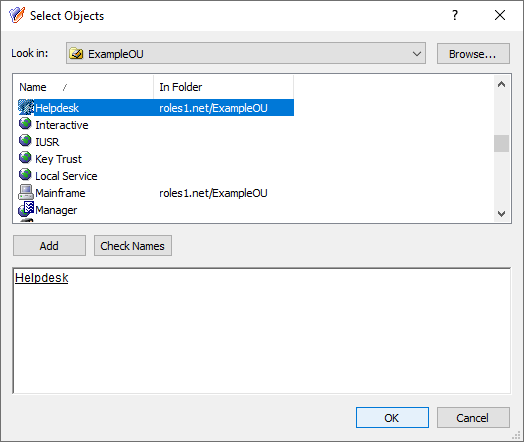
  2. Configuring an AT to deny access to that M365 group for the helpdesk users. For more information on this procedure, see Configuring an Access Template to hide Microsoft 365 Groups.

Prerequisites

To configure this example scenario, your organization must meet the following requirements:

  • To create MUs and ATs in the Active Roles Console, you must use an Active Roles Administration Service account. For more information, see Configuring the Administration Service account in the Active Roles Quick Start Guide.

  • The organization must already have one or more Azure tenants configured and consented for use with Active Roles. For more information, see Configuring a new Azure tenant and consenting Active Roles as an Azure application.

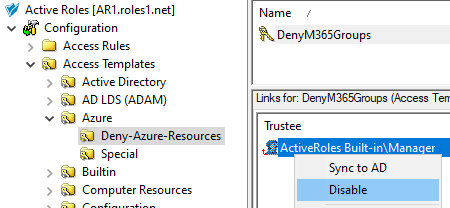
  • To ensure that the Helpdesk group receiving the granular read permission can still read other Azure groups, they must have the built-in Azure Microsoft365 Groups - Read All Attribute AT (or a custom AT based on this built-in AT) applied to them, with the affected Object being the Azure tenant of the managed Azure AD resources. For more information on how to apply an AT, see Applying Access Templates.

  • The users receiving the configured permissions must be on-premises or hybrid Active Directory users. You cannot delegate the configured granular permission to cloud-only Azure users.

Configuring a Managed Unit to hide specific Microsoft 365 groups

To set up a highly-granular Microsoft 365 (M365) group access logic, first you must configure a Managed Unit (MU) that will contain the M365 group that cannot be read by the affected helpdesk users.

In this example, the MU is configured to explicitly include the Marketing M365 group of an example Azure tenant. For more information on the available membership rule options for MUs, see Creating a Managed Unit.

To configure a Managed Unit to hide a specific Microsoft 365 group

  1. In the Active Roles Console, on the Console Tree, navigate to Configuration > Managed Units.

  2. To create a new container for the configured MU, right-click on the Managed Units node, then click New > Managed Unit Container.

    Figure 104: Active Roles Console – Launching the Managed Unit Container dialog

  3. In the Managed Unit Container dialog, specify a Name, and optionally, a Description for the new MU container.

    This example uses the following container settings:

    • Name: Denied-Azure-Resources

    • Description: Managed Units for the granular denial of Azure resources.

  4. To create the new container, click Next then Finish.

  5. To start configuring the new MU, right-click the newly-created Denied-Azure-Resources container, then click New > Managed Unit.

  6. In the New Object - Managed Unit dialog, specify a Name, and optionally, a Description for the new MU.

    This example uses the following MU settings:

    • Name: Denied-M365-Groups

    • Description: Managed Unit for the granular denial of M365 groups.

    To continue, click Next.

  7. To specify a new membership rule for the MU, in the Membership rule step, click Add.

  8. In the Membership Rule Type dialog, select the rule type used to populate the MU. This example uses the Include Explicitly rule type. Select it, then click Next.

    Figure 105: New Managed Unit – Selecting the Include Explicitly membership rule type

  9. In the Select Objects dialog, select the M365 group whose members you want to add to the MU.

    Figure 106: New Managed Unit – Adding an M365 Group to an MU

    To do so:

    1. In the Select Objects dialog, click Browse.

    2. In the Browse for Container dialog, expand the Azure > <azure-tenant-name> node (in this example, the Azure tenant is named ARSExampleOrg.onmicrosoft.com).

    3. Select the Microsoft 365 Groups node, and click OK. The M365 groups existing in the Azure tenant will appear in the Select Objects dialog.

    4. In the Select Objects dialog, select the M365 group you want to add to the MU (in this example, the Marketing group).

    5. To apply the selection, click Add and OK.

  10. To finish creating the MU, click Next, then Next again in the Object Security / Policy Object step, and finally Finish.

  11. To verify that the MU is populated correctly, select the newly-created MU in the Console Tree. The Marketing M365 group must appear in the Active Roles Console.

Configuring an Access Template to hide Microsoft 365 Groups

Once you set up the Managed Unit (MU) as described in Configuring a Managed Unit to hide specific Microsoft 365 groups, you must create an Access Template (AT) that denies the read access of the affected helpdesk users to the Microsoft 365 (M365) group included in that MU.

To create the AT, perform the following steps. For more information on creating ATs in general, see Creating an Access Template.

To deny access to the Microsoft 365 group of a Managed Unit with an Access Template

  1. In the Active Roles Console, in the Active Directory (AD) tree, navigate to Configuration > Access Templates.

  2. Create a new container where you will store the AT. In this example, the container is created in the Azure sub-container of the Access Templates node. Right-click Access Templates > Azure, then click New > Access Template Container.

    Figure 107: Active Roles Console – Launching the Access Templates Container dialog

  3. In the Access Templates Container dialog, specify a Name, and optionally, a Description for the new AT container.

    This example uses the following container settings:

    • Name: Denied-Azure-Resources

    • Description: Access Templates for the granular access of Azure resources.

  4. To create the new container, click Next then Finish.

  5. To start configuring the new AT, right-click the Denied-Azure-Resources container, then click New > Access Template.

  6. In the New Object - Access Template dialog, specify a Name, and optionally, a Description for the new AT.

    This example uses the following AT settings:

    • Name: DenyM365Groups

    • Description: AT to deny access to the specified M365 groups.

    To continue, click Next.

  7. In the Access Template permission entries step, click Add. Then, in the Add Permission Entries Wizard, select Only the following classes, and select EDS-Azure-O365Group from the list. To continue, click Next.

    Figure 108: New Access Template – Selecting the M365 group object class to deny general access to them

    TIP: If you cannot find the class in the list, select Show all possible classes.

  8. In the Select permission category step, select Deny permission, then click Finish. The permission then appears in the Access Template permission entries step of the New Object - Access Template dialog.

    Figure 109: New Access Template – Verifying the deny permission

  9. To finish creating the AT, click Next, then Finish.

  10. Assign the newly-created AT to the helpdesk users whose access you want to restrict. To do so, check if the Advanced Details Pane option of the Active Roles Console is selected. If not, open View, and select Advanced Details Pane.

  11. To start the Delegation of Control Wizard, select the newly-created DenyM365Groups AT, then right-click in the Advanced Details Pane, and click Add.

    Figure 110: Active Roles Console – Launching the Delegation of Control Wizard from the Advanced Details Pane

  12. In the Objects step of the wizard, click Add. Then, in the Select Objects dialog, Browse for the Denied-Azure-Resources Managed Unit Container that you created in Configuring a Managed Unit to hide specific Microsoft 365 groups. To add the Denied-M365-Groups MU to the list of managed objects, click Add, then click OK.

    Figure 111: Delegation of Control Wizard – Selecting the Managed Unit as an administered object

    To continue, in the Objects step, click Next.

  13. In the Users or Groups step, click Add, then select the users to which you want to delegate the permission. In this example, the AT is delegated to the Helpdesk group of an example Organizational Unit (OU). To add the group, click Add, then click OK.

    Figure 112: Delegation of Control Wizard – Selecting the Helpdesk group as Trustee

    To continue, in the Users or Groups step, click Next.

  14. In the Inheritance Options step, make sure that the This directory object and Child objects of this directory object settings are selected. To continue, click Next.

  15. In the Permissions Propagation step, leave the Propagate permissions to Active Directory setting in its default state. To continue, click Next.

  16. To complete the wizard, click Finish.

Enabling or disabling the granular access to Microsoft 365 Groups

Once you configured the Managed Unit (MU) of the Microsoft 365 (M365) group, and set up the Access Template (AT) to deny access to that group, the Helpdesk group to which the AT is assigned can no longer see the M365 group included in the MU. Instead:

  • If they expand the Microsoft 365 Groups node of the Azure tenant on the Active Roles Web Interface, the M365 group included in the MU will not be visible to them.

  • If they open the Azure Member Of page of any Azure user or Azure guest user who are also members of the affected M365 group, the page will not list the M365 group included in the MU among the group membership of the users.

This behavior is dynamic: adding additional M365 groups into the MU in the Active Roles Console will result in those M365 groups also disappearing in the Active Roles Web Interface for the affected helpdesk users once the changes of the Console are synchronized to the Web Interface. Likewise, removing an M365 group from the MU will result in that M365 group appearing again for the affected helpdesk users in the Web Interface.

You can easily enable or disable the configured granular access later for the affected helpdesk users by enabling or disabling the AT.

To enable or disable the configured granular access to Microsoft 365 groups

  1. In the Active Roles Console, on the Console Tree, navigate to Configuration > Access Templates > Denied Azure Resources.

  2. Select the DenyM365Groups AT.

  3. In the Advanced Details Pane, right-click the configured link, and click Disable.

    Figure 113: Active Roles Console – Disabling the configured Access Template

    TIP: If the Advanced Details Pane does not appear for you, click View > Advanced Details Pane.

    Once the AT is disabled, the M365 group included in the associated Denied-M365-Groups MU will appear in the Web Interface for the users to which the AT is assigned.

  4. (Optional) To re-enable the AT, right-click the configured link again, and click Enable.

Related Documents

The document was helpful.

Seleziona valutazione

I easily found the information I needed.

Seleziona valutazione