You can use the Active Roles Web Interface to specify owners for a Microsoft 365 (M365) group. Using the applicable options, you can either add or remove owners to or from the selected M365 group.
NOTE: Consider the following when configuring group ownership:
-
You cannot specify a group as an owner of another group.
-
Although Active Roles and Azure AD support specifying Azure guest users as group owners, One Identity recommends doing so only if assigning the ownership of a specific group to a guest user is in line with the security policies of your organization.
To add owners to an M365 group
-
Navigate to Directory Management > Tree > Azure > <azure-tenant-name> > Microsoft 365 Groups.
The list of existing M365 groups in the selected Azure tenant appears.
NOTE: When opening the list of Microsoft 365 Groups the first time, Active Roles checks and fetches all existing M365 groups that may exist in the Azure cloud. This action is performed automatically and may take a few minutes to complete.
-
Select the group that you want to configure.
-
In the right-side pane, click Azure Properties.
-
To list the owners of the selected group, click the Owners tab of the Azure Properties window.
-
Click Add to add a new owner (or owners) to the selected group.
-
In the Select Object page, use the search field to find the users or guest users in the Azure tenant that you want to specify as owners.
The users and guest users meeting the search criteria will appear in the Display Name column.
-
Select the check boxes of the users or guest users you want to specify as owners of the group. The selected users will be listed in the lower pane of the Select Object page.
-
(Optional) To search for additional users or guest users, enter another search string. After that, select the users or guest users you want to add from the updated list.
-
To apply your changes, click OK. The Owners page will be updated with the new settings.
To remove owners from an M365 group
-
Navigate to Directory Management > Tree > Azure > <azure-tenant-name> > Microsoft 365 Groups.
The list of existing M365 groups in the selected Azure tenant appears.
NOTE: When opening the list of Microsoft 365 Groups the first time, Active Roles checks and fetches all existing M365 groups that may exist in the Azure cloud. This action is performed automatically and may take a few minutes to complete.
-
Select the group that you want to configure.
-
In the right-side pane, click Azure Properties.
-
To list the owners of the selected group, click the Owners tab of the Azure Properties window.
-
Select the owners whose ownership you want to revoke, and click Remove. The selected owners are removed from the list of owners.
-
To apply your changes, click OK. The Owners page will be updated with the new settings.
You can use the Active Roles Web Interface to add members to an existing Microsoft 365 (M365) group with an Assigned membership setting. M365 groups support Azure users, Azure guest users, or external users as members.
NOTE: You cannot add or remove members manually to or from an M365 group with dynamic membership. To change the members of a dynamic group manually, first modify its membership type from Dynamic Members to Assigned membership. For more information, see Modifying an M365 Group with the Web Interface.
NOTE: Azure AD does not support adding M365 groups as members to other M365 groups. For more information, see the Add member page of the Microsoft GRAPH REST API documentation.
To add members to an M365 group
-
Navigate to Directory Management > Tree > Azure > <azure-tenant-name> > Microsoft 365 Groups.
The list of existing M365 groups in the selected Azure tenant appears.
NOTE: When opening the list of Microsoft 365 Groups the first time, Active Roles checks and fetches all existing M365 groups that may exist in the Azure cloud. This action is performed automatically and may take a few minutes to complete.
-
Select the group that you want to configure.
-
In the right-side pane, click Members.
The Members page then appears with the list of members in the selected group.
-
Click Add to add a new member (or members) to the group.
-
In the Select Object page, use the search field to find the users or guest users in the Azure tenant that you want to add as members.
The users and guest users that meet the search criteria will appear in the Display Name column.
-
Select the check boxes of the users or guest users you want to add as members to the group. The selected users or guest users will be listed in the lower pane of the Select Object page.
-
(Optional) To search for additional users or guest users, enter another search string. After that, select the users or guest users you want to add as members from the updated list.
-
To apply your changes, click OK. The Members page will be updated with the new membership settings.
To remove members from an M365 group
-
Navigate to Directory Management > Tree > Azure > <azure-tenant-name> > Microsoft 365 Groups.
The list of existing M365 groups in the selected Azure tenant appears.
NOTE: When opening the list of Microsoft 365 Groups the first time, Active Roles checks and fetches all existing M365 groups that may exist in the Azure cloud. This action is performed automatically and may take a few minutes to complete.
-
Select the group that you want to configure.
-
In the right-side pane, click Members.
The Members page then appears with the list of members in the selected group.
-
To remove a member (or members) from the selected group, select the members from the Members Name list, and click Remove.
The selected members are removed from the Members Name list.
-
To apply your changes, click OK. The Members page will be updated with the new membership settings.
You can check the members of a Microsoft 365 (M365) group with dynamic membership via the Active Roles Web Interface. This is useful if you want to get a quick update on the current membership status of the dynamic M365 group.
NOTE: You cannot add or remove members manually to or from an M365 group with dynamic membership. To change the members of a dynamic group manually, first modify its membership type from Dynamic Members to Assigned membership. For more information, see Modifying an M365 Group with the Web Interface.
To view the members of an M365 group with dynamic membership
-
Navigate to Directory Management > Tree > Azure > <azure-tenant-name> > Microsoft 365 Groups.
The list of existing M365 groups in the selected Azure tenant appears.
NOTE: When opening the list of Microsoft 365 Groups the first time, Active Roles checks and fetches all existing M365 groups that may exist in the Azure cloud. This action is performed automatically and may take a few minutes to complete.
-
Select the group whose members you want to check.
-
In the right-side pane, click Dynamic Members.
The Dynamic Members page then appears with the list of members in the selected group.

-
To exit the Dynamic Members window, click Close.
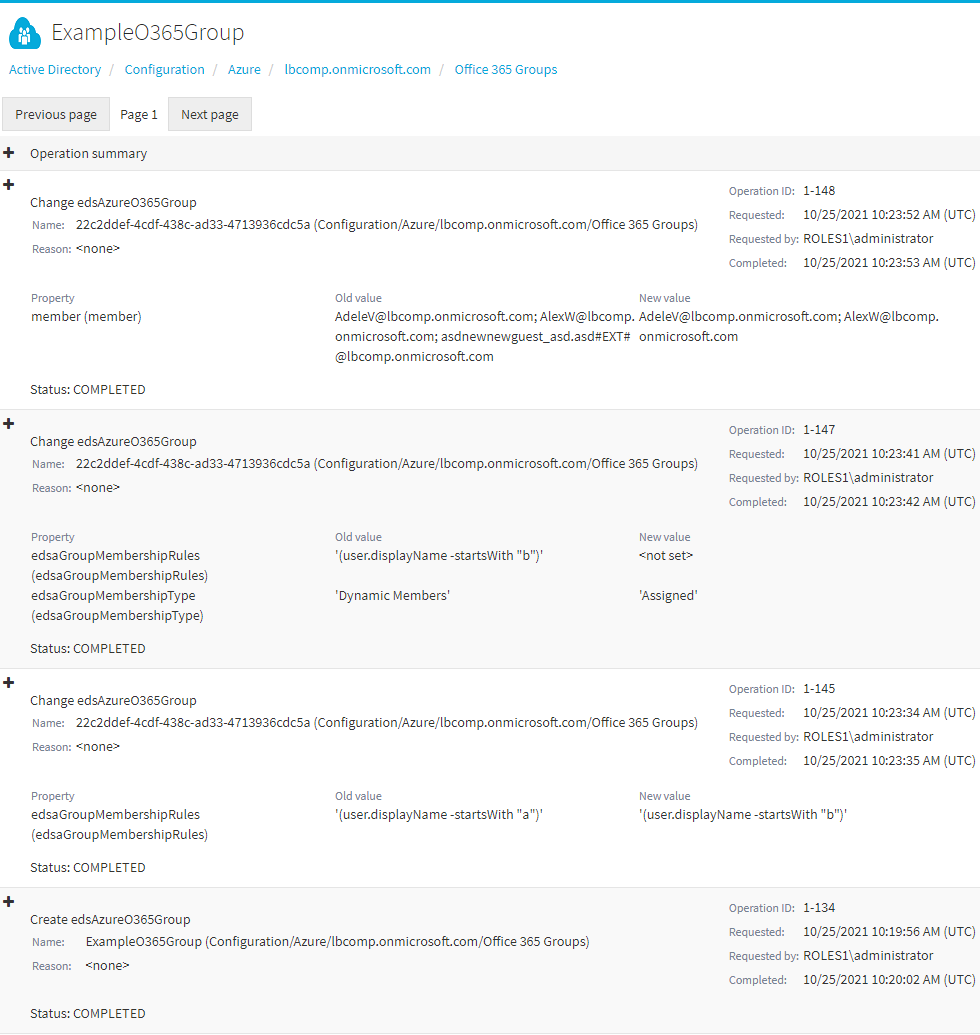
You can check the change history of a Microsoft 365 (M365) group with the Active Roles Web Interface. This is useful if you want to view the list of changes that occurred to the selected M365 group, such as:
-
Membership changes (that is, added or removed members).
-
Membership type changes (that is, whether the group has been set to assigned or dynamic membership).
NOTE: The Change History option of the Active Roles Web Interface lists only group modifications that were performed in Active Roles. It does not list the changes of the group that were performed outside Active Roles, for example in Azure Portal.
To view the change history of an M365 group
-
Navigate to Directory Management > Tree > Azure > <azure-tenant-name> > Microsoft 365 Groups.
The list of existing M365 groups in the selected Azure tenant appears.
NOTE: When opening the list of Microsoft 365 Groups the first time, Active Roles checks and fetches all existing M365 groups that may exist in the Azure cloud. This action is performed automatically and may take a few minutes to complete.
-
Select the group whose change history you want to check.
-
In the right-side pane, click Change History.
The Change History page then appears, with the newest change of the group listed at the top of the page.
-
To close the Change History window, click any Tree node, or any option listed in the right-side pane.
