Chatta subito con l'assistenza
Chat con il supporto

Active Roles 8.1.1 - Administration Guide

Introduction Getting started Rule-based administrative views Role-based administration
Access Templates as administrative roles Access Template management tasks Examples of use Deployment considerations Windows claims-based access rules
Rule-based autoprovisioning and deprovisioning
Provisioning Policy Objects Deprovisioning Policy Objects How Policy Objects work Policy Object management tasks Policy configuration tasks
Property Generation and Validation User Logon Name Generation Group Membership AutoProvisioning Exchange Mailbox AutoProvisioning AutoProvisioning in SaaS products OneDrive Provisioning Home Folder AutoProvisioning Script Execution Microsoft 365 and Azure Tenant Selection E-mail Alias Generation User Account Deprovisioning Office 365 Licenses Retention Group Membership Removal Exchange Mailbox Deprovisioning Home Folder Deprovisioning User Account Relocation User Account Permanent Deletion Group Object Deprovisioning Group Object Relocation Group Object Permanent Deletion Notification Distribution Report Distribution
Deployment considerations Checking for policy compliance Deprovisioning users or groups Restoring deprovisioned users or groups Container Deletion Prevention policy Picture management rules Policy extensions
Using rule-based and role-based tools for granular administration Workflows
Key workflow features and definitions About workflow processes Workflow processing overview Workflow activities overview Configuring a workflow
Creating a workflow definition for a workflow Configuring workflow start conditions Configuring workflow parameters Adding activities to a workflow Configure an Approval activity Configuring a Notification activity Configuring a Script activity Configuring an If-Else activity Configuring a Stop/Break activity Configuring an Add Report Section activity Configuring a Search activity Configuring CRUD activities Configuring a Save Object Properties activity Configuring a Modify Requested Changes activity Enabling or disabling an activity Enabling or disabling a workflow Using the initialization script
Approval workflow Email-based approval Automation workflow Activity extensions
Temporal Group Memberships Group Family Dynamic groups Active Roles Reporting Management History Entitlement profile Recycle Bin AD LDS data management One Identity Starling Join and configuration through Active Roles Managing One Identity Starling Connect Configuring linked mailboxes with Exchange Resource Forest Management Configuring remote mailboxes for on-premises users Azure AD, Microsoft 365, and Exchange Online Management
Configuring Active Roles to manage Hybrid AD objects Managing Hybrid AD users
Creating a new Azure AD user with the Web Interface Viewing or updating the Azure AD user properties with the Web Interface Viewing or modifying the manager of a hybrid Azure user Disabling an Azure AD user Enabling an Azure AD user Deprovisioning of an Azure AD user Undo deprovisioning of an Azure AD user Adding an Azure AD user to a group Removing an Azure AD user from a group View the change history and user activity for an Azure AD user Deleting an Azure AD user with the Web Interface Creating a new hybrid Azure user with the Active Roles Web Interface Converting an on-premises user with an Exchange mailbox to a hybrid Azure user Licensing a hybrid Azure user for an Exchange Online mailbox Viewing or modifying the Exchange Online properties of a hybrid Azure user Creating a new Azure AD user with Management Shell Updating the Azure AD user properties with the Management Shell Viewing the Azure AD user properties with the Management Shell Delete an Azure AD user with the Management Shell Assigning Microsoft 365 licenses to new hybrid users Assigning Microsoft 365 licenses to existing hybrid users Modifying or removing Microsoft 365 licenses assigned to hybrid users Updating Microsoft 365 licenses display names
Unified provisioning policy for Azure M365 Tenant Selection, Microsoft 365 License Selection, Microsoft 365 Roles Selection, and OneDrive provisioning Microsoft 365 roles management for hybrid environment users Managing Microsoft 365 contacts Managing Hybrid AD groups Managing Microsoft 365 Groups Managing cloud-only distribution groups Managing cloud-only dynamic distribution groups Managing Azure security groups Managing cloud-only Azure users Managing cloud-only Azure guest users Managing cloud-only Azure contacts Changes to Active Roles policies for cloud-only Azure objects Managing room mailboxes Managing cloud-only shared mailboxes
Modern Authentication Managing the configuration of Active Roles
Connecting to the Administration Service Managed domains Using unmanaged domains Evaluating product usage Creating and using virtual attributes Examining client sessions Monitoring performance Customizing the Console Using Configuration Center Changing the Active Roles Admin account Enabling or disabling diagnostic logs Active Roles Log Viewer
SQL Server replication Using regular expressions Administrative Template Communication ports Active Roles and supported Azure environments Integrating Active Roles with other products and services Active Roles Language Pack Active Roles Diagnostic Tools Active Roles Add-on Manager

Deleting or changing the remote mailbox of an on-premises user

You can remove the remote mailbox (that is, the assigned Exchange Online mailbox) of an on-premises user with the Active Roles Web Interface and the Active Roles Console.

Deleting the remote mailbox of a user is typically required in case of an organizational or infrastructural change, but is also a mandatory prerequisite if you want to change the current remote mailbox of the user.

To delete the remote mailbox of an on-premises user

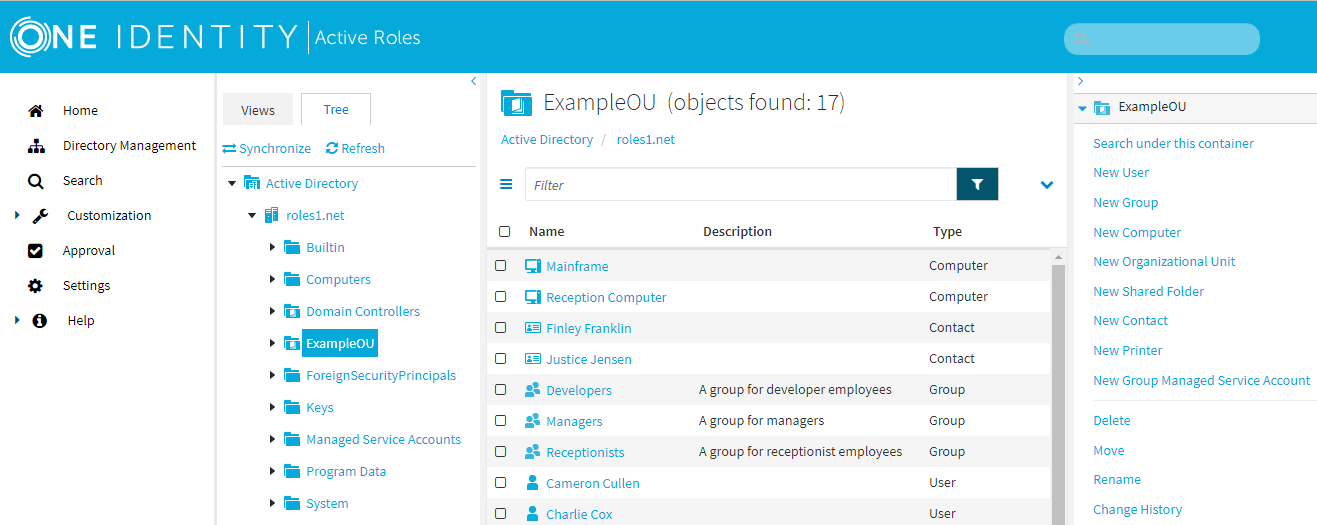
  1. In the Active Roles Web Interface, under Directory Management > Tree > Active Directory, navigate to the OU of the on-premises user whose remote mailbox you want to delete.

    Figure 191: Active Roles Web Interface – Navigating to the OU of the user

  2. Select the user and click Delete E-mail Addresses.

  3. To confirm the deletion of the email address, click OK.

    After clicking OK, Active Roles deletes the remote mailbox of the on-premises user. However, this change does not reset the value of the edsvaMsExchEnableRemoteMailRoutingAddress property of the user. While this does not cause any operational issues, Active Roles recommends updating this value manually for consistency as described in the next step.

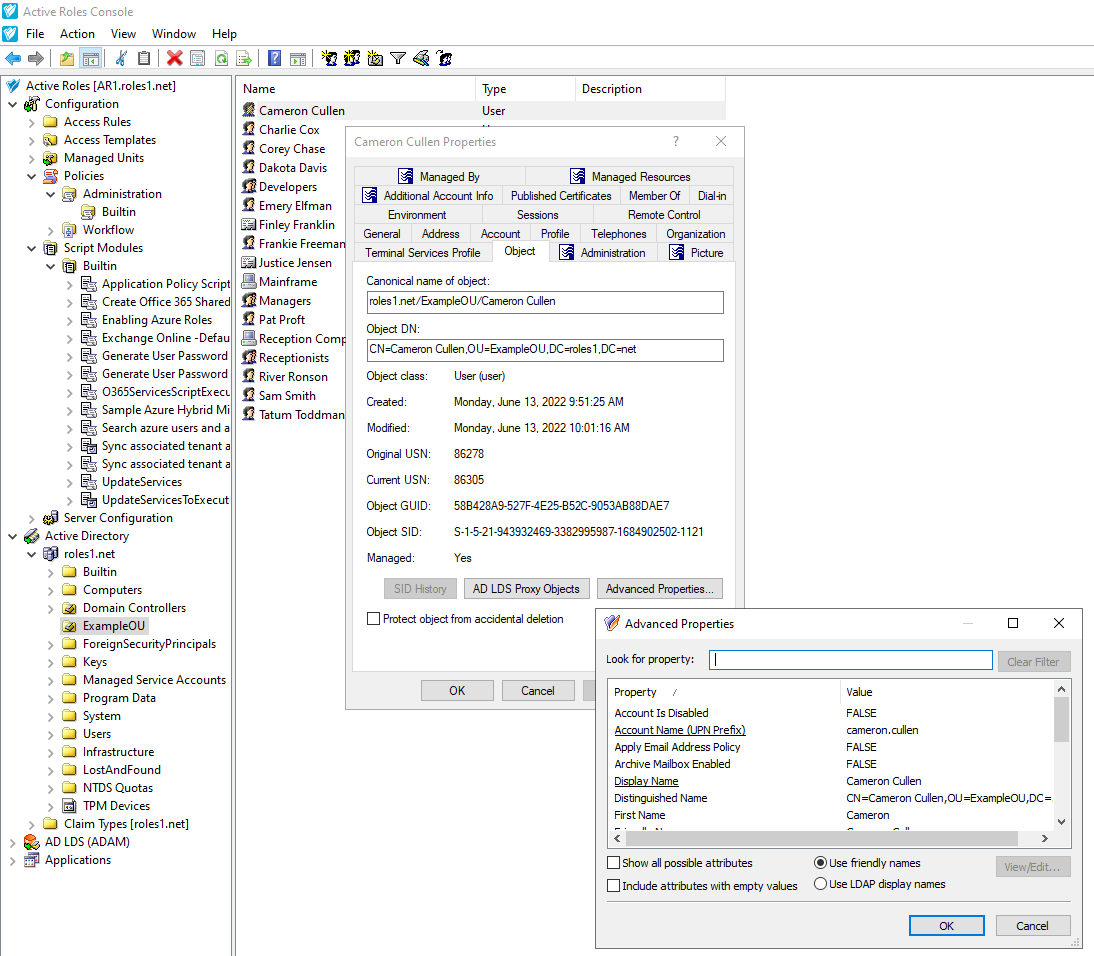
  4. (Optional) Open the Advanced Properties of the on-premises user. In the Active Roles Console, in the Active Directory (AD) tree, navigate to the Organizational Unit (OU) where the user is located, double-click the user, then in the Properties window, click Object > Advanced Properties.

    Figure 192: Active Roles Console– Opening the Advanced Properties of a user

  5. Search for the edsvaMsExchEnableRemoteMailRoutingAddress property.

    TIP: To find the property faster, enter its name (or part of its name) in the Look for property field. If you cannot find the property, select Show all possible attributes and Include attributes with empty values, too.

    After you found the property, open its settings by double-clicking it.

  6. In the Edit Attribute dialog, in Value, delete the configured remote mailbox.

  7. To apply your changes, click OK in each open window.

To change the remote mailbox of an on-premises user

  1. In the Active Roles Web Interface, delete the current remote mailbox of the on-premises user as described in the To delete the remote mailbox of an on-premises user procedure.

  2. Open the Advanced Properties of the on-premises user. In the Active Roles Console, in the Active Directory (AD) tree, navigate to the Organizational Unit (OU) where the user is located, double-click the user, then in the Properties window, click Object > Advanced Properties.

  3. Search for the edsvaMsExchEnableRemoteMailRoutingAddress property.

    TIP: To find the property faster, enter its name (or part of its name) in the Look for property field. If you cannot find the property, select Show all possible attributes and Include attributes with empty values, too.

    After you found the property, open its settings by double-clicking it.

  4. In the Edit Attribute dialog, in Value, specify the new remote mailbox for the user.

  5. To apply your changes, click OK in each open window.

Azure AD, Microsoft 365, and Exchange Online Management

Active Roles facilitates the administration and provisioning of Active Directory (AD), Exchange, and Azure AD resources in on-premises, cloud-only and hybrid environments as well. You can manage all these resources through the Active Roles Web Interface.

  • In an on-premises environment, when you create new AD objects (users, guest users, groups, contacts, and so on), Active Roles creates and stores these new objects in the local infrastructure of your organization.

  • In a cloud-only environment, when you create new AD objects (users, guest users, groups, contacts, and so on), Active Roles creates and stores these new objects in the Azure Cloud.

  • In hybrid environments, when you create new AD objects (users, guest users, contacts, and so on) Active Roles synchronizes the on-premises AD objects and their properties to the AD cloud. This synchronization is performed by the Active Roles Synchronization Service between Active Roles and Microsoft Microsoft 365, whenever you configure an AD object with the Active Roles Web Interface.

NOTE: Active Roles Web Interface supports AD-related operations only on sites based on the Administrators template. While some of the configuration procedures described in this document are also supported through the Active Roles Management Shell, they are all described with using the Active Roles Web Interface.

Configuring Active Roles to manage Hybrid AD objects

When a user signs up for a Microsoft cloud service, for example, Azure Active Directory, details about the user’s organization and the organization’s Internet domain name registration are provided to Microsoft. This information is then used to create a new Azure AD instance for the organization. The same directory is used to authenticate sign-in attempts when you subscribe to multiple Microsoft cloud services.

The Azure AD instance of the organization (also called the Azure AD tenant) stores the users, groups, applications, and other information pertaining to an organization and its security. To access the Azure AD tenant, we need an application that is registered with the tenant. Active Roles uses this application (also called the Azure AD application), to communicate to Azure AD tenant after providing the required consent.

The Active Roles Web Interface and Management Shell can be used to perform the Azure AD configuration tasks. You can add or modify existing tenants to the management scope through the Web Interface and Management Shell. Active Roles also supports the Multiple tenants model.

NOTE: Administrative users or users with sufficient privileges only can view Azure configuration.

The following section guides you through the Active Roles Web Interface and Management Shell to configure Azure AD tenants and applications and synchronize existing AD objects to Azure AD.

Configuring Active Roles to manage Azure AD using the GUI

Use the Active Roles Web Interface and the Active Roles Configuration Center to configure and manage Azure AD deployments with the following actions:

Related Documents

The document was helpful.

Seleziona valutazione

I easily found the information I needed.

Seleziona valutazione