You can add, edit or remove email addresses to or from an Exchange Online mailbox in the Exchange Online Properties > General tab of the Active Roles Web Interface. Adding, editing, or removing email addresses is typically required in case of organizational changes (for example, the mailbox user is assigned to a new project, or the contract of a guest user ends within the organization).
To add a new email address to an Exchange Online mailbox
-
On the Active Roles Web Interface, navigate to Directory Management > Tree View > Azure > <azure-tenant> > Azure Users (or Azure Guest Users).
-
From the list in the middle pane, select the Azure user or Azure guest user that you want to update.
-
To open the Exchange Online properties of the selected Azure user or guest user, click Exchange Online Properties on the right pane.
-
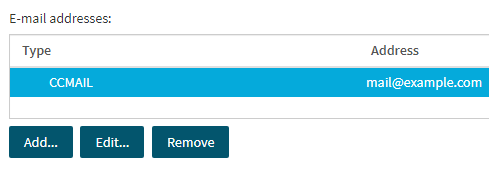
To open the email address settings, click the General tab.
Figure 188: Exchange Online Properties > General — Accessing the email account settings of an Exchange Online mailbox
-
Click Add.... The E-mail Address dialog then opens.

-
From the E-mail address type list, select the email account type applicable to your organization.
-
In the E-mail address text box, specify the address of the new account.
-
To apply your changes and create the new email account, click OK.
-
To close the Exchange Online Properties window, click Close.
To edit an existing email address of an Exchange Online mailbox
-
On the Active Roles Web Interface, navigate to Directory Management > Tree View > Azure > <azure-tenant> > Azure Users (or Azure Guest Users).
-
From the list in the middle pane, select the Azure user or Azure guest user that you want to update.
-
To open the Exchange Online properties of the selected Azure user or guest user, click Exchange Online Properties on the right pane.
-
To open the email address settings, click the General tab.
-
To open the settings of an email address, select the email address, then click Edit....
-
In the E-mail address text box, modify the current email address.
NOTE: You cannot modify the E-mail address type of an existing email account. You can only change the name of the existing address.
-
To apply your changes, click OK.
-
To close the Exchange Online Properties window, click Close.
To remove an existing email address of an Exchange Online mailbox
-
On the Active Roles Web Interface, navigate to Directory Management > Tree View > Azure > <azure-tenant> > Azure Users (or Azure Guest Users).
-
From the list in the middle pane, select the Azure user or Azure guest user that you want to update.
-
To open the Exchange Online properties of the selected Azure user or guest user, click Exchange Online Properties on the right pane.
-
To open the email address settings, click the General tab.
-
In the E-mail addresses list, select the address you want to remove.
-
Click Remove and confirm the deletion of the email address.
-
To close the Exchange Online Properties window, click Close.
You can enable or disable various Exchange Online mailbox features for an Exchange Online mailbox (such as Outlook Mobile Access or support for messaging protocols like IMAP4 or POP3) in the Exchange Online Properties > Mailbox Features tab of the Active Roles Web Interface. This is typically required if the organization supports specific applications and protocols for its Exchange mailboxes.
To enable or disable Exchange Online mailbox features for an Exchange Online mailbox
-
On the Active Roles Web Interface, navigate to Directory Management > Tree View > Azure > <azure-tenant> > Azure Users (or Azure Guest Users).
-
From the list in the middle pane, select the Azure user or Azure guest user that you want to update.
-
To open the Exchange Online properties of the selected Azure user or guest user, click Exchange Online Properties on the right pane.
-
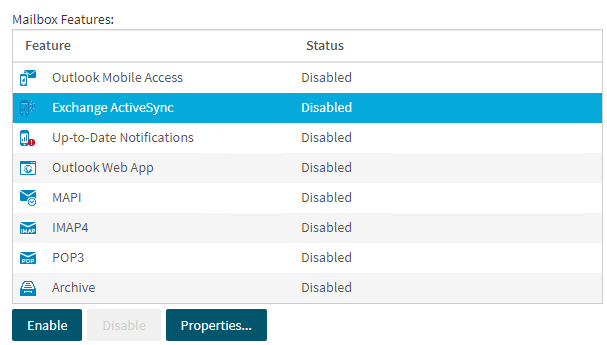
To open the mailbox feature settings, click the Mailbox Features tab.
Figure 189: Exchange Online Properties > Mailbox Features — Configuring mailbox features for an Exchange Online mailbox
-
Select the Exchange Online mailbox feature that you want to enable or disable:
-
Outlook Mobile Access: Enables or disables the Outlook Mobile Access (OMA) mobile browsing service for the mailbox. Enabling this settings allows the mailbox user use OMA on their mobile device to access their account.
-
Exchange ActiveSync: Enables or disables the Exchange ActiveSync synchronization protocol for the mailbox. Enabling this setting allows the mailbox user synchronize their configured mobile device with their mailbox.
-
Up-to-Date Notifications: Enables or disables the Up-to-date (UTD) feature notifications for the mailbox.
-
Outlook Web App: Enables or disables access to the browser-based Outlook Web App for the mailbox user.
-
MAPI, IMAP4, POP3: Enables or disables support for the MAPI, IMAP4 or POP3 protocols for the mailbox user. If MAPI is enabled, the mailbox user can access their mailbox through the Outlook desktop app (or other MAPI clients). If IMAP4 or POP3 is enabled, they are also able to access their mailbox with any IMAP4 or POP3 email client.
-
Archive: Enables or disables the archive mailbox feature for the mailbox.
-
Click Enable to enable the selected mailbox feature, or Disable to disable it.
-
Once you are done with the configuration, click Close.
-
To close the Exchange Online Properties window, click Close.
You can configure settings related to Messaging Records Management (MRM) for an Exchange Online mailbox in the Exchange Online Properties > Mailbox Settings tab of the Active Roles Web Interface. MRM settings are typically configured to meet mailbox archiving policies in effect within the organization.
For more information about MRM in Exchange Online, see Messaging records management in the Microsoft Exchange Online documentation.
To configure Messaging Records Management settings for an Exchange Online mailbox
-
On the Active Roles Web Interface, navigate to Directory Management > Tree View > Azure > <azure-tenant> > Azure Users (or Azure Guest Users).
-
From the list in the middle pane, select the Azure user or Azure guest user that you want to update.
-
To open the Exchange Online properties of the selected Azure user or guest user, click Exchange Online Properties on the right pane.
-
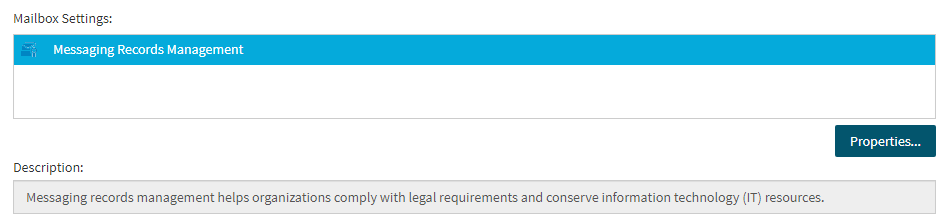
To open the MRM settings, click the Mailbox Settings tab.
Figure 190: Exchange Online Properties > Mailbox Settings — Accessing the MRM settings of an Exchange Online mailbox
-
Under Mailbox Settings, make sure that Messaging Records Management is selected, then click Properties. The Messaging Records Management dialog opens.
-
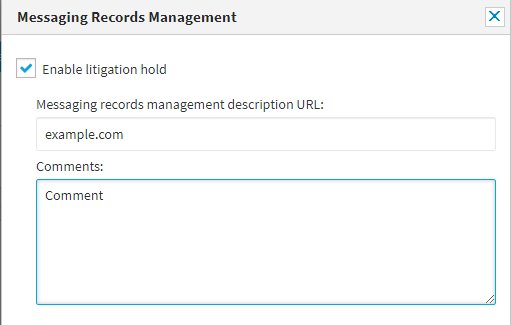
To enable placing the entire contents of the user mailbox on hold, enable the Enable litigation hold check box. For more information on the Litigation Hold feature of Exchange Online, see the In-Place Hold and Litigation Hold page of the official Microsoft documentation.
-
(Optional) If your organization has an internal resource on the litigation hold practices, specify its URL in the Messaging records management description URL text box.
-
(Optional) If you want to display a customized message in Outlook for the mailbox user on the litigation hold, write the message in the Comments text box.
-
Click Save to apply your changes and close the Messaging Records Management dialog.
-
To close the Exchange Online Properties window, click Close.
You can reset the password of an existing Azure guest user in the selected Azure tenant with the Reset Password option of the Active Roles Web Interface. This is typically performed if the guest user forgot their password.
To reset the password of an Azure guest user
-
Navigate to Directory Management > Tree > Azure > <azure-tenant-name> > Azure Guest Users.
The list of Azure guest users of the selected tenant is displayed.
Figure 238: Directory Management > Tree View > Azure > <azure-tenant-name> > Azure Guest Users — Listing the Azure guest users in the tenant
-
Select the Azure guest user whose password you want to reset.
-
Click Reset Password.
-
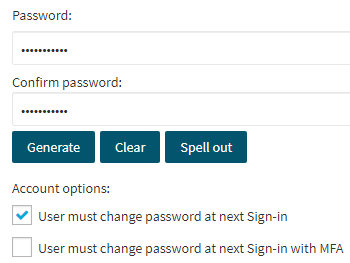
Specify a new password either manually or by generating a new one.
-
Configure the Password
Under Password, specify the new password of the Azure guest user with one of the available methods:
-
Configure the password manually
To specify the new password manually, enter it into the Password and Confirm password fields.
-
Generate the password automatically
To generate a new password with Active Roles automatically, click Generate. The generated password will meet the policy requirements of both your organization and Azure AD.
To clear the currently specified password, click Clear.
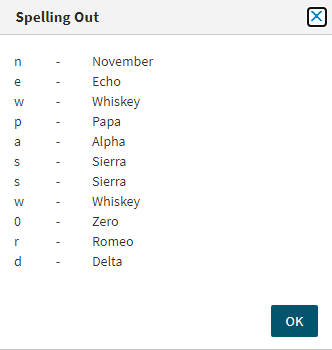
To spell out each character of the specified password for clarification, click Spell out.
-
Configure Account Options
Under Account options, configure the password change settings.
-
To apply your changes, click Finish.
